 Hubbard

The number that covers the whole board
Sweep tells you how many mines the board holds before you start, and the Mines left counter below the grid counts down as you flag. It is easy to treat that counter as a progress bar. It is actually a clue, and it is the only clue whose reach is the entire board rather than a three by three patch.
That matters most near the end. Once the numbers have done everything they can, the counter tells you how many mines are still hidden among the squares you have not resolved. If that figure equals the number of unresolved squares, every one of them is a mine. If it is zero, every one of them is clear.
A board with a blind corner
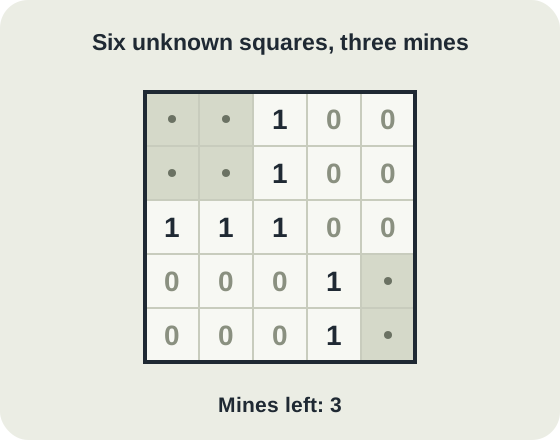
Here is a five by five board with three mines. Rows run r1 to r5 down the side and columns c1 to c5 along the top. A dot marks an unknown square; every other square shows its number.
Reading across the rows: unknown, unknown, 1, 0, 0; then unknown, unknown, 1, 0, 0; then 1, 1, 1, 0, 0; then 0, 0, 0, 1, unknown; then 0, 0, 0, 1, unknown. Six squares are unknown: a two by two block in the top left corner, and r4c5 and r5c5 at the bottom of the last column.
Let the numbers go first
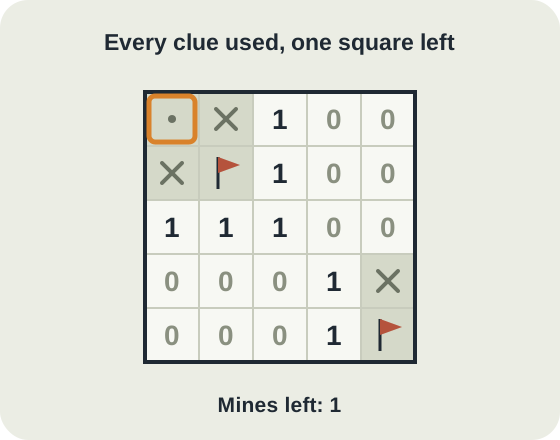
Start with the 1 at r3c3. Of its eight neighbours, only r2c2 is unknown; the other seven all show numbers, and a numbered square is never a mine. The 1 needs one mine and has one place to put it, so r2c2 is a mine.
That flag finishes two more clues. The 1 at r1c3 touches two unknown squares, r1c2 and r2c2, and r2c2 now supplies its mine, so r1c2 is clear. The 1 at r3c1 touches r2c1 and r2c2, and for the same reason r2c1 is clear.
Now the bottom right. The 0 at r3c5 touches r4c5, so r4c5 is clear. The 1 at r4c4 had two unknown neighbours, r4c5 and r5c5; with r4c5 cleared, its mine must be r5c5.
Two mines flagged, three squares cleared, and the counter reads 1. One unknown square is left on the whole board: r1c1, in the top left corner.
Why no number can decide it
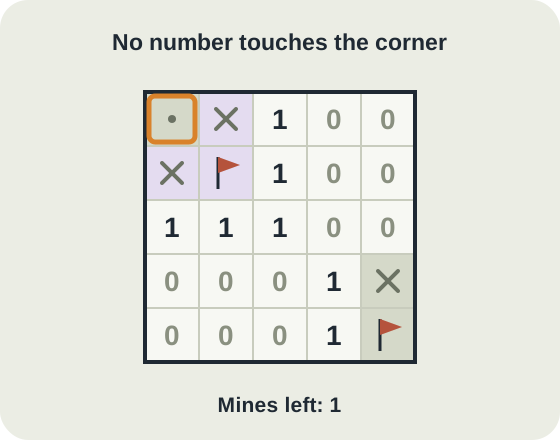
Look at what touches r1c1. A corner square has only three neighbours, and here they are r1c2, r2c1 and r2c2. None of them shows a number. Two are cleared squares and one is a mine, and none of the three was ever a clue.
So every number on the board is already satisfied whether r1c1 is a mine or not. Checking every possible layout by brute force confirms it: if you ignore the total, the numbers allow r1c1 to be either a mine or clear. The only thing that separates the two is the count. The board holds three mines, two are flagged, and one square remains, so r1c1 is the third mine.
Change the total and the answer flips. With exactly the same numbers and a total of two, r1c1 would be clear. The game's own checker confirms that each version has exactly one solution, and the only difference between them is the figure on the counter.
The mistake this avoids
The usual error is to reach a square like r1c1, see that no clue mentions it, and decide it is a coin flip. It is not. Sweep boards are built so that logic finishes them, and the mine total is part of that logic.
The second error is trusting the counter while a flag is wrong. The counter simply subtracts the flags you have placed from the board's total. It does not know whether they are right. A misplaced flag earlier in the solve makes the counter lie at exactly the moment you need it, so settle the numbered part of the board carefully before you lean on the total.
So the routine for the end of a board is short: when the numbers run dry, count the unknown squares that are left, compare them with Mines left, and see whether the two figures leave only one possibility.
Put it into practice
Try an Easy Sweep Library puzzle and look for one deduction from this guide.
Play a Sweep boardSign in or create an account to save your progress.



