Hubbard

Why a full field closes its border
Colour Fields asks you to colour every square green or blue. Squares of one colour that touch along an edge make a field, corners do not join anything, and every field has to hold exactly one clue and exactly as many squares as that clue says.
Now take a field that already has its full count. A green 4 with four green squares joined to it, say. Any empty square that touches that field along an edge cannot be green, because a green square there would join the field and make it five. So it is blue. The same goes for every square along the field's edge, all at once.
It helps to think of those squares as the field's fence. Whenever you complete a field, walk round its edge and paint the fence the other colour before you do anything else.
A 1 is a field that starts full
The clearest case is a 1. A 1 is a complete field before you touch it: one square, one clue, done. So every square next to a 1 takes the other colour, immediately, whatever else is on the board.
That makes a 1 in the middle of a grid worth four squares, a 1 on an edge worth three and a 1 in a corner worth two. It is the first thing to look for when a board opens, because it needs no counting at all.
An original board
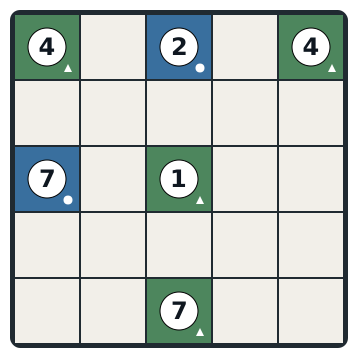
Here is a five by five board built for this article, the size of an Easy Colour Fields puzzle. Across the top row sit a green 4 in the left corner, a blue 2 in the middle and a green 4 in the right corner. The centre square holds a green 1, and row 3 also has a blue 7 at its left edge. The bottom row has a green 7 in the middle.
Four plus two plus four plus one plus seven plus seven is twenty five, the whole grid, as it always is.
Nothing below was checked by eye alone. With nineteen empty squares there are 524,288 ways to colour the board, and every one of them was run through the game's own validator. Exactly one completes it. The game's step-by-step solver also finishes the board without guessing.
Two fences before you count
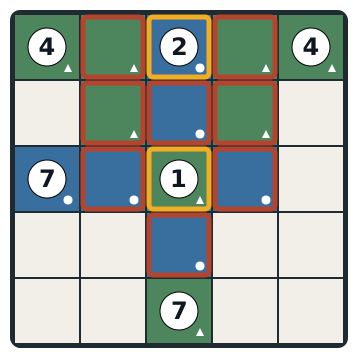
Start with the green 1 in the centre. It is already a full field, so its four neighbours are blue: row 2 column 3 above it, row 4 column 3 below, and row 3 columns 2 and 4 on either side.
One of those new blue squares, row 2 column 3, sits directly under the blue 2. Blue next to blue is one field, so the 2 now has two squares and is full. Its own fence follows straight away. The squares touching that two-square field are row 1 columns 2 and 4 and row 2 columns 2 and 4, and all four turn green. The fifth square it touches is the centre, which is green already.
That is eight squares, and the only arithmetic in it was noticing that one plus one makes two.
The 4s close, then the 7
Look at the green 4 in the top left. It now has three joined green squares: the clue, row 1 column 2 beside it and row 2 column 2 below that. It needs one more. The only empty square touching those three is row 2 column 1, because everything else around them is already blue. So row 2 column 1 is green and the 4 is full. Its fence below is row 3 columns 1 and 2, which are blue already, so nothing changes there.
The green 4 in the top right works the same way. It has the clue, row 1 column 4 and row 2 column 4, and the one square left to join is row 2 column 5. That completes the field, and its fence has one new square in it: row 3 column 5, directly underneath, which turns blue.
Now the blue squares on the right, row 3 columns 4 and 5, form a small field with no clue in it. A field needs exactly one clue, and the only blue clue left that is not already full is the 7 at the left edge. So those two squares must join the 7. The same is true of row 4 column 3 under the centre.
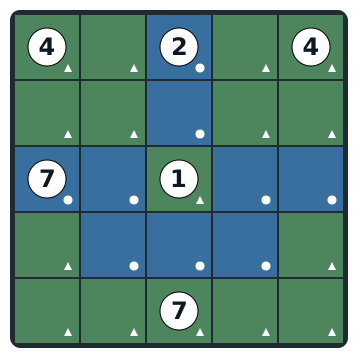
Count what the 7 has to reach. It owns row 3 columns 1 and 2. The centre is green, so it has to go under it: row 4 column 2, then row 4 column 3, then row 4 column 4 to climb back up to row 3 column 4 and row 3 column 5. That is exactly seven squares, the shortest route that picks up every stray blue square, and the 7 has no room for anything longer. So the blue 7 is full. Its fence takes row 4 columns 1 and 5 and row 5 columns 2 to 4, all green. That leaves the two bottom corners, and a blue square in either would be a field with no clue, so they are green too. Those seven green squares are the green 7.
The mistake this prevents
The tempting move early on is at row 2 column 3, the square between the blue 2 and the green 1. It is easy to leave it empty while you work out where the 2 goes, or to wonder whether the 2 might grow sideways along the top row instead.
Neither needs thinking about. The 1 has already made that square blue, and a blue square touching the 2 is part of the 2. Once that happens the 2 has its size, and asking where else it could grow is asking the wrong question. The square that finished the 2 also fenced it.
The general habit is to check, every time you colour a square, whether it just completed a field. If it did, paint the fence before you look anywhere else. A finished field left without its fence is an easy way to end up with a board that looks nearly done and will not finish.
What it looks like finished
The blue 7 ends up as a U shape bending under the centre square, and the green 7 wraps the bottom of the board from row 4 column 1 round to row 4 column 5. Every step on the way there was either a field reaching its number or the fence that follows.
Where Colour Fields sits
Colour Fields is a Just for fun game. There is a dated board each day alongside the league's competitive dailies, and a Library of boards you can play whenever you like. It is timed and records your time, but it does not add league points. It can be one of the games chosen for a Rival Week.
Completing your first board earns the Field Painter achievement. If you want to practise this, an Easy Library board is the right size: find the 1s first, paint their fences, and after every field you finish, walk round its edge before you count anything else.
Put it into practice
Try an Easy Colour Fields Library puzzle and look for one deduction from this guide.
Play a Colour Fields boardSign in or create an account to save your progress.