Hubbard

What the game asks for
A Four Colour board is a grid split into regions, each outlined in dark lines and numbered. Every region takes one of four colours: purple, amber, green or red. Two regions that share an edge must not match. Regions that touch only at a corner may.
Some regions are fixed. They show a dot and cannot be changed. Tapping any other region cycles it through purple, amber, green and red in that order, and the board checks itself the moment the whole map is valid, so the clock stops on the tap that finishes it.
Count colours, not neighbours
A region can have five or six neighbours and still be wide open, because an uncoloured neighbour rules out nothing. What matters is how many different colours are already sitting against it.
One colour beside a region leaves three choices. Two different colours leave two. Three different colours leave exactly one, because there are only four in the game. At that point the region is not a decision any more. It is a tap you have not made yet.
So the first pass over a board is a count. For each open region, look only at its coloured neighbours and ask how many different colours they show. Any region that reaches three can be coloured straight away, and it cannot be wrong.
An original board
Here is a five by five board built for this article, with eight regions and three fixed colours. Region 1 is purple and covers r1c1, r1c2 and r2c1. Region 4 is amber and covers r2c4 and r3c4. Region 5 is green and covers r3c1, r4c1 and r4c2.
The five open regions are these. Region 2 runs along the top from r1c3 to r1c5 and drops to r2c5. Region 3 is r2c2, r2c3 and r3c2, in the middle of the upper left. Region 6 is r3c3, r4c3, r4c4 and r5c4. Region 7 runs down the right edge from r3c5 to r5c5. Region 8 is the bottom row from r5c1 to r5c3.
Everything claimed below was checked two ways. A separate script tried all 1,024 ways of giving the five open regions a colour each, and the game's own solver was run on the same board. Both found the same two valid finishes and nothing else.
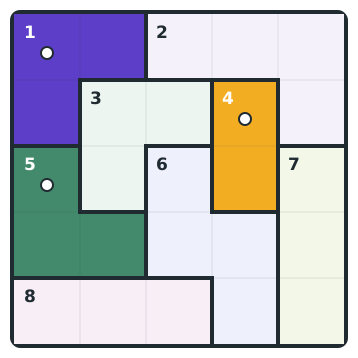
The one region the fixed colours corner
Run the count on each open region. Region 2 touches purple region 1 and amber region 4: two colours. Region 6 touches amber region 4 and green region 5: two. Region 7 touches amber region 4 only, and region 8 touches green region 5 only.
Region 3 is different. Its cell at r2c2 has region 1 above it at r1c2 and to its left at r2c1, so it touches purple. Its cell at r2c3 has r2c4 to its right, which is amber. Its cell at r3c2 has r3c1 to its left and r4c2 below it, both green. Three fixed regions, three different colours.
That leaves red, and only red. Region 3 has five neighbours in all, and two of them, regions 2 and 6, are still blank. They do not matter yet. A blank neighbour can only ever take a colour away later, and region 3 has none left to lose.
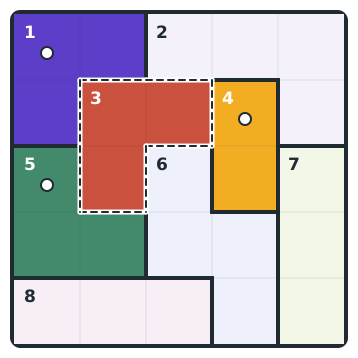
How one tap forces the next
Now run the count again, because region 3 has just become a coloured neighbour for everything around it.
Region 6 touches region 3 at r3c3, which is red now, amber region 4 at r3c4 and green region 5 at r4c2. Red, amber and green: region 6 is purple.
Region 2 touches purple region 1 at r1c2, red region 3 at r2c3 and amber region 4 at r2c4. Purple, red and amber: region 2 is green. These two were forced by the same tap, so take them in whichever order your hand reaches first.
Region 7 touches green region 2 at r2c5, amber region 4 at r3c4 and purple region 6 at r4c4 and r5c4. That is three colours again, and region 7 is red.
Four regions coloured and not one of them was a guess. Each was the only colour its coloured neighbours left, and each one was only knowable because of the one before it.
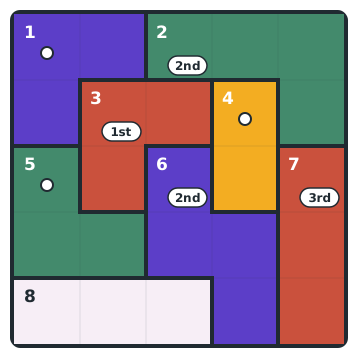
Where the squeeze stops
Region 8 has two neighbours: green region 5 above its first two cells and purple region 6 above and beside its third. Two colours, two left over. The count never reaches three, so the chain stops here.
That is not a problem to solve. Four Colour accepts any valid map, not one stored answer, so amber and red both finish this board. The two finishes the exhaustive check found are exactly these two, and they differ only in region 8. Pick one and the puzzle completes on that tap.
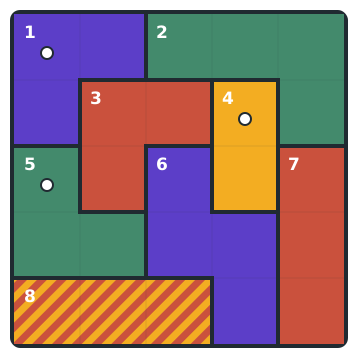
The mistake worth avoiding
The expensive mistake here is colouring region 2 first. It is the biggest open region and it sits right next to a fixed colour, so it looks like the natural place to start. At that point it touches purple and amber, so green and red both look fine.
Red is not fine. With region 2 red, region 3 touches purple, red, amber and green, and has nothing left. The exhaustive check agrees: of the two valid finishes, none has region 2 red. You would not find that out when you coloured region 2. You would find it out several taps later, stuck on region 3, with the clock running and no obvious reason why.
The fix is the count. Before tapping anything, look for the region with three colours against it. If there is one, it goes first, and regions that still have a choice wait until the squeeze reaches them.
A note on taps
Because each tap moves a region one step through purple, amber, green and red, an uncoloured region needs one tap for purple and four for red. On this board regions 3 and 7 are both red, so they take four taps each. Knowing the colour before your first tap saves you cycling past it and round again.
Where Four Colour sits on the site
Four Colour is timed, and it is a Practice and Just for fun game rather than one of the competitive dailies, so it awards no league points. It is a fair place to practise the count without your standings riding on it.
You can pick a board from the Library by filtering to the game, and it comes round in For You unless you have excluded it from your feed. It also appears as a choice on a stage in two of the Expeditions.
Put it into practice
Try an Easy Four Colour Library puzzle and look for one deduction from this guide.
Play a Four Colour boardSign in or create an account to save your progress.