Hubbard

Two ways a cell loses a partner
A cell can pair with any neighbour that shares an edge with it. Early on that is two, three or four candidates. There are two ways to shrink the list.
The obvious one is occupancy. When a neighbour gets swallowed by another domino, it is no longer available. Everyone uses this, because you can see it: the neighbour now has an outline round it.
The second is the complete set. If a cell holds a 0 and one of its free neighbours holds a 1, that pairing is only legal while the 0-1 domino is still unplaced. Once the 0-1 sits somewhere else, the neighbour is still free and still touching, but pairing with it would make a second 0-1. The board does not draw a line through it for you. You have to remember.
The board, and the first two dominoes
Here is a four by five board with digits from 0 to 3, so ten dominoes to place: 0-0, 0-1, 0-2, 0-3, 1-1, 1-2, 1-3, 2-2, 2-3 and 3-3. Reading across the rows: 2, 0, 2, 2, 1; then 3, 0, 0, 1, 0; then 3, 3, 1, 1, 1; then 3, 0, 2, 3, 2.
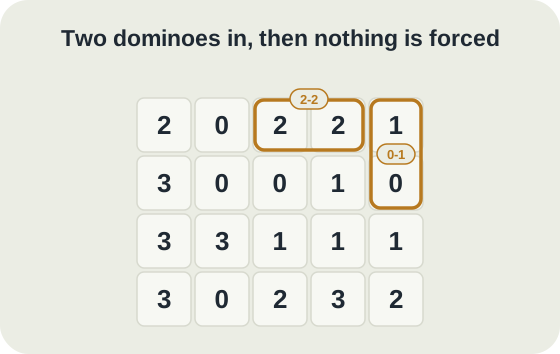
Start by asking where each pair could go. The 2-2 needs two 2s side by side. There are five 2s: row 1 columns 1, 3 and 4, and row 4 columns 3 and 5. Only one pair of them touches, the 2s at row 1 columns 3 and 4. The 2-2 goes there.
That takes a neighbour away from the 1 in the top right corner, at row 1 column 5. A corner cell has two neighbours. One was the 2 now inside the 2-2; the other is the 0 below it at row 2 column 5. One option left, so the 0-1 goes down the right-hand edge.
Now look for the next move. Every free cell still touches at least two free cells, so occupancy has nothing more to give. Every unplaced pair still has at least two possible homes: the 0-0, for example, could join row 2 column 2 to the 0 above it or to the 0 beside it. On the usual checks, the board has stopped.
Cross out the other 0-1s
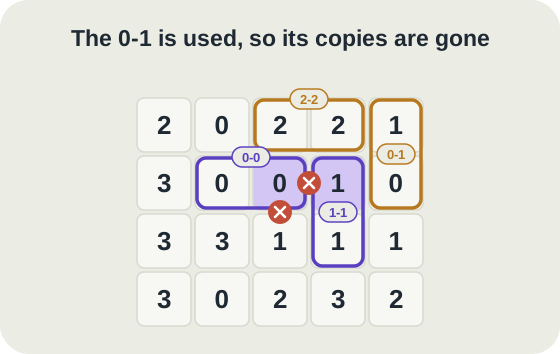
The 0-1 is on the board, so ask where else a 0 touches a 1. On the original grid there were five such places. One is the domino you just placed. Two more ran through the 0 at row 2 column 5, and that cell is now used. The last two both run through the 0 at row 2 column 3: it touches the 1 to its right at row 2 column 4 and the 1 below it at row 3 column 3. Those two are still free on the board and dead in practice.
Take the 0 at row 2 column 3. Above it is the 2 inside the 2-2. To its right and below it are 1s, and both of those pairings would be a second 0-1. The only neighbour left is the 0 at row 2 column 2. That cell has three free neighbours and only one real partner. The 0-0 goes across row 2 columns 2 and 3.
The 1 at row 2 column 4 falls the same way. Above it is the 2-2, to its right is the 0-1, to its left is a 0 it may no longer pair with. That leaves the 1 below it at row 3 column 4, so the 1-1 goes down column 4.
Neither of those moves came from a cell being boxed in. Both cells still had more than one free neighbour. They were forced because one of their pairings had already been spent elsewhere.
The rest falls in order
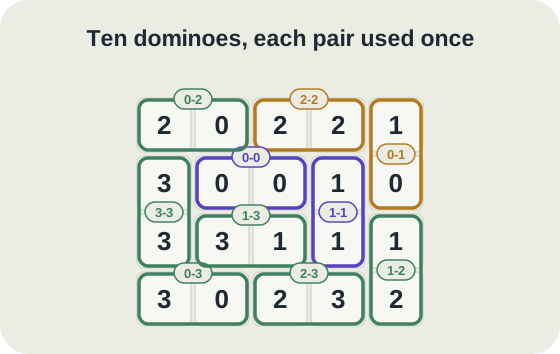
With the 0-0 and 1-1 down, occupancy takes over again. The 0 at row 1 column 2 has lost the cell below it and the 2 to its right, so it pairs left with the 2 at row 1 column 1: the 0-2.
That leaves the 3 at row 2 column 1 with only the 3 beneath it, so the 3-3 goes down column 1. The 1 at row 3 column 5 has only the 2 below it: the 1-2. The 3 at row 4 column 1 has only the 0 beside it: the 0-3. The 3 at row 3 column 2 now has only the 1 to its right: the 1-3. The last two cells, the 2 and 3 at row 4 columns 3 and 4, make the 2-3.
Check the set as you finish: 0-0, 0-1, 0-2, 0-3, 1-1, 1-2, 1-3, 2-2, 2-3 and 3-3, each once. The copy rule was quietly doing work in the cascade too. The 0-2 in the top left kills the 0 and 2 that touch in row 4, and the 1-2 on the right kills the 1 and 2 in column 3. Neither was needed to finish this board, but on a larger one they would be.
We checked this board with the game's own Pairs solver, which finds exactly one solution by the same cell and pair deductions, and by listing every way to cover the grid with dominoes. The grid has 95 domino tilings, and only one of them uses each pair once.
The mistake that turns this into guessing
The usual error is counting a dead copy as an option. At the stall point, the 0 at row 2 column 3 looks like it has three choices. A player who sees three choices either waits for something else to happen or picks one, and picking the 1 to its right makes a second 0-1.
The game will tell you. The Every pair once panel under the board turns a pair red when it is used twice, and the repeated dominoes are marked on the grid. But by then you have spent the move and have to tap the domino off again, and on a timed board the clock has kept running. Worse, a wrong domino changes which cells look forced, so moves you made after it may need taking back too.
The same panel is the cure. It ticks a pair green the moment you place it. Each time a pair goes green, glance at the grid for other places those two digits still touch. Usually there are none, or the cells are already used. When there is one, it tends to sit next to a cell that has just lost its last real choice.
The opposite mistake also happens: crossing out a pairing because you expect its pair to go somewhere else. Only a placed domino removes its copies. A pair you think belongs elsewhere is still a candidate everywhere until you have proved it.
Put it into practice
Try an Easy Pairs Library puzzle and look for one deduction from this guide.
Play a Pairs boardSign in or create an account to save your progress.