Hubbard

Start from the car in the lane and work backwards
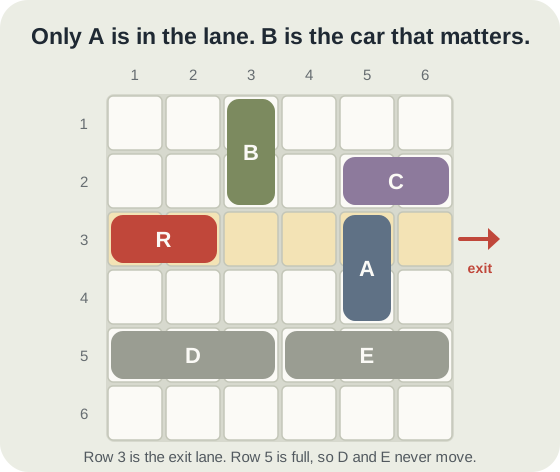
Here is a small board built for this article, not one of the published puzzles. The red ESCAPE car R sits in row 3, the exit lane, at columns 1 and 2. Only one car stands in its way: A, two cells tall, upright in column 5 across rows 3 and 4. Above the lane, B stands upright in column 3 across rows 1 and 2, and C lies flat in row 2 across columns 5 and 6. Row 5 is filled edge to edge by two three-cell cars, D and E, so neither of them can slide at all.
B is nowhere near the lane and nowhere near A. It looks like scenery. The quickest way to find out whether it is scenery is to ask, for the one car that does block you, where it can go and what stands in the way.
A cannot go down, because row 5 under it is full. So A has to go up, into rows 1 and 2 of column 5. Row 1 there is empty, but row 2 is the left half of C. That makes C the next car in the chain.
Why B has to go into the lane
C is flat and already touching the right-hand edge, so it can only slide left. To clear column 5 it has to end up at columns 3 and 4, 2 and 3, or 1 and 2. Every one of those either covers column 3 or passes through it, and column 3 of row 2 is where B is standing.
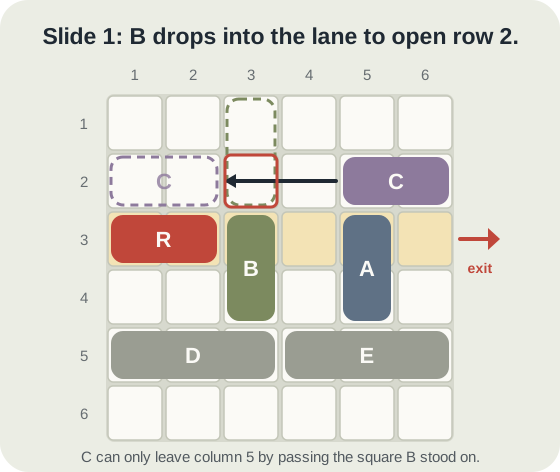
So B has to leave row 2. B is upright in column 3, and it has only three places it can ever be: rows 1 and 2, rows 2 and 3, or rows 3 and 4. It cannot go lower, because D fills row 5. Of those three positions, only rows 3 and 4 clear row 2. B has to slide down two squares, straight into the exit lane.
That is the move that feels wrong. The lane had one blocker, and you have just given it a second. It is still the only first move that leads anywhere, and the engine's own hint on this board says the same thing: slide B down.
Then take it back out
With row 2 clear, C slides left in one slide, all the way to columns 1 and 2. It has to go that far. If it stopped at columns 3 and 4, column 5 would be free for A, but C would now sit directly above B, and with D below, B would be stuck in the lane with nowhere to go.
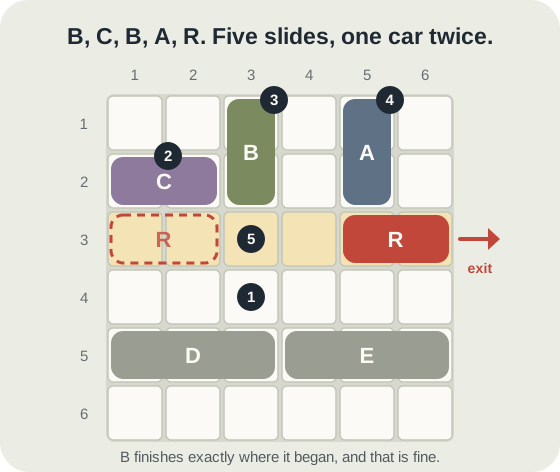
Now B slides back up to rows 1 and 2, exactly where it began. A slides up into rows 1 and 2 of column 5. Row 3 is empty from column 3 to the edge, and R drives out.
That is five slides: B down, C left, B up, A up, R out. The last two cars up can go in either order. We checked this with the game's own solver and by searching all 41 positions this board can ever reach: five slides is the shortest route, those are the only two five-slide orders, and there is no solution of any length in which B stays out of the lane or never comes back up.
The mistakes this avoids
The first is leaving B alone because it is not blocking you. Every car in the chain matters, however far it is from the lane. If a car stands in the only path of a car that stands in the only path of your blocker, it is part of the puzzle.
The second is sliding B down by one square. That puts B across rows 2 and 3: it is now in the lane and still in row 2, which is worse on both counts. Count the squares a car has to clear before you drag it.
The third is stopping C halfway. Columns 3 and 4 look like enough, because A can now go up, but they trap B. You would have to slide C again, and on a timed board that costs seconds. Sliding itself is free in Traffic: there is no move penalty and your result is elapsed time, so the real cost of a wrong guess is the time you spend spotting it.
- Name the cars actually in the lane.
- For each, list the squares it could move to, and pick out the ones that are possible at all.
- Whatever sits in those squares is the next link. Repeat until you reach a car that can move freely.
- If that free move means stepping into the lane, do it, and plan the step back out.
Where you will meet this
Small Easy boards like this one rarely need it. Harder boards are built to. When new Traffic boards are generated, the certified shortest route of every Hard board must include at least one car that reverses direction, Ultra boards at least two and Giga boards at least three. B above is a reversing car: down, then up.
So on a big board that seems stuck, stop looking for a car that simply gets out of the way. Look for the car that has to come towards you first.
Put it into practice
Try an Easy Traffic Library puzzle and look for one deduction from this guide.
Play a Traffic boardSign in or create an account to save your progress.