 Hubbard

Why the middle pearl cannot run along the line
Take three white pearls next to each other in one column. Suppose the loop passed through the middle one vertically, running along the column. Then it enters the pearl above from below and the pearl below from above, so it arrives at both of them travelling along the column too.
Both of those are white pearls, and a white pearl is passed straight through. So the loop carries on straight through the top pearl and straight through the bottom one. The middle pearl needed a turn in one of the two squares beside it on its line, and both of those squares have just gone straight. The rule fails, so the middle pearl crosses the column instead.
Now the outer two follow. If the top pearl ran along the column, the loop would have to pass from it into the middle pearl, and the middle pearl is going across, not up. So the top pearl crosses too, and by the same argument so does the bottom one. All three pearls are crossed from side to side, and the loop runs through the six squares either side of them.
A board to work
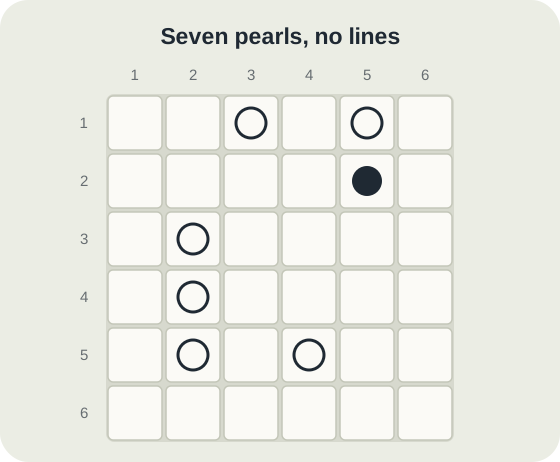
Here is an original six by six board with seven pearls: six white and one black. It has exactly one loop that satisfies every pearl, and the game's own deduction solver reaches it without guessing.
The white pearls are at row 1 columns 3 and 5, at rows 3, 4 and 5 of column 2, and at row 5 column 4. The black pearl is at row 2 column 5. The run to look for is the three whites stacked in column 2.
Cross the run, then let the edge finish the job
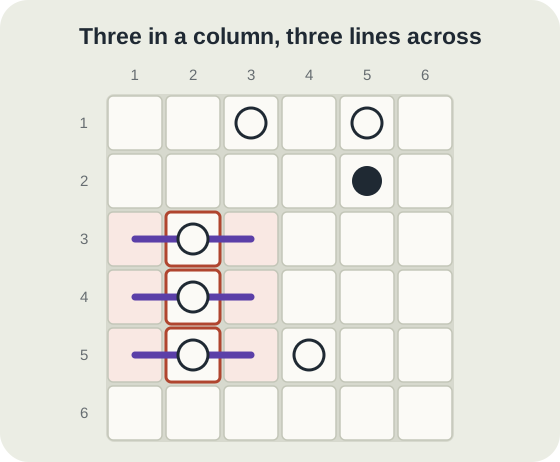
Apply the rule to column 2. The pearls at rows 3, 4 and 5 are all crossed from side to side, so the loop runs from column 1 through the pearl to column 3 on each of those three rows. That is six links drawn from one observation.
Next look at where those lines land in column 1. Each of those three squares has the loop arriving from the right, and there is nothing to its left, because column 1 is the edge of the board. The loop cannot carry straight on, so it turns in all three squares.
That settles every pearl in the run. Each white pearl needed a turn in a square beside it on its line, and each one now has a turn on its left. You have satisfied three clues and put the loop into nine squares without looking at the rest of the board.
What the rest of the board does
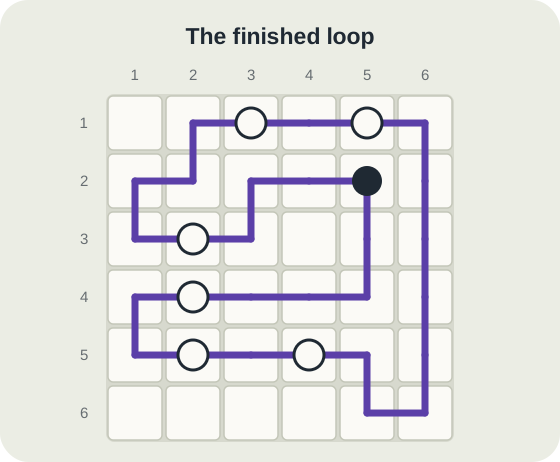
The run does not solve the puzzle on its own. The top row gives another foothold: the two white pearls at row 1 have nothing above them, so both run along the top edge. The black pearl at row 2 column 5 turns down and left, and the white pearl at row 5 column 4 ties the lower half together.
The finished loop is below. It leaves six squares unused, which is allowed: the loop has to close, not fill the grid. Check the three pearls in column 2 against it. Each is crossed, and each has its turn in column 1.
The mistake to stop making
The mistake is drawing a straight line through the whole run, pearl to pearl, because it looks like the pearls are pointing the way. It feels like progress and it is always wrong for three or more in a line. If you have done it, the middle pearl will never get its turn, and you will not find out until much later when the loop refuses to close.
Two white pearls side by side are different. Both can run along the line, provided the loop turns in the square just beyond each end. So a pair tells you much less than a run of three, and the argument above only starts at three.
A run of three is common enough to look for on every board. Across 300 six by six boards from the game's own generator, 149 contained at least one run of three or more white pearls in a line, and 514 of their 2,232 white pearls sat in such a run. That is close to one white pearl in four settled before you draw anything else.
One small consequence: you will never see three white pearls side by side along the edge row. They would all need to cross it, and there is no square beyond the edge to cross into.
Put it into practice
Try an Easy Pearl Loop Library puzzle and look for one deduction from this guide.
Play a Pearl Loop boardSign in or create an account to save your progress.



