 Hubbard

What the black pearl actually asks for
Read the black pearl rule slowly. The loop turns on the pearl, so it leaves in two directions at right angles to each other. Then it goes straight for a full square on both sides of that turn. So in each of those two directions the loop needs the pearl's neighbour, and then the square beyond that neighbour, because it has to arrive at the neighbour and carry on through it in the same line.
That is two squares of room in each direction, not one. A black pearl cannot point a given way unless the board has two squares that way.
This is why the edge of the board is worth reading first. A black pearl in the top row has no room above it at all, so it must run downwards. A black pearl in the second row has one square above it and needs two, so it must also run downwards. The same holds on all four sides, and the two directions are independent, so a pearl squeezed against two edges at once has nothing left to decide.
A board to work
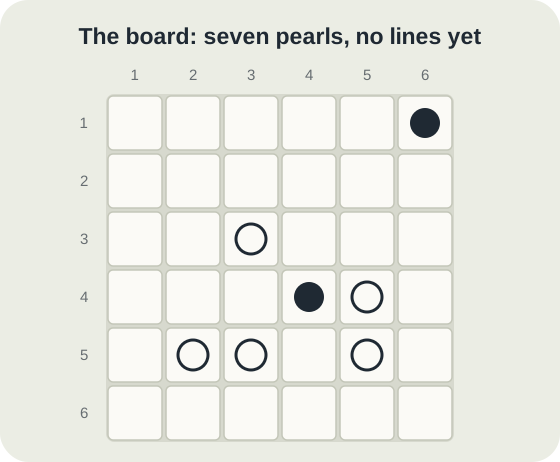
Here is an original six by six board with seven pearls: two black and five white. It has exactly one loop that satisfies every pearl, and the game's own deduction solver reaches it without guessing, so nothing below rests on a trial.
The black pearls are at row 1 column 6 and row 4 column 4. The white pearls are at row 3 column 3, row 4 column 5, and row 5 columns 2, 3 and 5.
The corner pearl decides itself
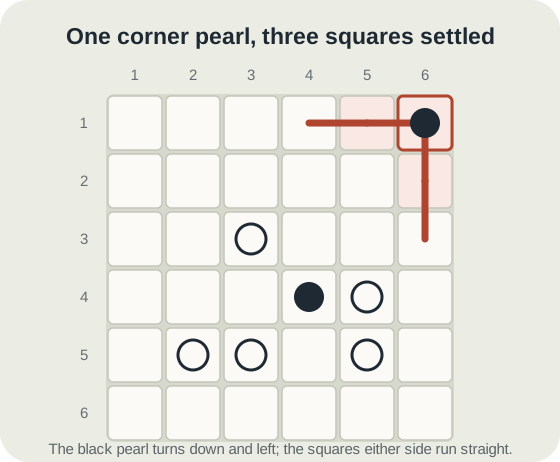
Take the black pearl at row 1 column 6, in the top right corner. It is on the top row, so there is nothing above it and it cannot run upwards. It is in the last column, so there is nothing to its right and it cannot run right. The two directions it leaves in have to be at right angles, and only down and left are left.
So the loop turns here, going down and going left. That is the pearl settled, and it was settled by the shape of the board rather than by anything else on it.
Now collect the rest of the clause. Going left, the loop must run straight for a full square, so row 1 column 5 is a straight horizontal piece. Going down, it must run straight for a full square, so row 2 column 6 is a straight vertical piece. Three squares are now fixed and you have not looked at a single other pearl.
Where the rule says nothing
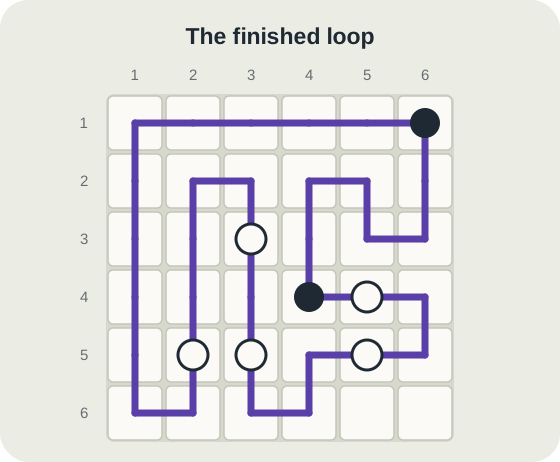
The other black pearl, at row 4 column 4, sits two squares clear of every edge. It has the room it needs in all four directions, so the board's shape tells you nothing about it and you have to find its turn some other way. In the finished loop it turns up and right, but that comes out of the white pearls around it, not out of the geometry.
This is the honest limit of the technique. It opens boards, it does not solve them. On this board the corner pearl gives you a foothold in the top right and the five white pearls do the rest of the work.
The loop below is the answer. It leaves row 6 columns 5 and 6 unused, which is allowed: the rule is that the loop closes, not that it fills the grid.
The mistake to stop making
The mistake is testing for one square instead of two. You look at a black pearl, ask whether there is a square above it, see one, and leave the direction open. The rule needed two, and the direction was never available.
It is worth knowing how much this costs. Across 300 generated Pearl Loop boards holding 492 black pearls between them, 148 of those pearls had a direction ruled out by the correct two-square test that the one-square test leaves open. That is 30% of every black pearl on the board, closed off for free, and a third of them never get closed.
The habit is cheap to build. Before drawing anything, find the black pearls, and for each one count two squares out in all four directions. Anything that runs off the board is not a direction. On 222 of those 300 boards at least one black pearl had a direction settled this way with no reasoning at all, and on roughly a quarter of black pearls both directions fell out at once, exactly as the corner pearl above did.
One more thing worth carrying: the white pearls have their own version of this. A white pearl is passed straight through, so it needs one square either side along its line. A white pearl on the edge row cannot be vertical, so it runs along the edge. That one is cheaper to check and about a third of white pearls sit on an edge, so it is worth the glance.
Put it into practice
Try an Easy Pearl Loop Library puzzle and look for one deduction from this guide.
Play a Pearl Loop boardSign in or create an account to save your progress.



