 Hubbard

Why a corner dot is different
Lineloop asks for one closed loop drawn along the lines between the dots. A number says how many of that cell's four sides the loop uses. Any dot the loop visits has exactly two lines running into it, so the loop never stops, branches or crosses itself.
Most dots have four lines to choose from, and edge dots have three. The dot at a corner of the grid has two, and both of them are sides of the same cell. Because the loop uses a dot's lines in pairs or not at all, those two sides are always drawn together or crossed together. Whatever else happens, the corner cell's top and left sides (or whichever two meet at that corner) agree.
Throughout this guide, rows are numbered from the top and columns from the left.
A 1, a 2 and a 3 in the corner
Put that pairing rule next to the clue and count. A corner cell's two outer sides come as a pair, so they contribute either zero lines or two.
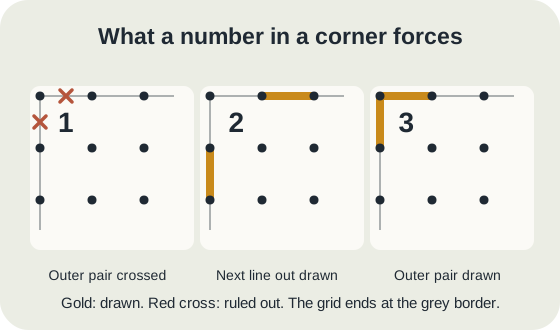
- A 1 cannot use the pair, because two is already too many. Cross both outer sides. The single line is one of the two inner sides.
- A 3 must use the pair, because the two inner sides alone only make two. Draw both outer sides, so the loop turns through the corner dot. The third line is one of the inner sides.
- A 2 has two ways to work: the outer pair, or the two inner sides. You cannot yet tell which, but both ways leave the next dot along each edge with exactly one line from the corner cell, so the loop has to carry on along the grid's edge. Draw the next edge line in each direction: the outer side of the neighbouring cell along the top, and the outer side of the neighbouring cell down the side.
- A 0 crosses all four sides, like a 0 anywhere else.
The board
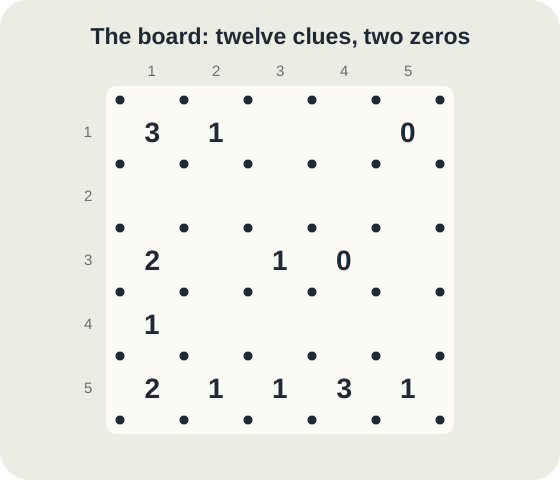
This five by five board has twelve clues, and its four corners hold a 3, a 0, a 2 and a 1. The game engine's exhaustive search, which tries every way of drawing the lines, finds exactly one loop.
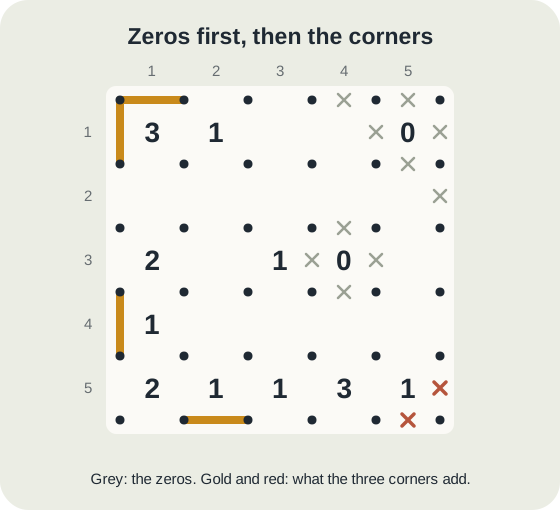
Try the ordinary counting first. Cross all four sides of the two zeros. Two dots next to them are then left with one possible line and nothing drawn, and a dot cannot hold a single line, so cross that one too: the top side of row 1 column 4 and the right side of row 2 column 5. That is ten of the sixty lines. After that, every clue still has more than one way to be met and every dot still has more than one option, so counting clues and dots settles nothing else.
What the corners add
Now read the corners. The 3 at row 1 column 1 draws its top and left sides. The 2 at row 5 column 1 draws the next edge line in each direction: the bottom side of row 5 column 2 and the left side of row 4 column 1. The 1 at row 5 column 5 crosses its bottom and right sides.
I checked each of these against the engine by removing it and running the ordinary rules again. Without the 2's two lines, only fourteen of the sixty lines are ever settled. Without the 3's, forty-seven. The 1 is the only corner this board does not need: the loop reaches the same crosses later by other routes. Take it anyway, because it costs nothing.
The 2 unzips the bottom left
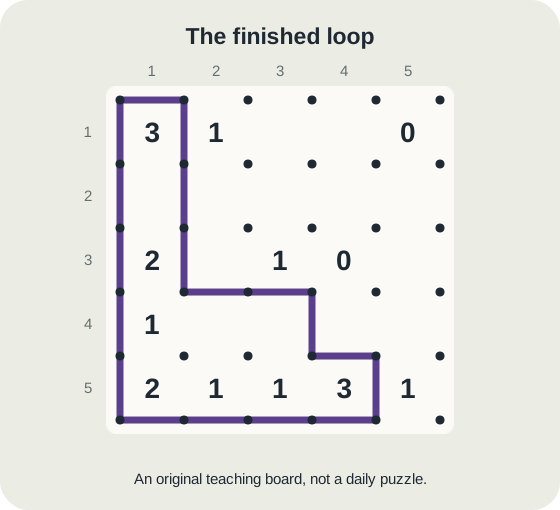
Row 4 column 1 is a 1 and now has its left side drawn, so its other three sides are crossed. Row 5 column 2 is a 1 with its bottom drawn, so its top, left and right are crossed.
The line on the left of row 4 column 1 has to continue at both ends. At its lower dot the only open line is the left side of row 5 column 1, so draw it, and at the bottom left corner dot the loop must turn along the bottom of the same cell. That completes the 2 at row 5 column 1 with its outer pair, which the corner rule allowed but did not choose for you. At the upper dot the top of row 4 column 1 is crossed, so the line climbs the left side of row 3 column 1.
Along the bottom, the line under row 5 column 2 reaches a dot whose line upwards is crossed, so it carries on under row 5 column 3. That satisfies the 1 there, crossing its top and right. Row 5 column 4 is a 3 with its left side crossed, so its top, bottom and right are all drawn. Its right side is the left side of the 1 at row 5 column 5, which crosses that cell's top.
Round the zero and up to the 3
The top of row 5 column 4 runs left to a dot where the only open line goes up, between columns 3 and 4 in row 4. At the top of that line sits a corner of the 0 at row 3 column 4, whose sides are crossed, so the loop turns left along the bottom of row 3 column 3. That is the 1 in row 3 satisfied, so its top and left are crossed.
The line continues left under row 3 column 2, because the line below that dot was crossed when its other lines ran out. At the next dot the only way on is up the right side of row 3 column 1. That cell's 2 is now met by its left and right sides, so its top is crossed.
Two lines are now climbing towards the 3 in the corner. The outer one runs up the left side of row 2 column 1 and meets the corner line already drawn, so that dot has its two lines and the bottom of row 1 column 1 is crossed. The 3 still needs a third side, and the only one left is its right side. That satisfies the 1 at row 1 column 2, and the line runs down the right side of row 2 column 1 to meet the inner climbing line. The loop is closed, and every remaining line is crossed.
The mistake that costs the most time
Treating a 2 in the corner as either of its two pairs and picking one. On this board, drawing the outer pair of row 5 column 1 straight away happens to be right, and drawing the inner pair is wrong, but at the moment you read the corner neither choice is proved. A guess there leaves a board that fails several moves later with nothing to show where. What is proved is the two lines one cell further along the edges, and those are the lines that unlocked this board.
The other trap is using the corner rule on a cell that only sits on one edge. An edge dot has three lines, so the pairing does not apply to it. The rule needs a dot with exactly two possible lines, both belonging to the same cell.
Beyond the corners of the grid
Grid corners are not the only place this shows up. Once crosses start to appear, any dot left with exactly two possible lines, and nothing drawn at it, behaves like a corner: both lines are drawn or neither is. If those two lines are sides of the same cell, that cell's clue works exactly as it would in a corner. A 1 crosses both and a 3 draws both. Look for it next to zeros, where crosses gather fastest.
Put it into practice
Try an Easy Lineloop Library puzzle and look for one deduction from this guide.
Play a Lineloop boardSign in or create an account to save your progress.



