 Hubbard

What a clue settles on its own
Take one cell away from the rest of the board and count the ways its four edges could be drawn.
A 1 uses one edge, and any of the four could be it: four arrangements. A 2 uses two, which can be picked in six ways. A 3 uses three, so it leaves exactly one edge out, and there are four choices of which one to leave: four arrangements again.
A 0 uses none of them. There is one arrangement, and you are already looking at it.
That is the whole argument. A 0 is the only clue on a Lineloop board that settles anything by itself. Every other number needs a neighbour, a dot or a corner to narrow it down first. The 3 you were reaching for is no more decided than a 1 is.
There are also far more zeros than threes
Being the only self-sufficient clue would matter little if zeros were rare. They are not, and the gap is wider than it looks from a single board.
I generated 420 boards with the game's own generator, sixty at each of its seven difficulty levels, and counted what came out. An average five by five board carries 20.8 clues, of which 8.8 are zeros and 1.3 are threes. Zeros outnumber threes by about seven to one, and the ratio barely moves as the board grows: a seven by seven averages 16.3 zeros against 1.5 threes.
Clue counts are not the useful measure though. Edges are. Each 0 crosses out four edges, and zeros sitting side by side share an edge between them, so the total is never simply four times the count. Measured properly, on the average board the zeros alone rule out 47% of every edge on the grid.
That figure came out at 47%, 47% and 48% for the five, six and seven row boards, so it is not a quirk of one size. Close to half the board is decided before you have thought about a single line.
A board to work
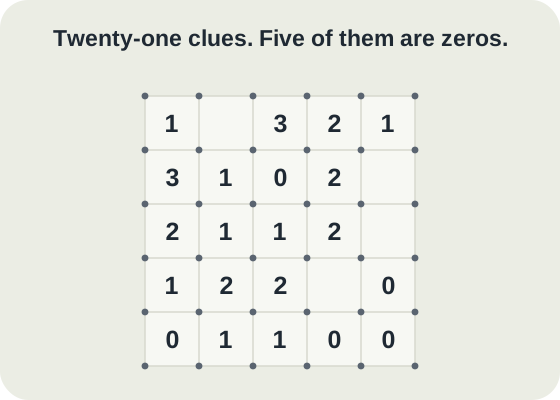
Here is a five by five board. It has one solution, and the game's solver reaches it by deduction alone, so nothing below rests on a guess.
Reading across the rows: row 1 is 1, blank, 3, 2, 1. Row 2 is 3, 1, 0, 2, blank. Row 3 is 2, 1, 1, 2, blank. Row 4 is 1, 2, 2, blank, 0. Row 5 is 0, 1, 1, 0, 0.
Twenty-one clues, of which five are zeros and two are threes. On zeros this is a thin board: the average five by five carries 8.8 of them. It will still hand you most of an opening.
Cross them before you draw anything
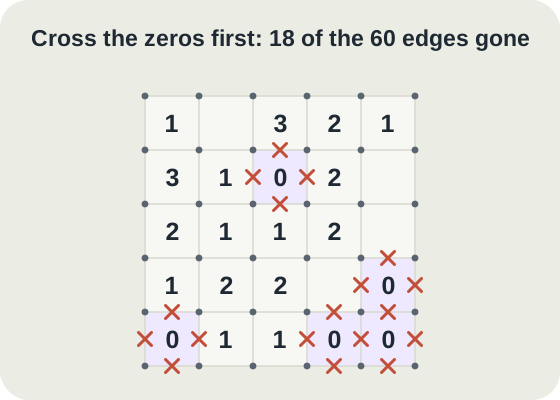
The five zeros sit at row 2 column 3, row 4 column 5, row 5 column 1, row 5 column 4 and row 5 column 5. Mark all four edges of each one as crossed.
The three along the bottom row overlap, so twenty marks land on eighteen distinct edges rather than twenty. Eighteen of the sixty edges on a five by five board, which is 30% of it. That is below the 47% average precisely because this board is short of zeros, and it is still almost a third of the grid removed by reading rather than reasoning.
Do this before anything else and for a plain reason: every cross you place now is one you would otherwise have to rediscover later, usually at the moment it would have saved you from a wrong line.
Now look at what sits above a zero
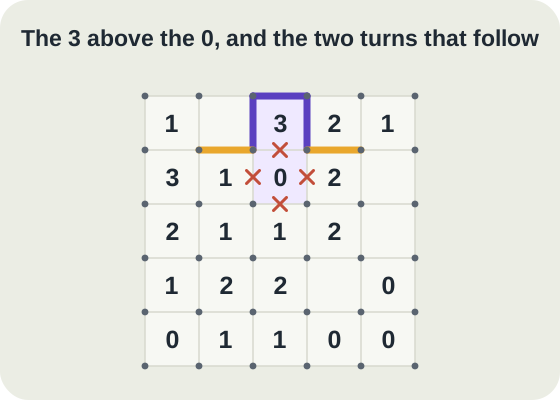
The 3 at row 1 column 3 has the 0 at row 2 column 3 directly beneath it. Those two cells share an edge: the bottom edge of the 3 is the top edge of the 0, and you crossed it out a moment ago.
A 3 has four possible arrangements. Three of them use that shared edge, so all three are gone. One is left. The top, left and right edges of the 3 are lines, and its bottom edge is not. Draw them.
Then the two lower corners of that 3 pay out again. Take the dot at its bottom left. Four edges meet there: the 3's left edge, which you have just drawn as a line; the 0's top edge and the 0's left edge, both crossed; and one more, running away to the left along the top of row 2 column 2. A dot with a line running into it must have exactly two lines, and only one candidate is left, so that fourth edge is a line as well. The bottom right corner gives the same answer by the same reasoning, and the top of row 2 column 4 is a line too.
Five edges settled, from one 0 and one 3, with nothing tried and rejected along the way.
The mistake to stop making
There are two, and underneath they are the same mistake wearing different clothes.
The first is opening on a 3. On an empty board a 3 is four arrangements and no decision, so what follows is a shape you picked rather than one the board gave you. The 3 above only became readable because a 0 had already taken one of its edges away. Threes are excellent second moves.
The second happens just after you draw those three lines. Two loose ends now hang at the lower corners of the 3, and the obvious thing is to carry them straight on downwards, because downwards is where the empty board is. Both of those downward edges are the sides of the 0, and you crossed them out yourself. The line has to turn outwards instead. If you ever find yourself drawing over your own crosses, what has happened is that you stopped reading them the moment they blocked a shape you had already decided on.
Lineloop runs from five by five up to seven by seven, with a nine by nine Giga board in Practice. It is timed, appears as a Just for fun daily and in the Library, and awards no league points, so the only thing the zero sweep costs you is about fifteen seconds on the clock. It is the cheapest fifteen seconds available.
Put it into practice
Try an Easy Lineloop Library puzzle and look for one deduction from this guide.
Play a Lineloop boardSign in or create an account to save your progress.



