 Hubbard

What the game asks for
A Four Colour board is a grid carved into regions of different shapes and sizes. Every region takes one of four colours, and two regions that share an edge must not match. Touching at a single corner does not count, so two regions meeting diagonally may take the same colour.
A few regions arrive already coloured and cannot be changed. Everything else is yours. Tapping anywhere inside a region cycles it: an untouched region goes purple on the first tap, then amber, then green, then red, then back to purple.
There is no number to work out and nothing to count. The board finishes itself the moment every region is coloured and no two neighbours clash, so the time you record is mostly the time you spent changing your mind.
Three regions that all touch need three colours
Take three regions where each one borders the other two. None of them can match another, so between them they use three different colours. That is forced by the rule alone, before you know anything else about the board.
Now add a fourth region that borders all three. It has to differ from all three. There are four colours in the game and three of them are spoken for, so exactly one is left.
A region in that position has no decision in it. You cannot get it wrong and you cannot settle it early either, because which colour it ends up with depends entirely on what its neighbours become. It is the last thing on the board worth thinking about, and on a timed puzzle that is worth knowing.
An original board
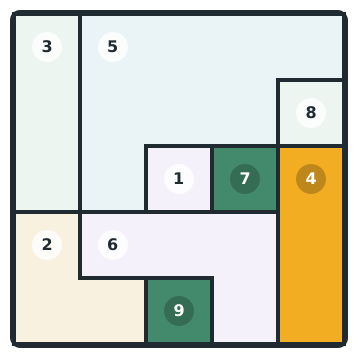
Here is a five by five board built for this article with the game's own generator. It has nine regions. Three of them are fixed: region 4 is amber, region 7 is green and region 9 is green. The other six are empty.
Everything claimed about this board below was checked against the engine rather than eyeballed, by working through every colouring the rules allow.
The region that never needed a decision
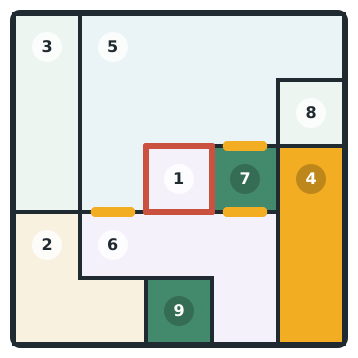
Region 1 is the single cell at row 3, column 3. Look at what is on its four sides. Above it and to its left is region 5, the large area across the top. Below it is region 6. To its right is region 7. So it has three neighbours, not four.
Those three neighbours all touch each other, and you can see exactly where. Region 5 meets region 7 along the top edge of region 7's cell. Region 6 meets region 7 along the bottom edge of that same cell. Region 5 meets region 6 further left, at the border between row 3 column 2 and row 4 column 2.
So regions 5, 6 and 7 take three different colours between them, and region 1 takes the fourth. That holds whichever three colours they turn out to be. It was checked the hard way: of the 24 legal ways to colour those three regions, and 24 is all a mutually touching trio allows, every single one leaves region 1 with exactly one colour available.
Region 7 is fixed green, so region 1 will never be green. Beyond that it is genuinely open at the start. Working only from the three fixed regions, region 1 could still finish purple, amber or red, and all three of those still allow the rest of the board to be completed. It settles when regions 5 and 6 settle, and not before.
Where the time actually goes
If the pockets decide themselves, the crowded regions are where a careless colour costs you. On this board region 6 borders six other regions, more than anything else on it. Region 5 borders five and region 7 borders four. Colour those early and carefully, and the rest of the board has very little room to go wrong.
The solver the game ships with works the same way round. When it picks which region to try next, it takes the uncoloured region with the most neighbours.
This matters more as boards grow. An easier Four Colour board is five by five with eight to ten regions and three of them already fixed. A harder one is six by six with ten to twelve regions and only one fixed, which leaves far more of the map resting on your first few choices.
There is no single right map
This is the part that catches people out. Counted exhaustively, the board above has 50 different valid colourings that respect its three fixed regions. Every one of them finishes the puzzle.
Finishing is judged on the map in front of you, not against a stored answer. The check is only that the fixed regions still hold their colours and that no two touching regions match. So if your finished board looks nothing like someone else's, neither of you has made a mistake.
That also means a colour is never wrong in isolation. It is only ever wrong in relation to what you have already put beside it, which is why the order you work in does more for your time than any individual choice.
The mistake worth avoiding
The single cell regions are the most eye-catching thing on a Four Colour board and the least useful. On this board, regions 1, 7, 8 and 9 are all one cell. They are quick to tap, which is exactly why people start there, and they give nothing back.
Start instead with whichever region has the most neighbours and work outwards. The pockets will be waiting at the end with one colour each, and you will not have to think about any of them.
One practical note, since the board is timed. Because tapping cycles through the colours in a fixed order, reaching red takes four taps on an untouched region. Decide what a region should be before you start tapping it, rather than cycling round to see what looks right.
One finished map
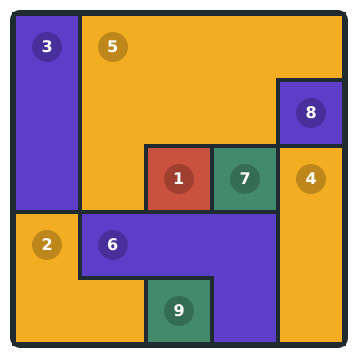
Here is the board completed. Region 1 came out red, because region 5 finished amber, region 6 finished purple and region 7 was fixed green. Nothing about region 1 was ever decided by you.
This is one of 50 valid finishes, not the finish. Across all 50, region 1 comes out amber 20 times, purple 15 and red 15. It is never green, because the region fixed green sits right beside it. And in every one of those 50 finishes it holds exactly the colour its three neighbours left over, which is the whole point: you never chose it.
Where Four Colour sits on the site
Four Colour is a Just for fun game rather than one of the ten competitive dailies, so a result here does not go into the league standings or your all time average. It is timed, and your finish is recorded in seconds.
You can start one from the Library, where you can filter to the game and pick a board, or wait for it to come round in For You. It also turns up inside Expeditions as one of the choices on a stage.
It is a good game to learn on, because the rule is small enough to hold in your head and the whole skill is in the order you work. That habit, colouring the crowded parts first and letting the pinched ones resolve themselves, carries over to most of the region based puzzles on the site.
Put it into practice
Try an Easy Four Colour Library puzzle and look for one deduction from this guide.
Play a Four Colour boardSign in or create an account to save your progress.


