 Hubbard

Three rules, and the one that gets misread
A finished board has exactly one bloom in every row, one in every column and one in every colour region. Seven rows, seven columns, seven regions, seven blooms.
The fourth rule is the one worth reading twice: no two blooms may touch. Touching means sharing any edge or any corner, so a bloom rules out all eight squares around it, diagonals included. Rows and columns are already covered by the first rule, which means the no-touch rule is really about diagonals, and that is exactly why it slips people's minds.
Regions do the work the numbers would do in Mini Sudoku. A region spread across thirteen squares tells you almost nothing. A region squeezed into one or two squares tells you nearly everything, because its bloom has nowhere else to go.
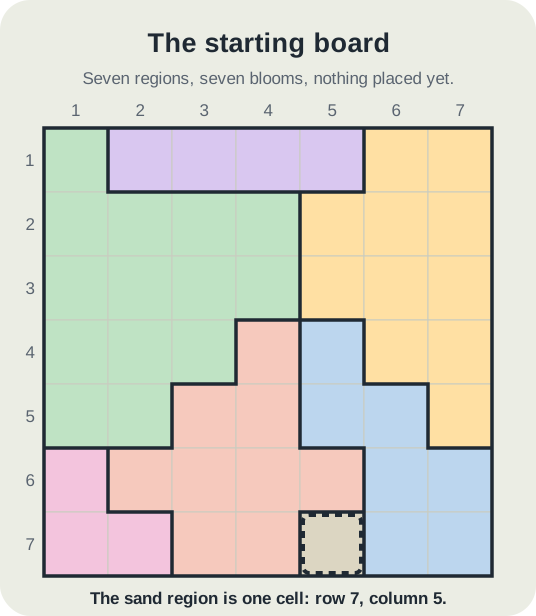
Every board has a region of one cell
This is not a stylistic preference. Twenty thousand boards were generated from the game's own generator and measured for this guide, across the difficulty range the league ships. Every single one contained a region of exactly one square. Not most of them. All of them.
So the opening move is never a guess, and you never have to hunt for a clever pattern to get started. Scan the board for the smallest patch of colour, and put a bloom in it.
Below is the board this guide works through. Seven regions, nothing placed. The sand region at row 7, column 5 is a single square, so its bloom is already decided before you have thought about anything else.
Four blooms without making a choice
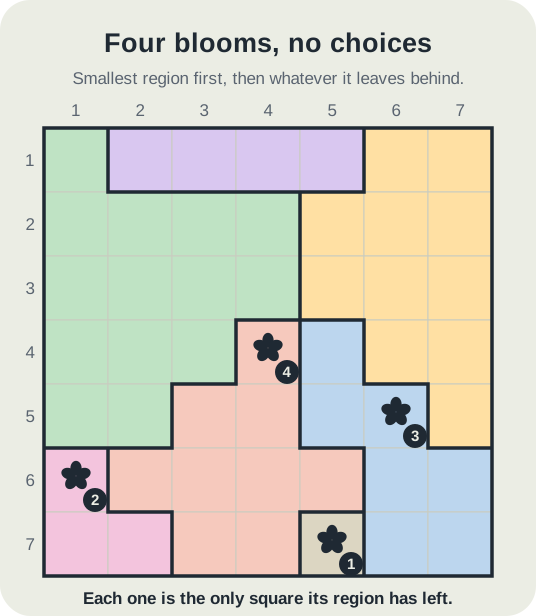
Place the first bloom at row 7, column 5. That uses up row 7 and column 5 for good, and the useful part is what it does to the regions next door.
The pink region has three squares: row 6 column 1, row 7 column 1 and row 7 column 2. Two of those sit in row 7, which is now spent. One square survives, so the second bloom goes to row 6, column 1.
The sky region has seven squares, which sounds far too many to settle. It is not. Rows 6 and 7 are gone, which removes four of them, and column 5 is gone, which removes two more. Row 5, column 6 is the only square left standing, and that is the third bloom.
The salmon region has nine squares, and eight of them lie in rows 5, 6 and 7. All three rows are now taken. The ninth square, row 4, column 4, takes the fourth bloom.
Four placements, and not one of them involved a choice. Each region was reduced to a single legal square by the blooms already down. Four is generous, as it happens: on a run of twenty thousand boards this cascade gave four or more on roughly one board in twelve, and a second free bloom on about two in three. Even one free bloom, which every board provides, is a better opening than a guess.
The mistake that stalls the rest of the board
Rows 1, 2 and 3 are still open, and so are columns 2, 3 and 7. Three rows, three columns, three regions. That is nine squares to consider and it looks like a small enough problem to brute-force in your head.
It is, but only if you apply the no-touch rule properly. The common error is to treat it as a restatement of one bloom per row and column, and then to place two blooms on a diagonal without noticing. Every arrangement ruled out below is ruled out by a diagonal, and nothing else. Read the rule as edges and corners and the finish falls out. Read it as rows and columns and the board looks like it has several answers, which is when people start guessing and lose the clock.
The bloom at row 4, column 4 already reaches upwards. It touches row 3 at columns 3, 4 and 5, so row 3 cannot take column 3. Row 3 is column 2 or column 7.
Finishing the top three rows
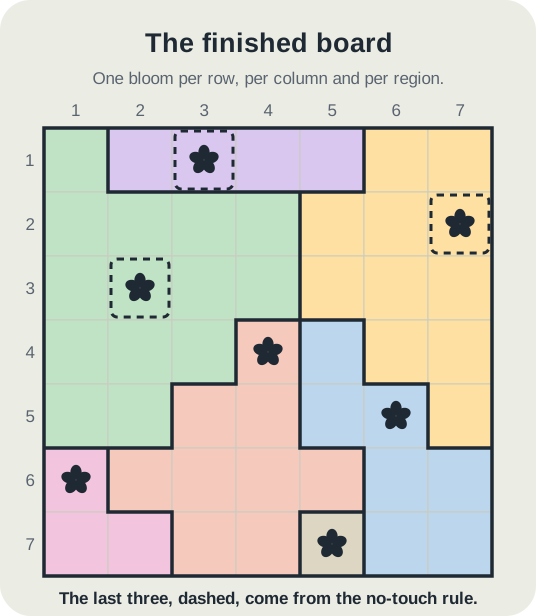
The lavender region sits entirely inside row 1, at columns 2, 3, 4 and 5. Since row 1 must hold a bloom, and every lavender square is in row 1, that bloom is the lavender one. Columns 4 and 5 are already used, so row 1 is column 2 or column 3.
Test column 2 first. If row 1 takes column 2, then rows 2 and 3 share columns 3 and 7 between them. Row 3 cannot take column 3, so row 3 takes column 7 and row 2 takes column 3. Now look at row 1 column 2 and row 2 column 3: they meet at a corner. That breaks the no-touch rule, and the whole branch dies with it.
So row 1 is column 3. That bloom touches row 2 at columns 2, 3 and 4, which removes column 2 from row 2. Column 3 is spent, so row 2 takes column 7. Row 3 takes the last column left, column 2, which is the option the no-touch rule left open two steps ago.
Check the regions before you stop: row 1 column 3 is lavender, row 2 column 7 is amber, row 3 column 2 is mint. Three different regions, and with the four already placed that is all seven. The board is finished, and it was finished without a guess at any point.
Where to try it
Blooms is one of the competitive daily games and it is scored on time, so the opening matters more than it does in an untimed game. Seconds spent staring at the middle of the board are seconds lost, and the smallest region is always there to be found.
Two habits are worth building. Find the smallest region before you touch anything, then keep following the cascade for as long as it runs rather than stopping at the first bloom. And when the cascade dries up, switch to the no-touch rule and check the diagonals around every bloom already on the board.
The play screen also lets you cross out squares by dragging along a bloom's row and column, which is worth using once the cascade stops. Marking what is dead is how you see what is left.
Put it into practice
Try an Easy Blooms Library puzzle and look for one deduction from this guide.
Play a Blooms boardSign in or create an account to save your progress.



