 Hubbard

The rule everyone reads past
Colour Fields gives you a grid and a few numbered squares. Every square ends up green or blue. Squares of the same colour that touch along an edge form a field, corners do not count, and each field must contain exactly one clue and exactly as many squares as that clue says.
The size half of that is obvious. A 4 means four squares. The other half is the one that does the quiet work: exactly one clue. Not at least one. A field holding two clues is wrong even when the arithmetic happens to add up, and a field holding no clue at all is wrong too.
The game knows this and will tell you. Join two clues into one field and once you lift your finger the whole field picks up a red outline, and the line under the board reads that the field has joined clues or too many cells. It does not say which, because either one is fatal.
Why a square between two clues is decided already
Take two clues of the same colour with exactly one square between them, side by side in a row or stacked in a column. Colour that square their colour and it touches both. All three are now joined, so all three sit in one field, and that field holds two clues.
So the square takes the other colour. Always. It does not matter how large the two clues are, how much room they still need, or which of them you would rather feed. The two clues could be a 2 and a 9 with fourteen squares going spare and the answer would not change.
This is worth more than it sounds, because it costs nothing. You are not counting, not tracking which squares are still free, not holding a possible shape in your head. You see two numbers of a colour with a gap between them and you fill the gap with the other colour.
An original board
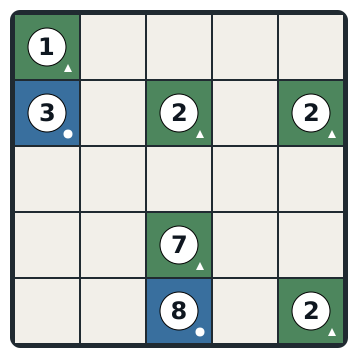
Here is a five by five board built for this article, the size you get on an Easy Colour Fields puzzle. Seven clues, eighteen empty squares. Green is marked with a small triangle and blue with a small circle, exactly as the game marks them, so the board still reads if the colours are hard to tell apart.
Reading across: row 1 has a green 1 in the corner. Row 2 has a blue 3 on the left, then a green 2 in the middle and another green 2 at the right edge. Row 4 has a green 7. Row 5 has a blue 8 and a green 2 at the right edge. One plus three plus two plus two plus seven plus eight plus two is twenty five, which is the whole grid, as it always is.
Everything claimed about this board below was checked by brute force rather than by eye. Eighteen squares are empty, so there are 262,144 ways to colour them in. Every one was tried against the game's own validator, and exactly one of them completes the board.
Two squares, no counting
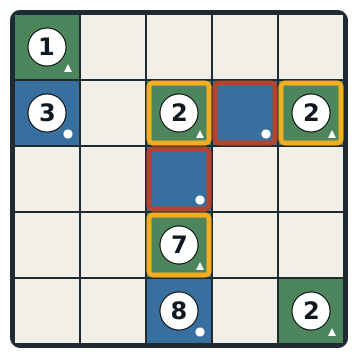
Row 2 has a green 2 at column 3 and a green 2 at column 5, with one square between them at column 4. Colouring it green would run those two clues together into a single green field holding both 2s. So it is blue.
Column 3 has the green 2 at row 2 and a green 7 at row 4, with one square between them at row 3. Same shape, same answer: green there would join a 2 to a 7 down the column, so it is blue.
Neither deduction used a number. The 2, the 2 and the 7 could have been anything. Both were confirmed the hard way as well. Fix row 2 column 4 green and there are 131,072 ways to fill the rest; none of them completes the board. Fix row 3 column 3 green and the same count comes back the same way: none.
The game's own solver agrees, and reaches for these before almost anything else. Run it on this board and its second move is exactly these two squares, both turned blue, together.
The mistake this prevents
The tempting move at row 2, column 4 is to hand it to the green 2 at the right edge. That clue is a 2, it has only itself so far, it needs one more square, and column 4 is right there against it. By size alone it fits perfectly.
It is still wrong, and it is wrong for a reason that has nothing to do with size. The square it wants is also against the other green 2. Feeding one clue starves the rule.
That green 2 does get its second square on this board, just from above rather than beside: the square directly over it, at row 1 column 5. Being forced to grow in one particular direction is normal in this game, and the pinch is often what tells you which direction is left.
The habit worth building is to check what a square touches before you check whether a clue has room for it. Room is a property of one clue. A square belongs to the whole board.
What it looks like finished
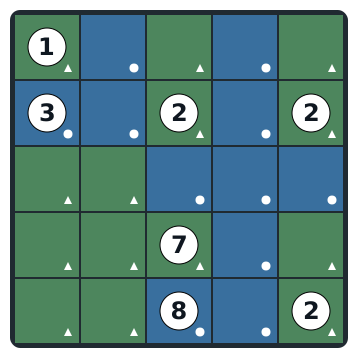
This board has exactly one solution, which is true of every Colour Fields board the site publishes. Two separate checks agree on it here: the exhaustive search above, and the game's step-by-step solver, which finishes this board in fourteen deductions without ever guessing.
The two squares the pinch settled turn out to belong to the blue 8, the long field that winds down the right of the grid. That is the other thing the rule quietly does. A square it takes away from one colour has to go somewhere, and it usually goes to the field you were not looking at.
The green 7 ends up as the block in the bottom left, seven squares across rows 3, 4 and 5. It never crosses row 3 column 3, because that square was decided before anyone counted to seven.
Where to look for it
The pattern is worth a deliberate sweep at the start of a board, before you count anything. Read each row and then each column, and every time two clues of one colour have a single square between them, fill that square with the other colour.
It scales with the board rather than against it. Easy is five by five, Normal six by six and Hard seven by seven, and the larger grids carry more clues, so there are more pairs of them to find. A seven by seven board usually gives up several squares this way before you have made a single decision.
The general form is worth carrying, because it catches cases that are not in a straight line. Any empty square touching two different clues of the same colour has to be the other colour, for the same reason. Two clues sitting diagonally apart never touch each other, but the two squares that complete their little two by two block each touch both, so both of those squares are settled at once.
Colour Fields is timed, so this matters for your result and not only for your patience. The squares you place without thinking are the cheap ones. Spend the clock on the ones that actually need counting.
Where Colour Fields sits
Colour Fields is a Just for fun game. It has a dated board each day alongside the competitive eight, and a Library of Easy, Normal and Hard boards you can play any time. It is timed and it records your time, but it does not add league points and it is not part of Rival Week.
Completing one earns the Field Painter achievement. Beyond that it is a game to play when you want a puzzle that rewards looking rather than arithmetic.
If you want to practise the rule from this article, an Easy Library board is the right size. Sweep the rows and columns for pinched squares first, fill them in, and only then start counting fields.
Put it into practice
Try an Easy Colour Fields Library puzzle and look for one deduction from this guide.
Play a Colour Fields boardSign in or create an account to save your progress.


