 Hubbard

What the counter counts
You drag the purple knots anywhere inside the board and their lines follow. The counter above the board shows how many pairs of lines still cross. Two lines that meet at a knot they share do not count; only unrelated lines passing over each other do.
When the counter reaches zero the timer stops and the board checks itself as soon as you let go of the knot. Any layout with no crossings is accepted. There is no hidden picture to reproduce, which is what makes the approach below work.
Untangle is timed and ranks the fastest finish, in Practice and in the Just for fun dailies. It carries no league points.
Check the shape first: one loop
Pick any knot and count its lines. It has two. Follow one of them to the next knot, which also has two, and keep going. You come back to where you started having visited every knot once.
That is true of every Untangle board on HubbardGames. We checked all 1,072 boards currently stored, from seven knots to thirteen: each one is a single loop, and each one opens with its knots spaced evenly around a ring, in the wrong order.
That changes what you are solving. A loop whose knots sit around a ring in the same order you meet them when you follow the lines is a plain outline, and an outline has no crossings. Your job is to put the knots back in loop order.
The board
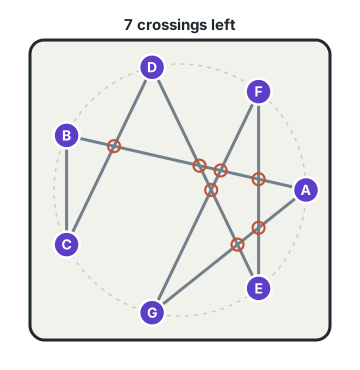
Here is an original seven knot board. The real game does not label its knots; the letters are here so we can talk about them. The loop runs A to B to C to D to E to F to G and back to A.
Reading clockwise from the knot on the right, the ring holds A, E, G, C, B, D, F. The counter reads 7.
Of the 5,040 ways to seat seven knots on those seven ring points, only 14 have no crossings: the loop in order, starting from any of the seven knots and going either way round. That count comes from trying every seating against the game's own crossing check.
Find the knots that are already in order
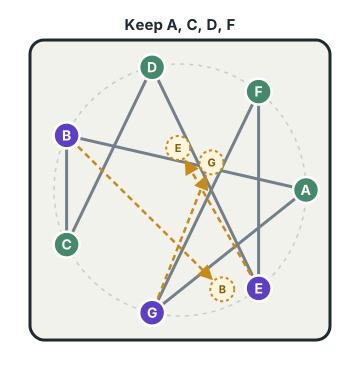
Read the ring clockwise and look for the longest set of knots that appear in loop order, skipping any that are out of place. Here A, C, D and F do: going clockwise from A you pass C, then D, then F, and loop order is A, then C, then D, then F once you ignore B, E and G.
Those four stay exactly where they are. Each of the other three has a gap waiting for it on the stretch of ring between its two loop neighbours, going clockwise. B belongs on the stretch from A round to C, which is where E and G sit now; both of them are about to leave. E belongs between D and F, and G between F and A.
Drop each one inside the ring, in its gap. It does not need to land on the ring itself, and the finished outline can be lopsided or dented and still count, because the game only asks for zero crossings.
Three drags, and what the counter says
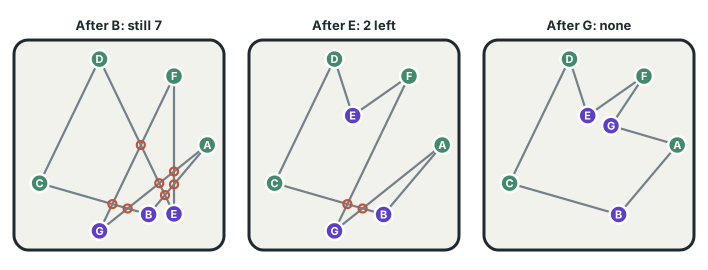
Move B first. The counter stays at 7. Move E and it drops to 2. Move G and it reaches zero, and the board checks itself.
We ran each of those positions through the game's own crossing counter, and counted the crossings again with a separate check to be sure the two agreed.
The common mistake: judging each drag by the counter
The counter is honest about the board as a whole and says very little about whether your last drag was right. Moving B into its gap removes no crossings at all. It is still a correct move, and B never needs to move again.
Do the same three drags in a different order and the counter tells a different story. G, then B, then E reads 7, 4, 3, then 0. E, then G, then B reads 7, 2, 1, then 0. Every order finishes in three drags.
The player who treats the counter as a score for each drag undoes the B move because it looked weak, then starts chasing whichever crossing is most visible. That is how a three drag board turns into a long one. Decide which knots stay, move the rest into their gaps, and look at the counter at the end.
- Follow the lines from any knot to find the loop order.
- Keep the longest run of knots already in that order round the ring.
- Drop every other knot inside the ring, between its two loop neighbours.
- Ignore the counter until the last knot is placed.
On bigger boards
The method does not change at thirteen knots; it just rewards the first look more. Spend the opening seconds tracing the loop and finding the run you can keep. Every knot you keep is a drag you never make, and on a timed board each saved drag is time off your finish.
If you get stuck, a hint highlights one knot to move and adds ten seconds to your time.
Put it into practice
Try an Easy Untangle Library puzzle and look for one deduction from this guide.
Play an Untangle boardSign in or create an account to save your progress.



