 Hubbard

The rule that is not printed anywhere
Numberlink asks you to join each pair of matching numbers with a line, and it adds one condition that beginners tend to read past: every open cell must belong to exactly one path. Not most cells. Every one. A board is not finished while a single square is still blank, even if all the pairs are joined.
Follow that through and each cell divides into one of two kinds. A cell with a number in it is the end of a line, so exactly one line touches it: one way in, and nothing else. A cell with no number has a line passing through it, so exactly two of its neighbours carry that same line: one way in, one way out.
Now count neighbours. A cell in the middle of the board has four, so knowing it needs two of them rules out very little. An edge cell has three. A corner has two. An empty corner therefore needs both of the only two neighbours it has, which makes it the one square on the board where the requirement and the options are the same number. There is nothing to choose. The line runs through the corner and joins its two neighbours, and it does so before you know anything else.
A board with one empty corner
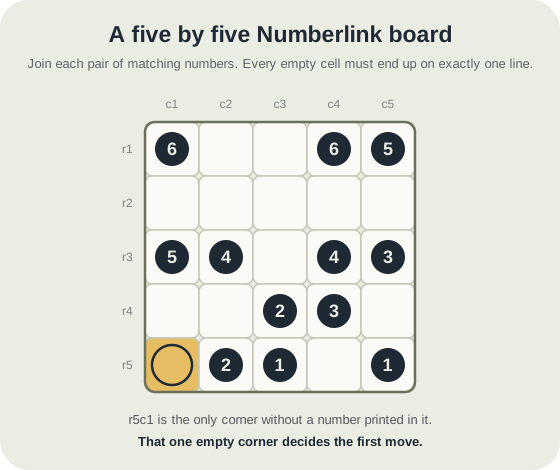
Here is an original five by five board with six pairs. Three of the four corners have numbers printed in them: 6 at r1c1, 5 at r1c5 and 1 at r5c5. The fourth, r5c1, is empty.
Look at the two 2s while you are here, because they are the pair the corner is about to settle. One sits at r5c2, immediately to the right of the empty corner. Its partner is at r4c3, a knight's move away and close enough that joining them looks like the easy opening the board is offering you.
What the corner forces, step by step
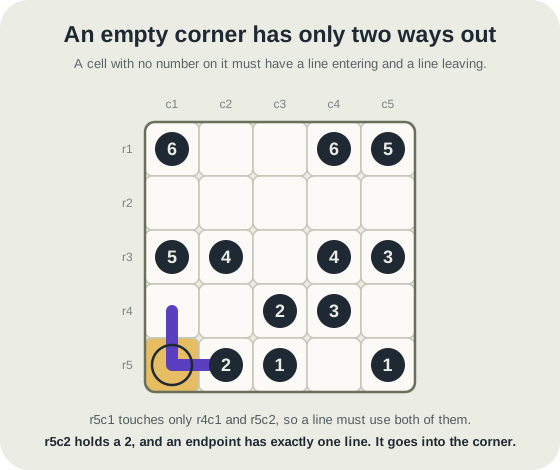
r5c1 has no number, so a line passes through it, so both of its neighbours carry that line. It has exactly two: r4c1 above and r5c2 to the right. Both are now settled, and neither was a choice.
The second half follows immediately. r5c2 holds a 2, and a numbered cell is the end of a line, so exactly one line touches it. The line into the corner is that one. So the 2 at r5c2 leaves to the left, into r5c1, and then turns upward into r4c1. Three cells of the 2's route are fixed, and no other clue on the board has been read.
It keeps going. r4c1 is empty, so it needs a second neighbour besides the corner, and its candidates are r3c1 and r4c2. r3c1 holds a 5, and a line can never pass through another pair's number, because a numbered cell only ever has one line touching it and that line is its own. So r4c1 continues to r4c2. Apply the same test at r4c2 and its remaining neighbours are r3c2, which holds a 4, and r4c3, which holds the matching 2. The 4 is ruled out for the same reason as the 5, and the line arrives at its partner.
Five cells, and the three-cell route that fails
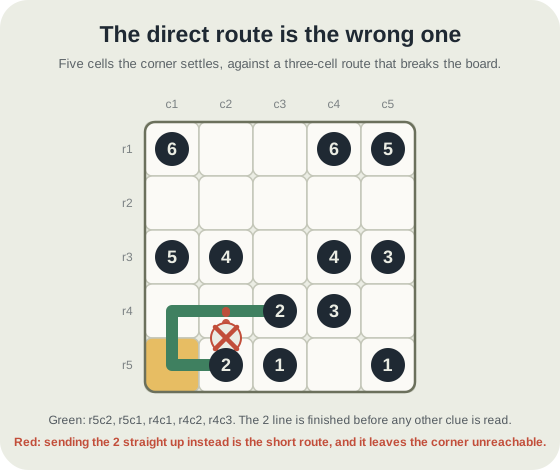
The 2 line is r5c2, r5c1, r4c1, r4c2, r4c3. Five cells, complete, from the corner rule and the no-passing-through-numbers rule, with the other five pairs untouched.
Compare that with the move most people make first. The two 2s are close, and the direct route between them is r5c2, r4c2, r4c3: three cells, drawn in a second, and it joins the pair exactly as the game asks. It also loses the board. Once the 2 at r5c2 has spent its single line going upward, the edge between r5c2 and the corner can never be used, and r5c1 is left with one usable neighbour when it needs two. Nothing you do afterwards recovers it.
That is the part worth keeping. The short route is not merely slower or less tidy. It is unfinishable, and the board will not tell you so until you are several pairs deep and out of room somewhere else entirely. The corner tells you at move one, for free.
Both claims here were checked twice: against the game's own solver, which reports exactly one solution for this board, and by an independent exhaustive enumeration written separately. Forcing the 2 to start into the corner leaves that one solution intact. Forcing it upward through r4c2 instead leaves none at all.
Using it on your own boards
Check the four corners before you draw anything. Every corner without a number joins its two neighbours, every time, on every board. If one of those neighbours is a number, that pair's first move is settled as well, which is the case worth hunting for because it starts a chain you can often run a long way.
The same counting argument works one step in from the corners, and it is the natural next place to look. An empty edge cell has three neighbours and needs two, so ruling out one of them settles the other two. Neighbours get ruled out when they hold another pair's number, when the board's edge cuts them off, or when a line already committed elsewhere has used them up. On larger boards, the 7 by 7 and the Practice-only 8 by 8 and 10 by 10, this is usually how the first quarter of the grid falls: corners first, then edges, then the middle once the outside has taken its choices away.
One caution. Some Numberlink boards include dark blocked cells, which cannot be entered at all. A blocked cell is not a neighbour, so it changes the count. A cell tucked against two blocked squares behaves like a corner even when it sits in the middle of the grid, and a corner with a blocked neighbour is not forced at all. Count the cells a line could actually reach, not the ones that happen to be adjacent.
Where Numberlink sits on the site
Numberlink is timed, and it runs in Practice and as a dated Just for fun board rather than as one of the competitive dailies. The fastest finish ranks highest among everyone who played that board, and it awards no league points, so it does not move your standing either way. Finishing a dated Just for fun board does fill a streak day on the London date it belongs to, the same as any other dated board.
Boards run 5 by 5 through 7 by 7 in ordinary play, with an 8 by 8 and a 10 by 10 kept to Practice. The 10 by 10 is built for dragging a route out with your finger held down rather than tapping cell by cell. If a route goes wrong, press any cell already on that line and it trims back to that point, so a wrong turn costs you the tail of the line and nothing more.
Put it into practice
Try an Easy Numberlink Library puzzle and look for one deduction from this guide.
Play a Numberlink boardSign in or create an account to save your progress.



