 Hubbard

What the game asks for
Triangle Tiles gives you a grid with some black cells fixed in place. Every other cell either stays white or holds one black triangle filling half the square, and there are four of those to choose from: the half against the top-left, the top-right, the bottom-right or the bottom-left.
Some black cells carry a number. It tells you how many of the cells directly above, below, left and right hold a triangle. Which way those triangles point is not part of the count, and cells touching only at a corner are not counted at all.
The second rule is the one that gives the game its shape. Look at the white space left over when you have finished, and every separate area of it has to be a rectangle. A tilted one is allowed: a square turned by 45 degrees is a rectangle here, and it is usually what the triangles are building.
A number is not a fraction of four
Four is the most cells a number can ever see, and it only sees four when it sits in the middle of the board with an open cell on all sides. Move it to an edge and it sees three. Put it in a corner and it sees two. Give it a black neighbour and it loses that one too.
So the useful thing to know about a number is not how large it is, but how much room it has. A 1 next to a single open cell has no decision left in it. Neither does a 2 with two open neighbours, or a 3 with three. In each case the number equals the space, and every cell it touches must hold a triangle.
A 0 works the same way from the other end. It never needs room, and every open cell it touches stays white. That makes a 0 strong wherever it sits, though a 0 in a corner with a black neighbour will still only clear one cell, which is worth knowing before you go hunting for one.
An original board
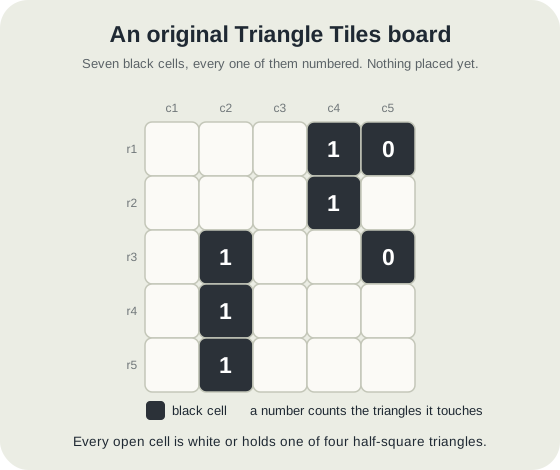
Here is a five by five board built for this article. Seven cells are black and every one of them carries a number: r1c4 and r2c4 both show 1, r1c5 and r3c5 both show 0, and r3c2, r4c2 and r5c2 each show 1.
The board has exactly one answer, and it can be reached without guessing anywhere. The game's own solver confirms both: it finds a single solution, and its deduction-only solver completes the grid without ever needing to try a value and see what happens.
The number that reaches one cell
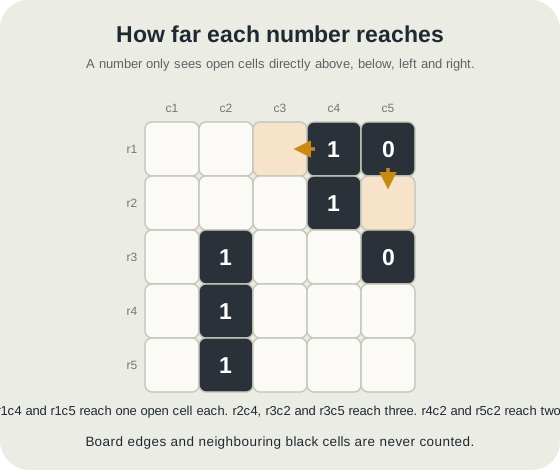
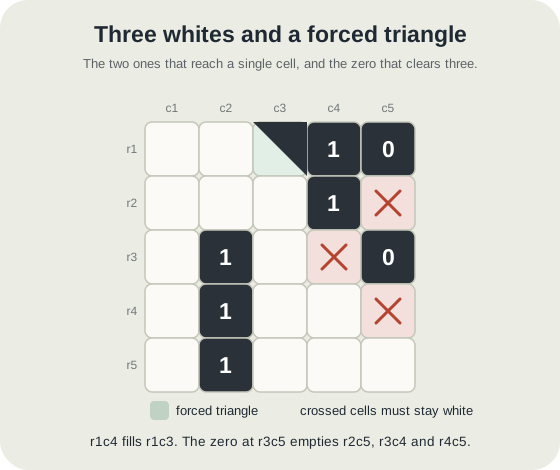
Start with r1c4, which shows 1. It sits in the top row, so there is nothing above it. To its right is r1c5, a black cell. Below it is r2c4, another black cell. That leaves r1c3, and nothing else.
One triangle to place, one cell to place it in. r1c3 holds a triangle, and you have not looked at the rest of the board to know it.
r1c5 is the mirror image. It shows 0, it is in the top-right corner, and its only open neighbour is r2c5 below it. So r2c5 is white. Two numbers, two cells settled, before any thinking about rectangles has started.
The other five numbers have more room. r2c4, r3c2 and r3c5 each reach three open cells, and r4c2 and r5c2 reach two each, so none of them decides anything on its own yet.
Which way the first triangle points
Knowing r1c3 holds a triangle is not the same as knowing which one, and here the rectangle rule does the work. Only one of the four fills that cell without leaving white space that can never close into a rectangle: the triangle against the top-right, tucked into the corner made by the top edge of the board and the black cell at r1c4. Its white half faces down and to the left, which is the only direction with room in it.
That is worth checking rather than taking on trust, and it was: each of the five things r1c3 could be, white plus the four triangles, was tested against the board, and only the top-right triangle survives. The same test was run with every other number on the board stripped away, and it still gives the same single answer, so this really does follow from r1c4 alone.
Now go back to the 0 at r3c5. It reaches r2c5, r3c4 and r4c5, and all three stay white. r2c5 was already white from the corner 0, so the two zeros agree with each other, which is a reasonable sign you have read the board correctly.
The next number falls out of it
r2c4 shows 1 and reaches three cells: r2c3, r2c5 and r3c4. Two of those three are now known to be white, cleared by the zeros. So the one triangle r2c4 is counting has nowhere left to go except r2c3.
This is the same move as before, arriving a step later. r2c4 never had a single open neighbour to begin with; the zeros took two of its three away, and what was left behind was a number with exactly as much room as it needs.
Its direction was checked the same way, and it is the triangle against the bottom-right. With those three cells marked white and no other cell assumed, white and the other three triangles are all contradictory at r2c3.
Where the triangles were heading
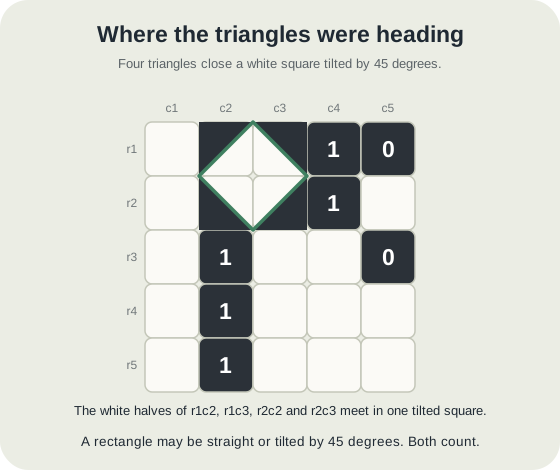
Two triangles now sit at r1c3 and r2c3, pointing top-right and bottom-right. They are two corners of a shape, and the rectangle rule finishes it: r1c2 takes the top-left triangle and r2c2 the bottom-left, and the four white halves meet around the corner those four cells share.
What they enclose is a square standing on its point. That is the tilted rectangle the rules allow, and once you have seen the board build one, the triangles stop looking like separate decisions. They are edges of white shapes, and the direction each one faces is whichever way lets the shape close.
The mistake worth avoiding
The slip is reading a number as a share of four without checking what it is next to. Someone doing that on this board looks at the two 1s and the two 0s, sees small numbers on a board with eighteen cells to fill, and goes looking for something more substantial to start with. There is nothing more substantial here. The whole opening is in the four numbers that look weakest.
The reverse error costs just as much. A 0 feels like it should clear four cells, so a 0 in a corner can feel like a wasted clue and get skipped. r1c5 clears exactly one cell on this board, and that cell is half of why r2c4 collapses two moves later.
The third one is quieter. Diagonal neighbours never count. A triangle sitting corner to corner with a number is invisible to it, and reading one in will make a number look satisfied when it still has a triangle owing.
Where Triangle Tiles sits on the site
Triangle Tiles is timed, and it is a Practice and Just for fun game rather than a competitive daily. It awards no league points, so a slow board costs you nothing in the standings and it is a fair place to try a new habit out.
You will find it in the Library, where you can filter to the game and work through boards in your own time. It is in the For You catalogue by default unless you have excluded it in your feed preferences, and a dated Just for fun board is published for it each day along with the rest of the catalogue. Today shows eight fun boards to start with and the rest under Play more, so it may be behind that link on any given day.
Boards run from five by five up to eight by eight, with a ten by ten in Practice and the Gallery a step beyond the usual top size. The habit is worth carrying up the sizes: before placing anything, walk the numbers and note how many open cells each one really touches. On a bigger board the edges and the black cells do more of that work, not less.
Put it into practice
Try an Easy Triangle Tiles Library puzzle and look for one deduction from this guide.
Play a Triangle Tiles boardSign in or create an account to save your progress.



