 Hubbard

Count the rows either side of the lane
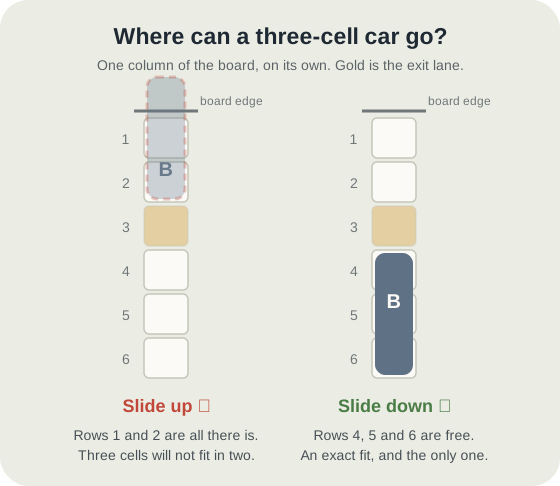
The red ESCAPE car sits in the exit lane and leaves through the right-hand edge. On a 6x6 board that lane is row 3. Look at what that leaves: two rows above it, rows 1 and 2, and three rows below it, rows 4, 5 and 6.
An upright car cannot turn. To stop blocking your lane it has to end up entirely above row 3 or entirely below it. A two-cell car can do either, because two cells fit in the two rows above. A three-cell car cannot fit in two rows, so it has exactly one destination on the whole board: rows 4, 5 and 6. Down, every time, with no choice about where it stops.
That is worth saying plainly because it is easy to miss under a clock. Three-cell cars are the ones that look most intimidating, and they are the ones whose route you already know before you have looked at anything else.
A board where that decides your first move
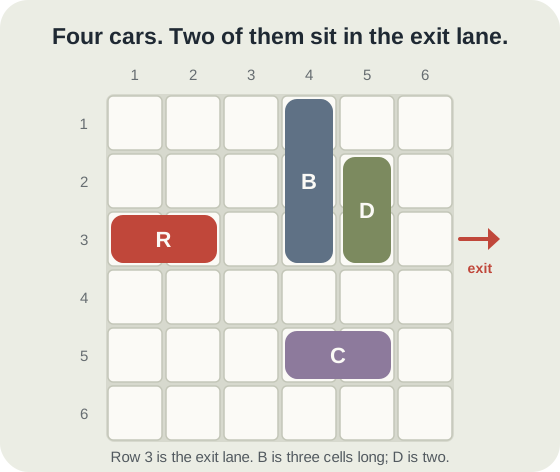
Here is a small jam built for this article, not one of the published boards. The escape car R sits in row 3 at columns 1 and 2. Two cars stand in its lane: B, three cells tall, in column 4 across rows 1 to 3, and D, two cells tall, in column 5 across rows 2 and 3. A fourth car, C, lies flat in row 5 across columns 4 and 5.
Both B and D have to leave row 3 before R can pass, so at minimum they move once each and R moves once. Three slides, if nothing gets in the way.
Why C moves before B does
Apply the count to B. It is three cells, so its only home is rows 4, 5 and 6 of column 4. Check those three cells: rows 4 and 6 are empty, but row 5 of column 4 is the left half of C. So B cannot complete its only legal destination until C is out of that column.
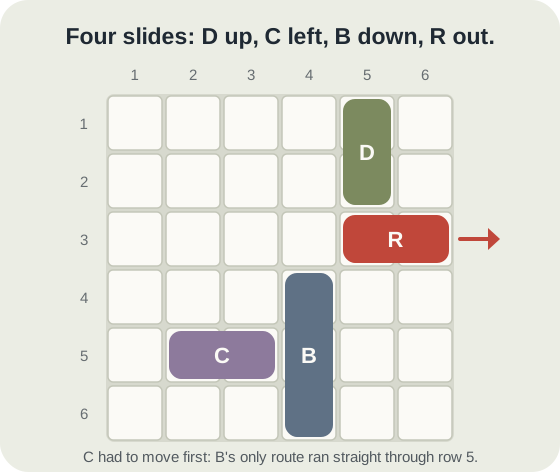
You do not have to search for that. The three-cell rule names B's destination for you, and the destination names the car you have to move first. C slides left, out of column 4. Now B drops into rows 4 to 6. D, being two cells, can go up into rows 1 and 2 or down, but down is where C and B now are, so it goes up. Row 3 is empty and R slides from column 1 straight out through the exit.
Four slides: C left, B down, D up, R out. The order of the first three is flexible, and moving D first costs nothing, but C must precede B. The board's exact shortest route is four slides, which puts it at the easy end of the range; harder tiers run to eleven slides and beyond, and the larger boards leave at least three rows on each side of the lane, so a three-cell car has a genuine choice there and this shortcut stops applying.
The mistake this avoids
The common error is to treat a three-cell car like a two-cell one and go looking for space above it. On this board B can legally slide down by one, into rows 2, 3 and 4, and that move feels like progress because the car has moved. It has not helped at all: B still occupies row 3, and you have spent a slide and several seconds of a ranked clock finding that out.
Sliding is free in Traffic. Moving a car back and forth costs no move penalty, and your result is elapsed time alone. So the thing you are protecting is not your move count, it is the seconds you spend nudging cars to see what happens. Counting rows first turns most of that guessing into arithmetic.
One practical note while you learn the pattern: the clock keeps running unless you leave the board or open the rules, and Clear board puts the cars back where they started without giving you the time back.
Put it into practice
Try an Easy Traffic Library puzzle and look for one deduction from this guide.
Play a Traffic boardSign in or create an account to save your progress.


