 Hubbard

Why the shared squares always give two
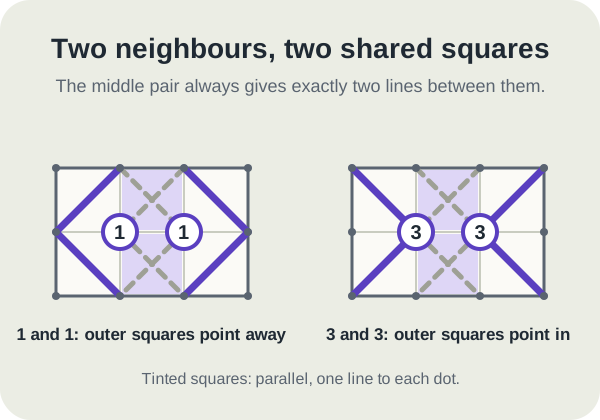
Take two numbered dots side by side, both away from the edge. Each has four squares around it, and two of those squares are shared: one above the gap between the dots and one below it. Both dots are corners of each shared square, and they are neighbouring corners, not opposite ones.
A diagonal always joins opposite corners. So whichever way a shared square slants, its line touches exactly one of the two dots, never both and never neither. Two shared squares give exactly two lines to the pair, however they are drawn.
That makes the pair easy to count. Add the two clues and take away 2. The answer is how many lines the four outer squares, the ones only one dot can see, must supply between them.
Stacked pairs work the same way. Two dots one above the other share the square to their left and the square to their right.
What 1 and 1, or 3 and 3, force
For two 1s, the sum is 2 and the shared squares already give 2. The outer squares must supply nothing, so all four point away from the pair. Neither dot can take both shared lines either, because that would give it 2, so each dot gets one. The only way to split them one each is for the two shared squares to be parallel: both slashes or both backslashes.
For two 3s, the sum is 6. The shared squares give 2, so the outer four must give all 4 they have. Every outer square points in towards its dot, and again the shared squares are parallel.
Other pairs are weaker on their own. A 2 next to a 2, or a 1 next to a 3, needs two lines from four outer squares, which leaves choices. They become useful once a few lines around them are drawn.
We checked this by listing every way to fill the six squares around each pair. Two 1s allow exactly two arrangements, and two 3s allow exactly two, and in both the outer squares are identical and only the parallel middle pair changes.
The board, and why counting stalls
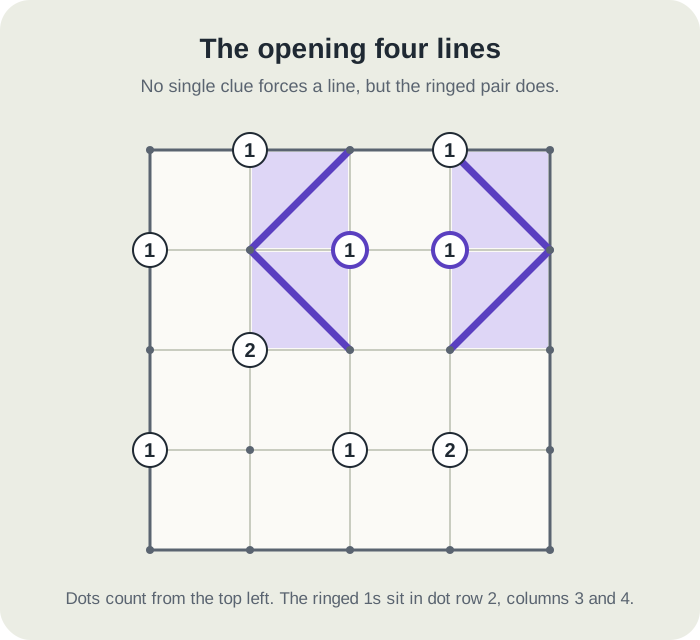
Here is a four by four board with nine clues. Dots are counted from the top left, so the top edge is dot row 1 and the left edge is dot column 1. Squares are counted the same way, from square row 1 column 1 in the top left corner.
There is no zero. The edge 1s each see two squares and the inner 1s see four, so none of them is full. The 2s at dot row 3 column 2 and dot row 4 column 4 each see four squares. No clue on its own forces a line, and with an empty grid there is no loop to avoid. The HubbardGames solver, restricted to single-clue counting and loop checks, finds no first move here.
Now look at dot row 2: there is a 1 in column 3 and another 1 in column 4, one step apart and both inside the board. That is the pair.
Four lines from the pair
The two 1s share square row 1 column 3 and square row 2 column 3, so the outer squares are the two on the left, square row 1 column 2 and square row 2 column 2, and the two on the right, square row 1 column 4 and square row 2 column 4.
Point each one away. Square row 1 column 2 becomes a slash, square row 2 column 2 a backslash, square row 1 column 4 a backslash and square row 2 column 4 a slash. None of those four touches either ringed dot. We have not decided the shared squares yet, only that they will be parallel.
Counting takes over
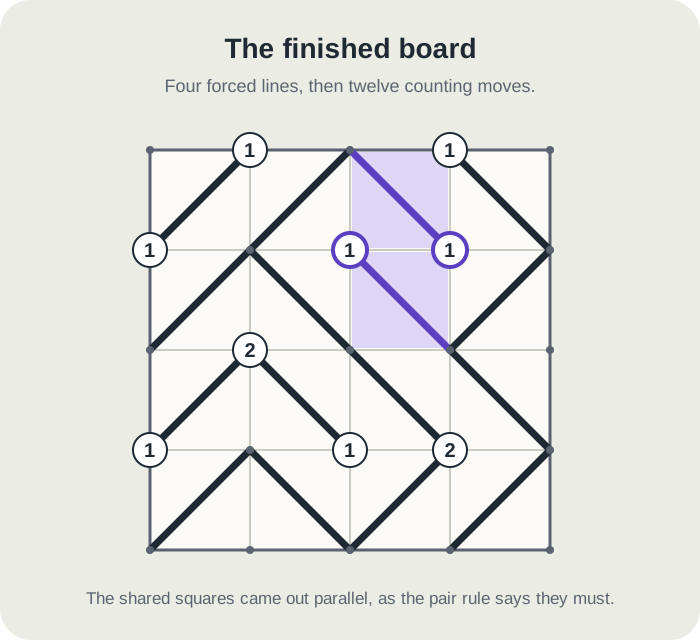
The top edge 1 at dot row 1 column 2 sees square row 1 column 1 and square row 1 column 2. The slash in square row 1 column 2 misses it, so square row 1 column 1 must touch it: a slash. The top edge 1 at dot row 1 column 4 is already touched by the backslash in square row 1 column 4, so square row 1 column 3 points away: a backslash.
That backslash touches the right-hand ringed 1, so the left-hand ringed 1 still needs its line and square row 2 column 3 is its last chance: a backslash. The two shared squares are both backslashes, parallel as promised.
On the left edge, the 1 at dot row 2 column 1 is touched by the slash in square row 1 column 1, so square row 2 column 1 points away: a slash. The 2 at dot row 3 column 2 is missed by both squares above it, so both squares below must touch it: a slash in square row 3 column 1 and a backslash in square row 3 column 2.
The bottom row follows. The 1 at dot row 4 column 1 is met, so square row 4 column 1 is a slash. The 1 at dot row 4 column 3 is met by the backslash above it, so its other three squares point away, giving backslashes in square row 3 column 3 and square row 4 column 2 and a slash in square row 4 column 3. The 2 at dot row 4 column 4 now has both its lines, so square row 3 column 4 is a backslash and square row 4 column 4 a slash. Every square is filled, every clue is exact and nothing closes a loop.
We confirmed the board has exactly one solution by checking all 65,536 ways to fill its sixteen squares, and the HubbardGames engine's exact solver agrees.
The mistakes to avoid
Do not use the rule on dots that are only diagonal neighbours. Two dots one step apart diagonally share just one square, so the shared squares do not give a fixed total and nothing is forced.
Watch the edges too. Two dots next to each other along the same outside edge also share only one square. The rule needs two shared squares, which you get whenever the step between the dots does not run along the border.
And do not try to give one shared square to both dots. The dots are neighbouring corners of that square, and no diagonal joins neighbouring corners.
Slant is a timed Library, For You and Just for fun game, not one of the league's scored dailies, so this is about solving faster rather than standings. Hard, Ultra and Giga Slant boards are built to need reasoning that links clues together, and the pair rule is the simplest version of it. If you are stuck, scan for two numbered dots one step apart before you reach for a hint, because a hint adds time to your clock.
Put it into practice
Try an Easy Slant Library puzzle and look for one deduction from this guide.
Play a Slant boardSign in or create an account to save your progress.



