 Hubbard

The pattern to look for
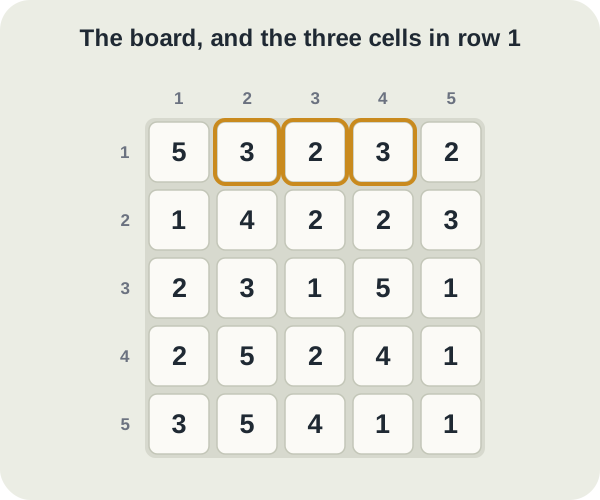
Scan each row and each column for two equal numbers with exactly one cell between them. On the board below, row 1 reads 5, 3, 2, 3, 2. Columns 2 and 4 both hold a 3, and the 2 at column 3 sits between them.
The three outlined cells are that pattern. The claim is that the 2 in the middle cannot be shaded, whatever else happens on the board, and you can settle it before you know anything about the other four rows.
Why the middle cell cannot be shaded
Assume the opposite and see what breaks. Suppose the 2 at row 1, column 3 is shaded.
Shaded cells may not touch side by side. The 3 at column 2 and the 3 at column 4 are both directly next to that cell, so if it is shaded then neither of them can be. Both 3s would stay unshaded.
That is the contradiction. Those two 3s are the same number in the same row, and the first rule of the game says a number cannot appear twice unshaded in one line. So the assumption fails, and the 2 at row 1, column 3 is unshaded.
Nothing in that argument depended on this particular board. Any two equal numbers in a line with exactly one cell between them make that cell safe, in a row or a column, at any size.
This row holds two of them
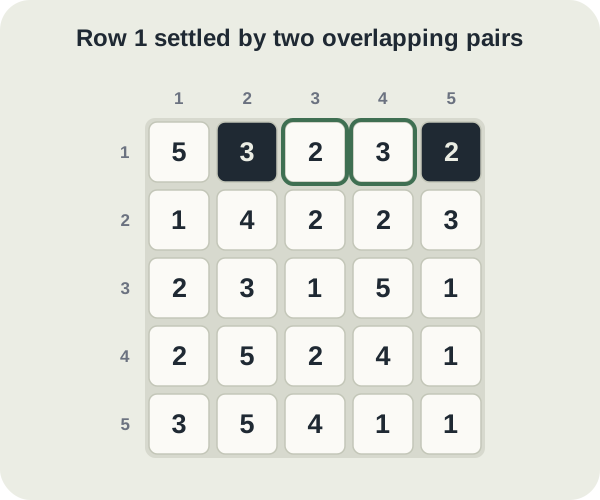
Read row 1 again, one step to the right. Columns 3 and 5 both hold a 2, and the 3 at column 4 sits between them. That is the same pattern overlapping the first one, so the 3 at column 4 is safe too.
Now the row settles itself. The 2 at column 3 is unshaded, so the other 2 in the row, at column 5, has to be shaded. The 3 at column 4 is unshaded, so the other 3, at column 2, has to be shaded. The 5 at column 1 is the only 5 in the row and needs nothing done to it.
Check the result against the adjacency rule before moving on. The two shaded cells are at columns 2 and 5, three apart, so they do not touch. The unshaded cells left in the row read 5, 2, 3, with no repeats. Row 1 is finished, and it came entirely from two applications of one pattern.
The mistake: reading it as a shading rule
The common error is to treat the pattern as if it named a cell to shade. It does not. Looking at the first pair on its own, the two 3s at columns 2 and 4, the pattern tells you the 2 between them is safe and tells you nothing about which of the two 3s ends up shaded.
On this board the shaded one turns out to be column 2, but that came from the second pair, not the first. Had the row been different, it could as easily have been column 4. Guessing at that point is how a clean opening turns into a board you have to unpick, and on a timed game unpicking costs more than the guess saved.
Take the safe cell, mark it, and wait for a second reason before you shade anything.
Carry the safe cell into its column
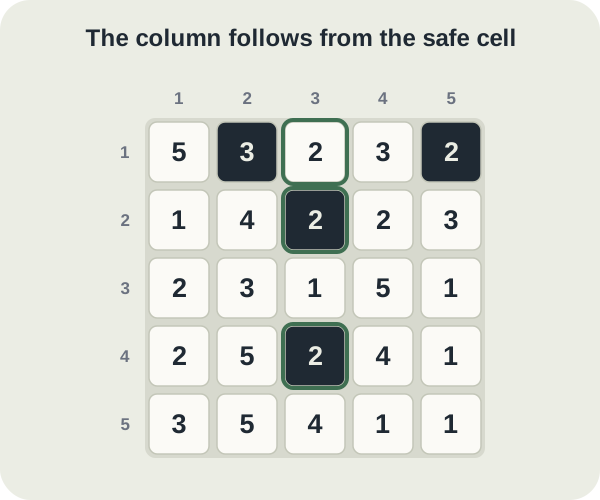
A confirmed unshaded cell is worth more than it looks, because it also sits in a column. Read column 3 downwards: 2, 2, 1, 2, 4. Three 2s, and you have just proved the one at the top is unshaded.
Only one copy of a number may stay unshaded in a line, so the other two 2s in that column, at rows 2 and 4, are both shaded. Check the adjacency rule again: they are at rows 2 and 4 with the 1 at row 3 between them, so they do not touch.
That is the shape of a good Shade Out opening. Find a safe cell by the pattern, use it to shade the duplicates that share its row and column, and let each newly shaded cell tell you that its own neighbours are safe. The board opens outwards from one small certainty rather than from a guess.
Where to try it
Shade Out runs as a Practice game and as a dated Just for fun puzzle. It is timed, so your fastest validated finish is what ranks, and it awards no league points. That makes it a good place to drill a pattern without a daily result riding on it.
Open a board from the Library and start by reading every row and every column for two equal numbers one cell apart. On a five by five you will usually find at least one, and each one you find is a cell you never have to think about again.
Put it into practice
Try an Easy Shade Out Library puzzle and look for one deduction from this guide.
Play a Shade Out boardSign in or create an account to save your progress.



