 Hubbard

Turn the question round
A finished Rectangles board splits the grid into rectangles. Each one holds exactly one printed number, and that number is its area. Nothing is left over, so every empty square belongs to exactly one number's rectangle.
The earlier Rectangles guide works from the numbers outwards: list each number's shapes, throw out any that run off the grid or swallow a second number, and draw a rectangle when only one shape is left. That is still the first thing to try. This guide is about what to do when it gives you nothing.
The other direction is to pick an empty square and ask which legal rectangles, from any number on the board, would cover it. Corners and edges are the best squares to ask about, because fewer shapes can reach them. If exactly one rectangle on the whole board covers the square, that rectangle must be in the solution, because something has to cover the square and nothing else can.
The board
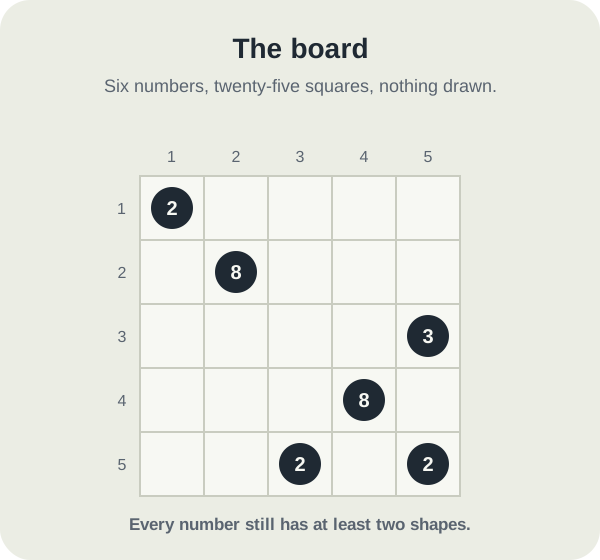
Five by five, twenty-five squares, six numbers. There is a 2 in the top-left corner, an 8 in row 2 column 2, a 3 on the right edge in row 3, a second 8 in row 4 column 4, and a 2 in each of row 5 column 3 and the bottom-right corner. The areas add up to 25, as they must, and the board has exactly one solution.
Try the usual method first. The top-left 2 can lie across or hang down. The first 8 has four legal shapes, the second 8 has two, the 3 has three, and the two 2s on the bottom row have three and two. No number is down to a single shape, so the number-first method has nothing to draw.
Who can reach the corner?
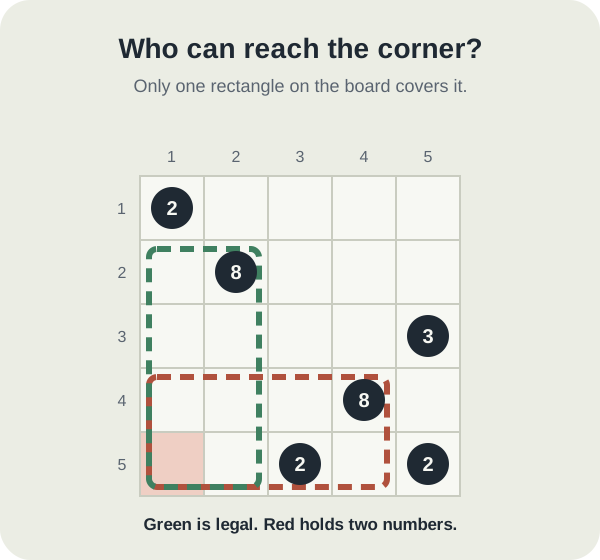
Look at the bottom-left corner, row 5 column 1. It is empty, so some rectangle has to cover it. Go through the numbers one at a time.
A 2 is two squares in a line, so it can only ever reach the square next to it. The 2 in row 5 column 3 can reach column 2 but not column 1, and the other two 2s are nowhere near. The 3 is on the far edge.
The second 8, in row 4 column 4, is the interesting one. To get from column 4 to column 1 it needs to be four squares wide, so it would be a two by four. To reach row 5 as well, that two by four would sit over rows 4 and 5, columns 1 to 4, and it would contain the 2 in row 5 column 3. A rectangle can hold only one number, so that shape is illegal.
That leaves the first 8. Of its four legal shapes, only one reaches the corner: four rows tall and two columns wide, covering rows 2 to 5 of columns 1 and 2. It is the only rectangle on the board that covers the corner, so it is the first one to draw.
The mistake: waiting for a number to run out
The trap here is to keep cycling through the numbers, recounting their shapes, hoping one will drop to a single option. On this board none will, however many times you look, because nothing has been drawn to take any space away.
The second trap is small but costs time: assuming the 2 next to the corner will fill it. It is the nearest number, which makes it feel like the natural owner. A 2 cannot stretch two squares, though, and the corner ends up belonging to an 8 whose printed number is three rows away.
On a timed board, when a scan of the numbers finds nothing, switch to the squares. Start with the corners, then the edges, and for each one name every rectangle that could cover it.
One forced rectangle, then the rest
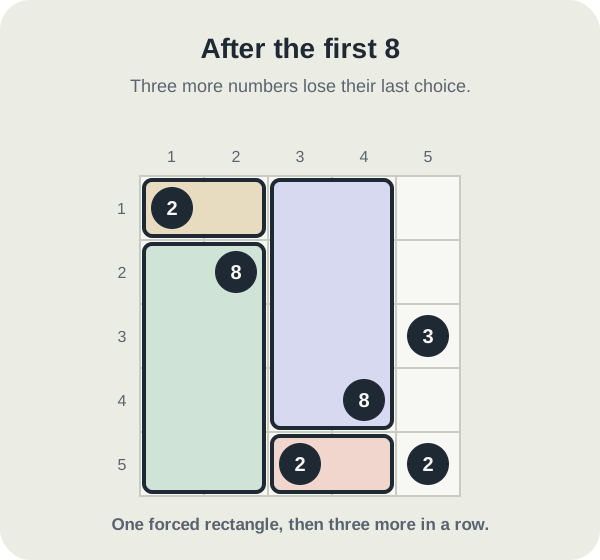
With the first 8 drawn, go back to the numbers. They have less room now.
The top-left 2 can no longer hang down, because the square below it is taken, so it lies across row 1 in columns 1 and 2. The second 8 loses its two by four shape, which would overlap the first 8, and has to stand four tall in columns 3 and 4, rows 1 to 4. That in turn boxes in the 2 in row 5 column 3: the square to its left and the square above it are both taken, so it lies across to column 4.
The finished board
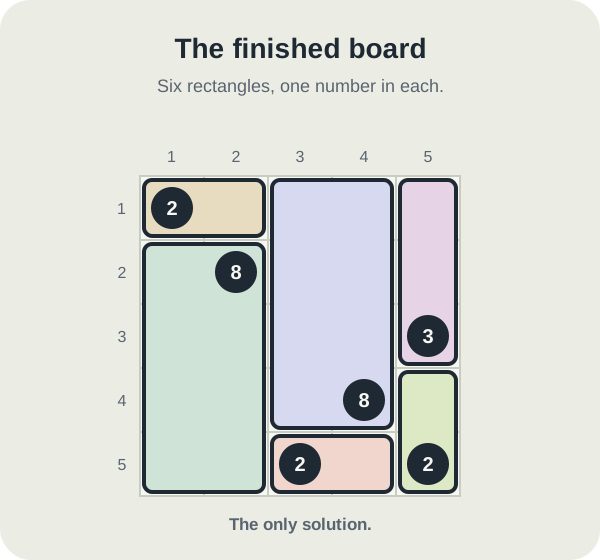
Only column 5 is left, with the 3 in row 3 and the 2 in row 5. The bottom-right 2 cannot lie across any more, because row 5 column 4 is taken, so it stands up over rows 4 and 5. The 3 then has only rows 1 to 3 of column 5 left, which is exactly three squares.
Six rectangles, one number in each, every square covered once. Only the first move needed the square-first check. After that, the ordinary number-first method did everything, which is how this usually goes: the square-first question gets you unstuck, and then you switch back.
Where to practise it
Rectangles is a timed Just for fun game with boards in the Library at several sizes. Easy boards rarely need this check, because a number usually runs out of shapes early. On larger boards, the first time you find yourself stuck with nothing drawn, pick a corner and ask who can reach it.
Put it into practice
Try an Easy Rectangles Library puzzle and look for one deduction from this guide.
Play a Rectangles boardSign in or create an account to save your progress.



