Hubbard
Read each number as an area
Divide the whole grid into rectangles. Each finished rectangle contains exactly one printed number, and that number equals its area in cells. A 6 could be 1×6, 2×3, 3×2 or 6×1, wherever the shape fits.
Orientation matters: 2×3 is two rows high and three columns wide; 3×2 is turned the other way. A square is also possible when its area works: a 4 might be 1×4, 2×2 or 4×1.
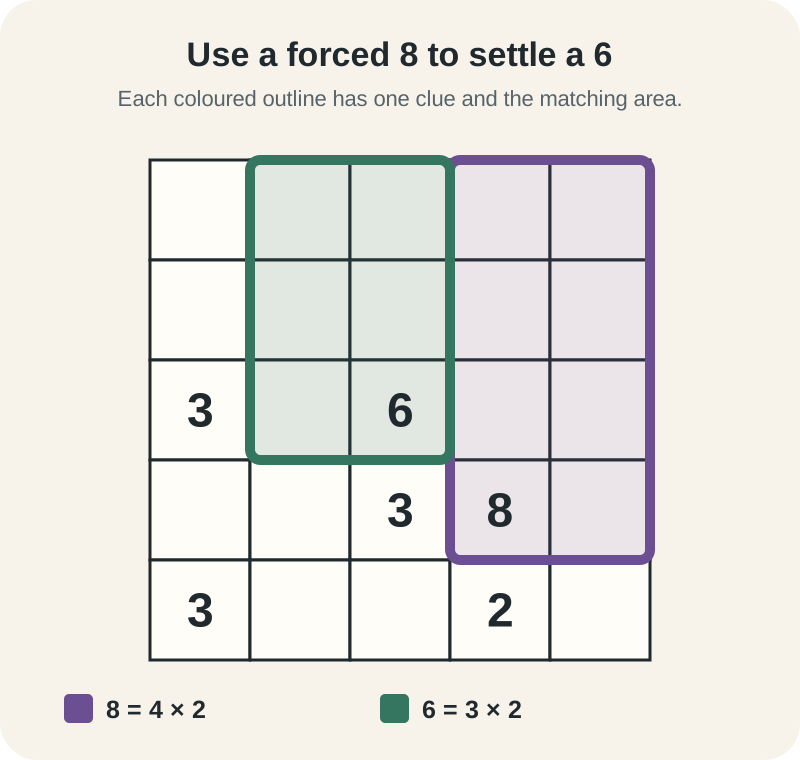
The diagram is an original 5×5 teaching position, not a current puzzle. It has one legal partition, but we need only the clues shown.
Let the edge and nearby clues settle the 8
Start with the 8 in row 4, column 4. Its usable factor shapes are 2×4 and 4×2; 1×8 and 8×1 cannot fit on a 5×5 grid. Every 2×4 placement also contains the 3 at row 4, column 3, so each is illegal.
A 4×2 rectangle in columns 3–4 contains other clues, leaving columns 4–5. It then has two vertical positions. Starting in row 2 would include the 2 at row 5, column 4. The sole survivor starts at row 1, column 4 and covers rows 1–4 of columns 4–5.
This is clue exclusion: reject a shape because it covers a different printed number. It differs from overlap, which only matters after you have confirmed another rectangle.
Revisit the 6 with less space available
Before the 8 is placed, the 6 at row 3, column 3 has four legal candidates: 2×3 from row 2, column 2 or 3; and 3×2 from row 1, column 2 or 3. The 1×6 and 6×1 forms do not fit.
The 8 occupies rows 1–4 in columns 4–5. Three of the 6 candidates overlap it, leaving the 3×2 rectangle from row 1, column 2. It covers rows 1–3 and columns 2–3, with the 6 as its only clue.
List shapes, place one only when a single candidate remains, then revisit the clues affected by its boundary. A long rectangle can remove options some distance away.
Keep the two exclusion checks distinct
A candidate can fail because it contains another printed clue, or because it overlaps a confirmed rectangle. Check both, but do not confuse them.
A rectangle may pass next to a clue or share an edge with another rectangle. Inspect the cells inside its outline; only a second clue inside is forbidden.
A 6 does not insist on 2×3. Factor pairs create possibilities; the board decides the orientation and position.
- Write the factor-pair shapes for a clue’s area.
- Discard shapes that run beyond the grid.
- Discard shapes that include any other printed clue.
- After a rectangle is confirmed, discard candidates that overlap it.
- Draw a rectangle only when one legal candidate remains, then check newly constrained clues.
Finish by covering every cell exactly once
The final partition covers every cell with no overlaps or gaps. Every rectangle has one clue, and its area must match that clue. A rectangle with no clue, or two clues, cannot be part of the finish.
If an awkward gap remains, return to the last rectangle with more than one candidate. On an Easy board, scan the largest clues first: their shapes are often limited by the edge, and one confirmed outline can settle a smaller clue.
Put it into practice
Try an Easy Rectangles Library puzzle and look for one deduction from this guide.
Play RectanglesSign in or create an account to save your progress.