 Hubbard

The rule that crosses borders
Block borders govern which numbers a block holds. They have nothing to do with touching. A cell touches its eight neighbours whether they sit in its own block or in three different ones, and two equal numbers can never be neighbours.
That gives you a deduction most people never reach for. If you can work out that a number must land somewhere inside one block, and every cell it could land in touches some cell in a different block, then that cell cannot hold that number. You never have to know which of the candidate cells it actually lands in. You only have to know that all of them touch.
A board with no free move
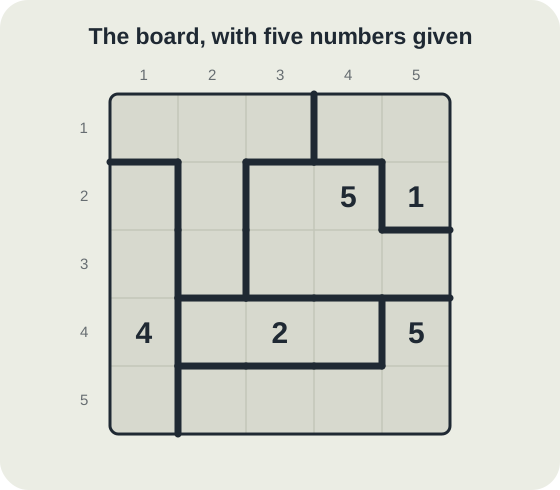
Here is a five by five board with six blocks and five numbers given. In reading order: a 5 at row 2 column 4, a 1 at row 2 column 5, a 4 at row 4 column 1, a 2 at row 4 column 3 and a 5 at row 4 column 5.
Try the usual opening on it. Take each empty cell, list the numbers its block allows, then strike out anything that already sits in the block or touches the cell. Do that for all twenty empty cells and not one of them comes down to a single option. The tightest cell on the board still has two numbers to choose between, and most have more.
So there is no free move, and this is where a lot of boards get abandoned or guessed at.
Start at the smallest block that already has a number in it
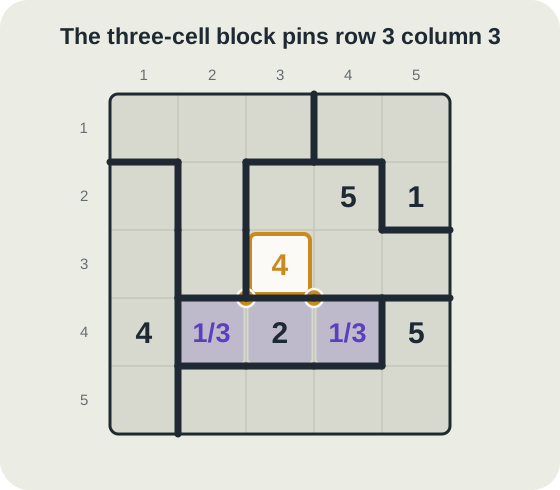
Row 4, columns 2 to 4 is a block of three. It holds 1, 2 and 3, and its 2 is already given at column 3. So the 1 and the 3 fill row 4 column 2 and row 4 column 4, one each, and nothing on this board yet tells you which way round.
It does not matter which way round. Both of those cells sit diagonally below row 3 column 3, so both of them touch it. Wherever the 1 goes it touches row 3 column 3, and wherever the 3 goes it touches row 3 column 3. That cell can hold neither.
Now count what is left to it. Row 3 column 3 belongs to the five-cell block, so it starts with 1 to 5 available. The given 5 at row 2 column 4 is in that same block, which removes the 5. The given 2 at row 4 column 3 is directly below it, which removes the 2. That left 1, 3 and 4, and the three-cell block has just taken the 1 and the 3 away.
Row 3 column 3 is a 4.
Checked, not asserted
This board came out of the game's own generator and it has exactly one solution. That was confirmed twice over: once by the engine's solution counter, and once by an independent brute-force search that knows nothing about the deduction above and only ever re-checks the two published rules.
The placement was then tested the hard way. Put a 1, a 2, a 3 or a 5 in row 3 column 3 and count the finishes: each one gives zero. Not a harder board, not an ambiguous one. No solution exists at all. Only the 4 survives, and it leads to one finish.
The 4 is also the entire cost of the board. With it written in, the remaining nineteen cells fall one after another to plain direct elimination, with no further cross-block reasoning needed anywhere. One deduction buys the whole grid.
The mistake that wrecks the most boards
People arrive from Mini Sudoku and assume a row and a column each hold a number once. Number Neighbours has no such rule. Blocks and touching are the whole of it, and a row can legally repeat a number as long as the two copies are not neighbours.
This board's one finish proves it. Row 1 holds a 3 at column 3 and another 3 at column 5. Row 2 holds a 1 at column 3 and another 1 at column 5. Column 5 holds a 2 at row 3 and another 2 at row 5. Every one of those pairs is legal, because two apart is not touching. Strike a number from a whole row out of habit and you will make the board unsolvable, then spend five minutes wondering which of your earlier entries was wrong.
The second habit is waiting for a big block to fill up before using it. It is backwards. A three-cell block with one number already in it was the strongest thing on this board, because two numbers confined to two cells is a much sharper statement than five numbers loose across five.
Where to play it
Number Neighbours, which appeared as Suguru until the September renaming, is not one of the scored competitive dailies. It turns up as a Just for fun board, and it sits in the Library and in the For You feed, so you can take one at your own pace, leave it and come back, or replay it.
Boards run from five by five up to eight by eight, and the game is timed. If you want the technique without the clock pressure, start on a five by five from the Library.
The in-game hint reasons in exactly the terms above and will tell you when one block is pointing at a cell in another. It costs ten seconds on your clock, so it is worth doing the border check yourself first.
Put it into practice
Try an Easy Number Neighbours Library puzzle and look for one deduction from this guide.
Play a Number Neighbours boardSign in or create an account to save your progress.



