 Hubbard

Turn the question round
Asking what a cell can hold is one question. The other is to pick a block and a number it still needs, then ask which of its cells can take that number. Every block has to place each of its numbers somewhere, so if only one cell is left that can take it, that cell has it, however many other options the cell still shows.
The largest number in a block is the best one to ask about. A 5 can only live in a five-cell block, so every given 5 nearby is a strong constraint, and one given 5 touches up to eight cells at once.
A board where no cell is forced
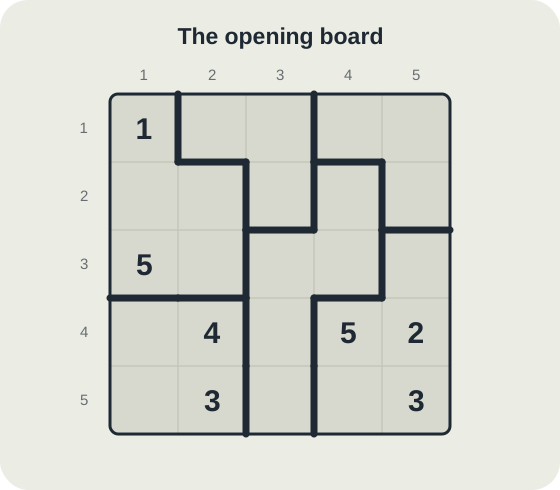
Here is a five by five board with six blocks and seven numbers given. In reading order: a 1 at row 1 column 1, a 5 at row 3 column 1, a 4 at row 4 column 2, a 5 at row 4 column 4, a 2 at row 4 column 5, a 3 at row 5 column 2 and a 3 at row 5 column 5.
Run the cell-by-cell scan over all eighteen empty cells and none of them comes down to one number. The tightest have two options left. Row 2 column 4 has all five, since its block is completely empty and none of its eight neighbours is filled.
That empty block, running from row 2 column 4 down through the middle of the board to row 5 column 3, is where the board opens.
Where can the 5 go?
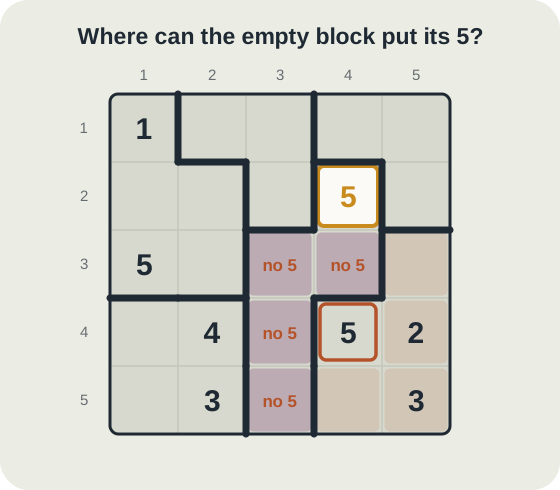
The empty block has five cells: row 2 column 4, row 3 columns 3 and 4, and row 4 and row 5 of column 3. It needs a 5 somewhere.
Now look at the given 5 at row 4 column 4. It sits in the next block along, and touching ignores block borders. Row 3 column 3 touches it at a corner. Row 3 column 4 is directly above it. Row 4 column 3 is directly beside it. Row 5 column 3 touches it at a corner. None of those four cells can hold a 5.
That leaves row 2 column 4, two rows up and out of reach. The block's 5 goes there, in the cell that looked the most open on the board.
Then the 4, then the 3
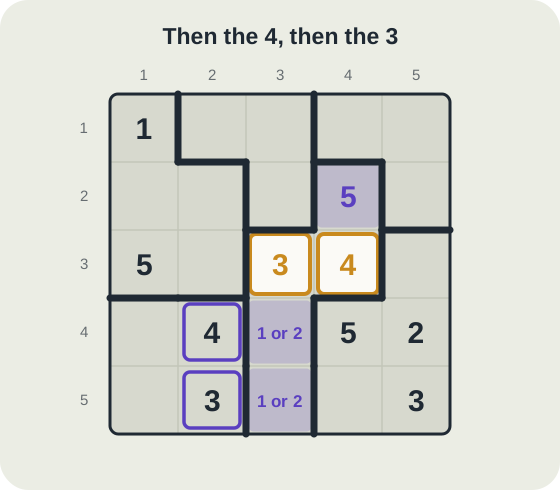
Keep going down the same block. It still needs a 4, and the given 4 at row 4 column 2 touches three of the four open cells: row 3 column 3 at a corner, row 4 column 3 directly beside it and row 5 column 3 at a corner. The 4 goes in row 3 column 4. Cell by cell, that square still shows 1, 3 and 4.
The block still needs a 3. The given 3 at row 5 column 2 touches row 4 column 3 at a corner and row 5 column 3 directly beside it, so the 3 goes in row 3 column 3, which on its own still shows 1, 2 and 3.
Three numbers placed in a block that started empty, and not one of those cells was down to a single option when it was filled. The two cells left in the block take the 1 and the 2, and the rest of the board falls one cell at a time to the ordinary cell-by-cell scan with no further tricks.
Checked, not asserted
The board came from the game's own generator and has exactly one solution. That was confirmed by the engine's solution counter and again by a separate brute-force search that knows nothing about the reasoning above and only checks the two published rules.
Each placement was then tested directly. Put anything other than a 5 in row 2 column 4 and the board has no solution. With the 5 in place, anything other than a 4 in row 3 column 4 leaves no solution, and with both in place, anything other than a 3 in row 3 column 3 leaves none. The engine's own solver also finishes the board from the givens without guessing.
The mistakes that hide this
The first is skipping busy cells. A cell with five candidates feels like a bad bet, so the eye slides past it to cells with two. On this board that means circling the tight cells forever while the answer sits in the widest one.
The second is forgetting corners. Two of the four cells the given 5 rules out, row 3 column 3 and row 5 column 3, touch it only diagonally. Count only the cells directly beside it and you will think the 5 has three homes, not one.
The third is borrowing a Sudoku habit. Number Neighbours has no row or column rule. Two 3s share row 5 on this board's givens, at columns 2 and 5, and that is legal because they do not touch.
Where to play it
Number Neighbours is not one of the scored competitive dailies. It turns up among the Just for fun boards and sits in the Library and the For You feed, so you can take one at your own pace, leave it and come back.
When a board stalls, go block by block and ask where its largest missing number can go before you start listing candidates. The in-game hint uses the same idea, and when it does it will say the cell is the only one left in its block that can take that number.
Put it into practice
Try an Easy Number Neighbours Library puzzle and look for one deduction from this guide.
Play a Number Neighbours boardSign in or create an account to save your progress.



