 Hubbard
Ask where, not what
Mini Sudoku is a 6×6 grid. Every row, every column and every box holds 1 to 6 once each, and the boxes are two rows tall and three columns wide, so the board has six of them.
A candidate scan asks what a square can hold. A box scan asks where a number can go inside one box. Both use the same rules, but the second one can finish a placement while the first is still looking at three possibilities. Throughout this guide, rows are numbered from the top and columns from the left, so row 2 column 3 is the second row down, third square across.
Here is the board. It has 13 given numbers and exactly one solution, which we checked by trying every possible completion.
- Row 1: blank, blank, blank, 5, 4, 6
- Row 2: 6, blank, blank, 2, blank, blank
- Row 3: 2, blank, blank, blank, 6, blank
- Row 4: blank, 4, blank, 1, blank, blank
- Row 5: blank, 1, blank, blank, blank, 4
- Row 6: blank, blank, 5, blank, blank, 2
The top-left box
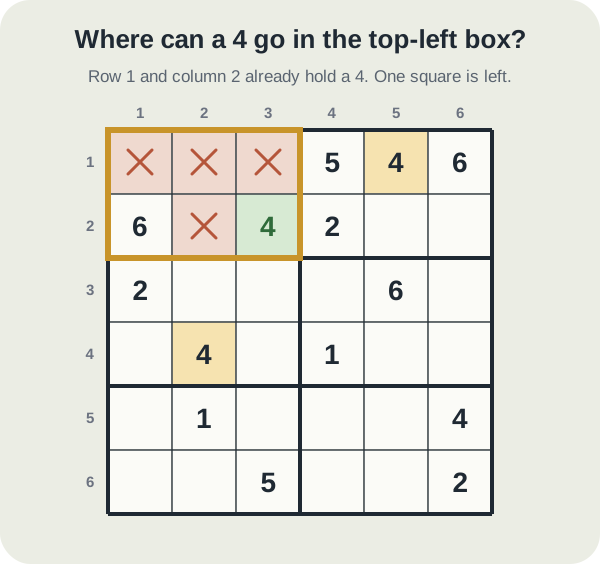
The top-left box covers rows 1 and 2, columns 1 to 3. It has no 4 yet, and it has five empty squares: all three in row 1, then row 2 column 2 and row 2 column 3.
Row 1 already has a 4, at column 5. That 4 sits outside the box, but it still rules out every square of row 1, including the three that fall inside the box. Three squares gone at once.
Column 2 has a 4 at row 4. That rules out row 2 column 2, the last empty square of the box in that column.
One empty square is left, row 2 column 3, so that is where the box's 4 goes.
Why a candidate scan would have walked past it
Look at row 2 column 3 the other way. Its row holds 6 and 2, its column holds 5, and its box holds 6. That leaves 1, 3 and 4 all still possible for the square itself. On a candidate scan it looks unfinished, and you would move on.
The box scan does not care that the square could hold a 1 or a 3. It only asks whether any other square in the box could hold a 4, and none can. When a number has one home left in a box, the square's other candidates stop mattering.
Carry the same 4 into the next boxes
Stay with 4 and move box by box. Three boxes already have one: the top-right box (row 1 column 5), the middle-left box (row 4 column 2) and the bottom-right box (row 5 column 6). Skip those.
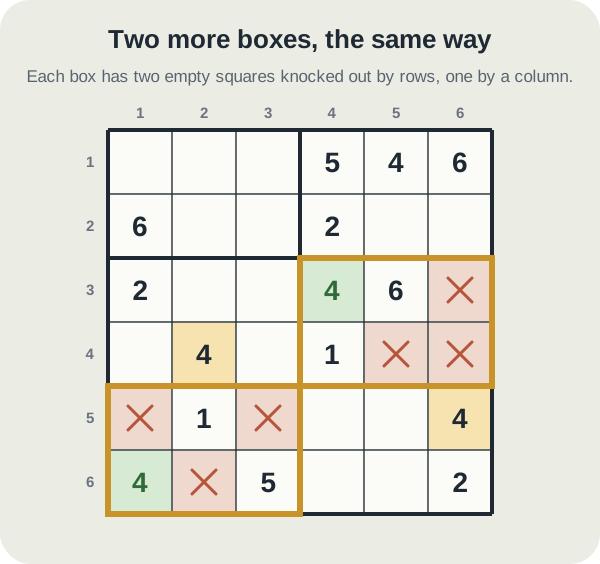
The middle-right box covers rows 3 and 4, columns 4 to 6. Its empty squares are row 3 columns 4 and 6, and row 4 columns 5 and 6. Row 4 has a 4 at column 2, which knocks out both row 4 squares. Column 6 has a 4 at row 5, which knocks out row 3 column 6. The 4 goes in row 3 column 4.
The bottom-left box covers rows 5 and 6, columns 1 to 3. Its empty squares are row 5 columns 1 and 3, and row 6 columns 1 and 2. Row 5 has a 4 at column 6, so both row 5 squares are out. Column 2 has a 4 at row 4, so row 6 column 2 is out. The 4 goes in row 6 column 1.
Notice that the 4 at row 5 column 6 did two jobs: it blocked a column in one box and a row in another. Every copy of your chosen number is worth checking against every box that shares its row or its column.
Six boxes, six 4s
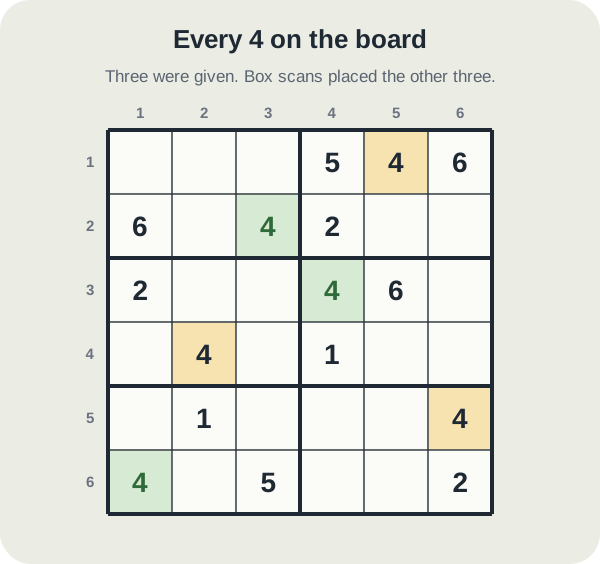
That completes the number. The board started with three 4s and now has all six, one in every row, column and box, and each new one matches the board's only solution.
None of the three was a square with a single candidate. Row 3 column 4 could have held a 3, and so could row 6 column 1. A number sweep found them anyway, in three quick looks.
Then pick the next number and do it again. On this board the same sweep also places a 1, a 2, a 5 and a 6 somewhere, so it keeps paying out well after the 4s are done.
The mistake to avoid
Only looking inside the box. The 4 that cleared the top row of the first box was two squares outside it, and the one that cleared the bottom box sat in a different box altogether. When you scan a box, look along each of its two rows and each of its three columns right to the edge of the board.
The opposite slip is just as common: counting a square as blocked because a 4 is close by, when that 4 is actually one row up or one column over. A square is ruled out only by a 4 in its own row, its own column or its own box.
On a timed board the order helps as well. Sweep one number across all six boxes before switching to the next, and you will not keep re-reading the same rows for different digits.
Put it into practice
Try an Easy Mini Sudoku Library puzzle and look for one deduction from this guide.
Play a Mini Sudoku boardSign in or create an account to save your progress.



