 Hubbard

Two kinds of bigger
More or Less is our Futoshiki game. On a 4×4 board every row and every column holds 1, 2, 3 and 4 once each. A sign between two squares is a comparison, and its pointed end always faces the smaller number.
Take a square with two signs pointing away from it, towards two neighbours. What that tells you depends on where the neighbours are.
If both neighbours are in the same row, they are two different numbers, because a row never repeats. The square has to beat two different numbers, so it is at least 3. The same holds when both neighbours are in its column. Call this a peak.
If one neighbour is in the row and the other is in the column, they share no row and no column. Nothing stops them holding the same number. Both could be 1, so the square only has to be at least 2. Call this a corner.
Throughout this guide, rows are numbered from the top and columns from the left.
- Peak: two smaller neighbours in one line, so at least 3.
- Corner: one smaller neighbour in the row, one in the column, so only at least 2.
- Even a square bigger than all four neighbours is only guaranteed to be at least 3, since the row pair and the column pair can repeat each other.
The board
This board has two given numbers and four signs. We checked it has exactly one solution by trying every possible completion, and each of the four signs is needed: remove any one of them and the board has more than one answer.
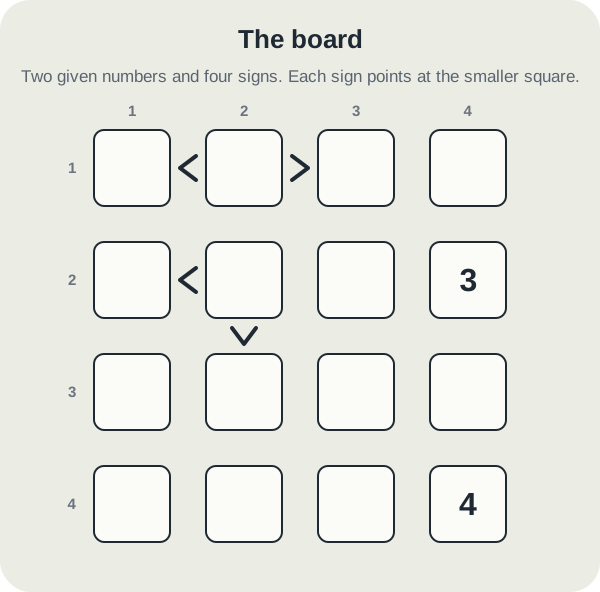
- Row 2 column 4 is 3, and row 4 column 4 is 4.
- Row 1: column 2 is bigger than column 1 and bigger than column 3. That is a peak.
- Row 2 column 2 is bigger than row 2 column 1 and bigger than row 3 column 2. That is a corner.
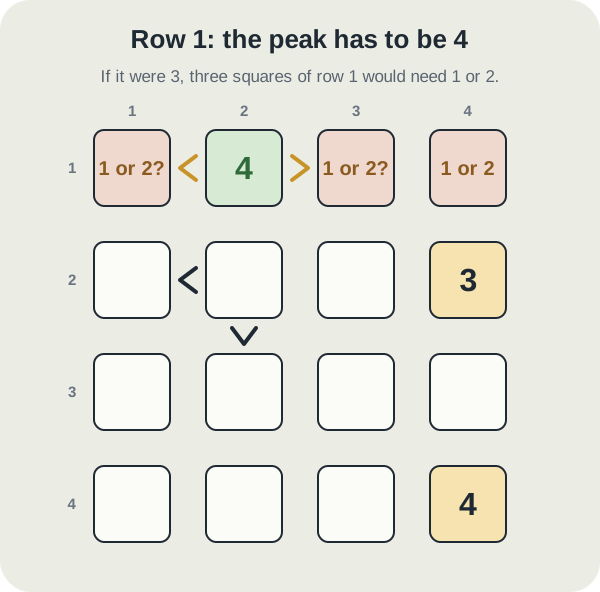
The peak in row 1 is a 4
Row 1 column 2 is a peak, so it is 3 or 4. The peak rule on its own stops there, but row 1 has a fourth square that tightens it.
Column 4 already holds 3 and 4, so row 1 column 4 can only be 1 or 2.
Now suppose the peak were 3. Columns 1 and 3 of row 1 would both have to be below 3, so they would be 1 and 2 in some order. Column 4 also needs 1 or 2. That is three squares sharing two numbers, which a row cannot do. The peak is 4.
The peak rule says how many numbers must fit below a square. The count works best when you add in every other square of the line that is also stuck below the same value.
The corner is a 2, and both its neighbours are 1
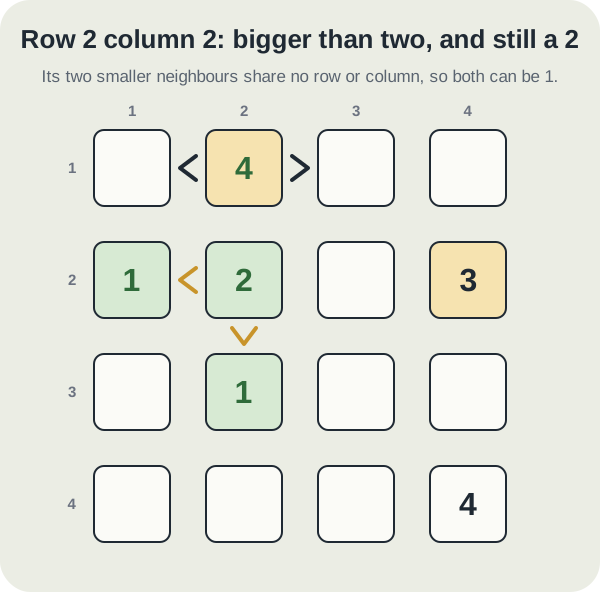
Row 2 column 2 is a corner: its smaller neighbours are row 2 column 1, in its row, and row 3 column 2, in its column.
Row 2 already has a 3 at column 4. Column 2 now has the 4 we just placed. That leaves 1 or 2, and a square that is bigger than something cannot be 1. Row 2 column 2 is 2.
Both of its smaller neighbours must be below 2, so row 2 column 1 is 1 and row 3 column 2 is 1. Two 1s side by side on the diagonal is fine, because they sit in different rows and different columns.
The mistake this board catches
Read the corner as if it were a peak and you rule out 2 straight away, on the grounds that it needs two different numbers below it. That leaves 3 and 4, but row 2 already has a 3 and column 2 already has a 4. The square has no legal value, and the natural conclusion is that an earlier step was wrong.
Nothing earlier was wrong. The only faulty step was treating a row neighbour and a column neighbour as if they had to differ. On a timed board that kind of false contradiction is costly, because it sends you back to undo correct work.
Finishing the board
Every remaining step is a single: a square with only one number left, or a number with only one square left.
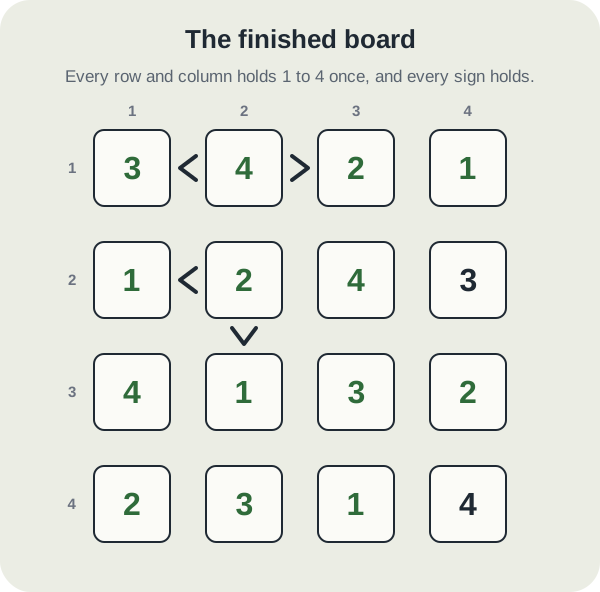
- Row 2 reads 1, 2, blank, 3, so row 2 column 3 is 4.
- Column 2 has 4, 2 and 1, so row 4 column 2 is 3.
- Row 3 column 4 must be 1 or 2, because column 4 holds 3 and 4. Row 3 already has a 1, so it is 2, and row 1 column 4 becomes 1.
- Row 3 columns 1 and 3 need 3 and 4. Column 3 has a 4 in row 2, so row 3 column 3 is 3 and row 3 column 1 is 4.
- Row 4 columns 1 and 3 need 1 and 2. Column 1 has a 1 in row 2, so row 4 column 1 is 2 and row 4 column 3 is 1.
- Column 1 now has 1, 4 and 2, so row 1 column 1 is 3, and row 1 column 3 is 2. Row 1 reads 3, 4, 2, 1, and both signs hold.
Check it on your next board
Before placing anything, look for squares with two signs pointing away from them and ask where the two neighbours are. The same test works in reverse for a square with two signs pointing at it: in one line it is at most 2 on a 4×4 board, while at a corner it only has to be below 4. Larger boards use more numbers, but the reasoning is the same: count the different numbers that must fit below or above the square, and only count two neighbours as different when they share a row or column.
- Two signs pointing away, same line: at least 3.
- Two signs pointing away, one in the row and one in the column: at least 2.
- Then add every other square in that line that is stuck on the same side, as row 1 did.
Put it into practice
Try an Easy More or Less Library puzzle and look for one deduction from this guide.
Play a More or Less boardSign in or create an account to save your progress.



