 Hubbard
What a tap does
You tap any group of two or more tiles of the same colour that touch along a side. Corners do not count. The whole group disappears, every tile above a gap falls straight down to fill it, and if a column empties completely, the columns to its right slide left to close the space.
A single tile with no matching neighbour cannot be tapped at all. The round ends when no group of two is left anywhere, and your result is the number of tiles still on the board. Zero is a full clear.
That scoring matters for everything below. There is no bonus for removing a big group in one go. Six tiles in one tap and six tiles in three taps of two are worth exactly the same, so the only question is which order leaves the fewest tiles at the end.
The board
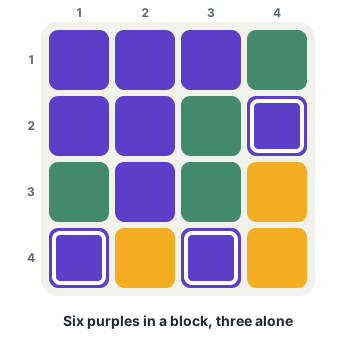
Here is an original four by four board with three colours: nine purple, four green and three amber. Real boards are bigger, but the idea is the same at every size.
Six of the purples sit in one connected block across the top left. The other three are on their own: one at row 2, column 4, and two in the bottom row, at columns 1 and 3. Each of those three touches no other purple, so none of them can be tapped yet.
Only three moves are legal on this board: the purple block of six, the green pair in column 3, and the amber pair in column 4.
Tap the block first and a full clear is gone
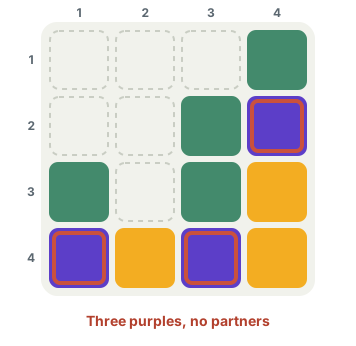
The purple block is the tempting move. It takes out six of the sixteen tiles in one go and leaves the board looking much emptier.
Look at what it leaves behind, though: the three lone purples, and no purple group for any of them to join. They can only ever pair up with each other, and the greens and ambers in between keep them apart. An exhaustive search of every possible move order after this tap finds only two ways the round can end, with three tiles left or with four. A purple is stranded in both.
The amber pair is no better. Open with that and the best you can do from there is also three tiles left. Of the three legal first moves, two rule out a full clear before the second tap.
Tap the small green pair instead
The green pair in column 3 is the only opening that still allows a full clear, and the reason is gravity.
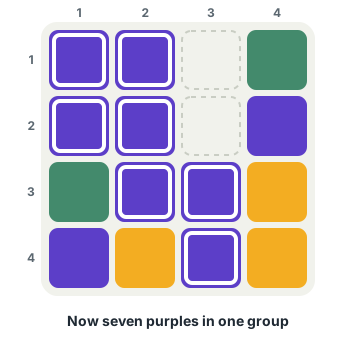
Removing those two greens leaves a gap in column 3, and the purple at the top of that column falls two rows. It lands at row 3, column 3, where it touches the purple block on its left and the lone purple directly below it. The block does not shrink. It grows from six to seven, and one of the stranded purples is now part of it.
From there the board clears in four more taps. Tap the seven purples. Column 3 empties, so column 4 slides left, which brings the two ambers at the bottom of that column up against the amber left in column 2. Tap those three ambers and the remaining two greens and two purples settle into a pair each on the bottom two rows. Tap the greens, then the purples, and the board is empty: five taps in all.
The lone purple from row 2, column 4 ends up beside the purple from row 4, column 1. It got there by falling and by columns closing left, never by a tap of its own.
The habit that finds it
Before you tap a big group, count the tiles of that colour that are not in it. Each one will need a new partner once the group has gone, and that partner has to come from somewhere.
If the count is high, treat the big group as something to grow rather than something to spend. Look for a small tap that will drop the lone tile, or the group, into contact with the other. Remove the tiles standing between a stray and its colour first, and tap the big group last, once it has collected everything it can.
In this board the check takes a few seconds: three purples outside the block, a green pair directly under the top purple of column 3, and a lone purple waiting beneath that pair.
- Size earns nothing on its own. Your result is only the number of tiles left.
- Count the stragglers of a colour before you tap its biggest group.
- Tap what is in between first, so gravity carries lone tiles into the group.
- Remember that an empty column pulls everything on its right one column left. That can bring two far apart tiles together.
Where to play it
Group Drop is in the Library and For You, and it appears as a Just for fun daily. It is not one of the competitive league games, so no league points ride on it: it is there to be played carefully.
Easier boards are 6 by 6 with three colours. Harder ones grow to 7 by 7 and then 8 by 8, with up to five colours, which means more stragglers and more reason to count them. Each board allows three restarts of the same layout, so if an opening goes wrong you can start the board again and try the other order. A hint shows you one legal group; it does not work out the best order for you, so the counting is still your job.
Put it into practice
Try an Easy Group Drop Library puzzle and look for one deduction from this guide.
Play a Group Drop boardSign in or create an account to save your progress.



