 Hubbard

From one region in one row to two in two
A finished Blooms board has one bloom in every row, every column and every colour region, and no two blooms touch, not even at a corner.
Start with the version you may already use. If every open square of a region lies in row 4, the region's bloom must go in row 4. Row 4 only gets one bloom, so it is the region's, and every square in row 4 outside that region is ruled out.
Now take two regions whose open squares all lie in rows 1 and 2. Between them they need two blooms, and those blooms can only land in rows 1 and 2. Rows 1 and 2 hold exactly two blooms in total. So both of those blooms belong to the two regions, and no other region can use either row. Every square in rows 1 and 2 outside the pair is ruled out.
The same argument works for columns, and for three regions confined to three rows. Two is the size you will actually meet during a timed solve, because it is small enough to see at a glance.
The board
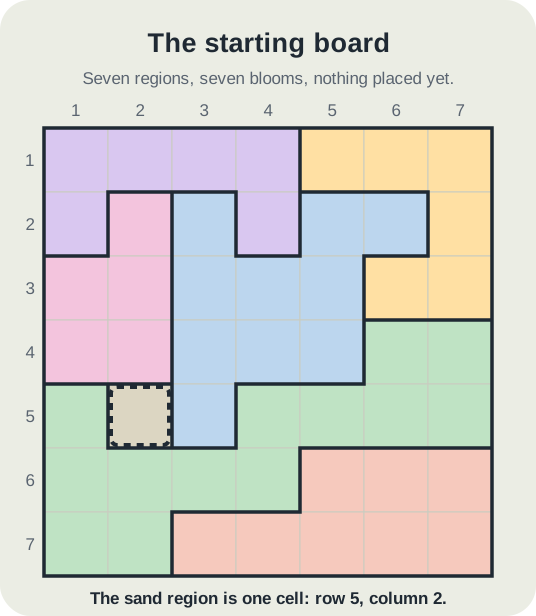
Seven by seven, seven regions, nothing placed. The board has exactly one solution, checked by testing every one of the 5,040 ways to put one bloom in each row and column.
The sand region is a single square at row 5, column 2, so the first bloom is free. Lavender and amber share the top two rows, but at the start neither is confined to them: lavender reaches down to row 2 on the left and amber reaches row 3 on the right.
Two blooms without a choice
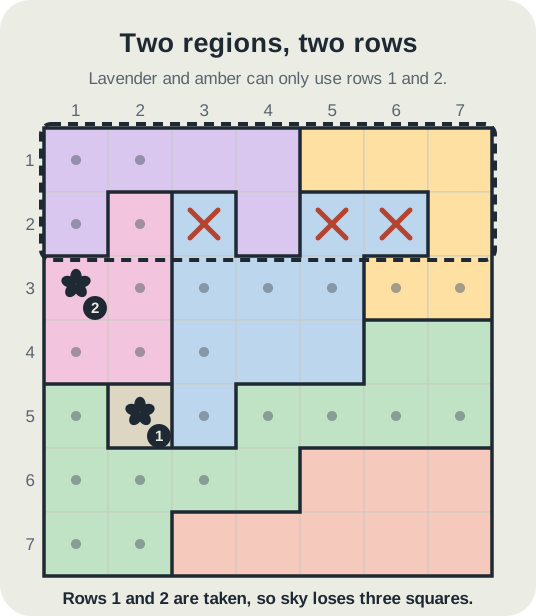
Bloom 1 goes in the sand square at row 5, column 2. That spends row 5 and column 2, and rules out the eight squares around it.
Pink has five squares: row 2 column 2, row 3 columns 1 and 2, and row 4 columns 1 and 2. Three of them are in column 2, which is spent. Row 4, column 1 touches bloom 1 at a corner. Only row 3, column 1 survives, so bloom 2 goes there, spending row 3 and column 1.
Now the singles stop. Every row, column and region left has at least two open squares, and no region sits inside a single row or column. This is where players start guessing.
Spotting the pair
Look at lavender. Column 1 is spent, which removes row 1 column 1 and row 2 column 1. Column 2 is spent, which removes row 1 column 2. What is left is row 1 columns 3 and 4, and row 2 column 4.
Look at amber. Its two squares in row 3 went when bloom 2 spent that row. What is left is row 1 columns 5, 6 and 7, and row 2 column 7.
Neither region is inside one row, so the single-row shortcut says nothing about either of them. Taken together, though, every open square of lavender and amber is in rows 1 and 2. Those two rows hold two blooms, and those two regions need two blooms with nowhere else to put them. Rows 1 and 2 are theirs.
Three squares go at once: the sky squares at row 2, columns 3, 5 and 6. Sky has to find its bloom somewhere else.
Notice that amber only became confined when bloom 2 used up row 3. A pair often appears after a placement rather than at the start, so look again each time a row or column is spent.
The rest follows in order
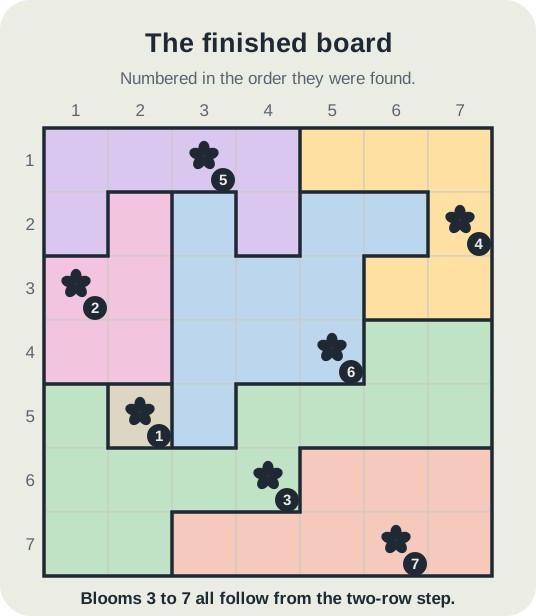
Sky has ten squares. The three in row 2 have just gone. Row 3 and row 5 are spent, which removes four more, and row 4, column 3 touches bloom 1. Only row 4, columns 4 and 5 remain, both in row 4. That is the one-region shortcut: row 4 belongs to sky, so mint loses row 4, columns 6 and 7.
Mint has thirteen squares, and they fall away quickly. Row 5 is spent, columns 1 and 2 are spent, row 6 column 3 touches bloom 1, and the two row 4 squares have just gone. Row 6, column 4 is all that is left. Bloom 3.
Row 2 is now down to one square. Columns 1, 2 and 4 are spent, and the pair step removed columns 3, 5 and 6. Bloom 4 goes at row 2, column 7, and that is amber's.
Row 1 is down to one as well. Columns 1, 2 and 4 are spent and amber is done, so bloom 5 goes at row 1, column 3 for lavender. Notice that the pair did not tell you which region took which row. The board settled that later, through row 2.
Row 4 has only column 5 left, since column 4 went with bloom 3. Bloom 6 is sky's. Row 7 then has one column left, column 6, and bloom 7 goes there in salmon. It sits two columns away from bloom 3, so they do not touch.
Seven blooms, seven regions, and only one step that was not a straightforward single.
The mistakes that break it
The first is counting a region that is nearly confined. If amber still had one open square in row 3, the pair would prove nothing, because amber's bloom could go there and leave row 2 free for sky. Every open square of both regions has to be inside the two rows. One stray square cancels the whole step.
The second is reading more into the pair than it gives. It tells you the two rows are taken by those two regions. It does not tell you which region goes in which row. Lavender looks like a row 1 region, and here it did end up there, but at the moment of the pair step it still had an open square in row 2. Placing it on instinct is a guess, and on another board the same instinct is wrong.
A single region spread over two rows tells you nothing by itself. It is the partner that makes the count work: two regions, two rows, two blooms.
Where to try it
Blooms is one of the competitive daily games and it is scored on time, so a step that replaces a guess is worth seconds on the standings. The habit is short: whenever the singles dry up, look for two regions whose open squares sit in the same two rows, then do the same for columns.
Library boards do not count towards the daily standings, which makes them a good place to practise the scan before you rely on it against the clock.
Put it into practice
Try an Easy Blooms Library puzzle and look for one deduction from this guide.
Play a Blooms boardSign in or create an account to save your progress.



