 Hubbard
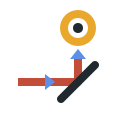
What is actually on the board
The beam enters from one edge and travels in a straight line until something interrupts it. A mirror turns it. A wall stops it dead. The receiver ends the board, and reaching it checks your answer on its own, with no submit step.
Mirrors have two angles and you tap to swap between them: a forward slash and a backslash. Nothing else on the board moves. Walls and the receiver are fixed from the moment the board opens.
An empty square does nothing at all, which matters more than it sounds. The beam runs straight through a square it has already passed through, so a route is allowed to cross itself. Every Beam Route board above the easy tier is built to contain at least one of those crossings.
Boards published since 11 September are timed and need at least eight turns to solve. Older boards still count your moves instead, and the two units are never compared against each other in your results.
One rule about mirrors does most of the work
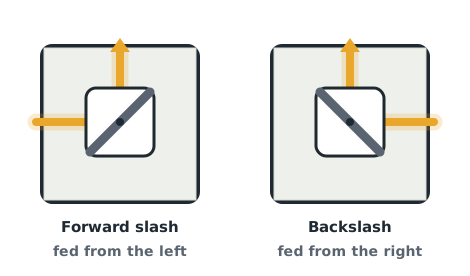
A forward slash sends an upward beam right, a rightward beam up, a downward beam left and a leftward beam down. A backslash sends an upward beam left, a leftward beam up, a rightward beam down and a downward beam right.
Read those eight cases again and one thing holds across all of them. The beam always changes axis. A beam that arrives travelling vertically leaves travelling horizontally, and the other way round. No mirror lets a beam carry on the way it came, and none sends it back the way it arrived.
That turns every mirror into a two-way lookup. If you know which direction the beam has to leave by, you know it must have arrived along the other axis, and each of the two possible arrival sides picks out exactly one angle. Knowing the output is almost as good as knowing the answer.
A small board to try it on
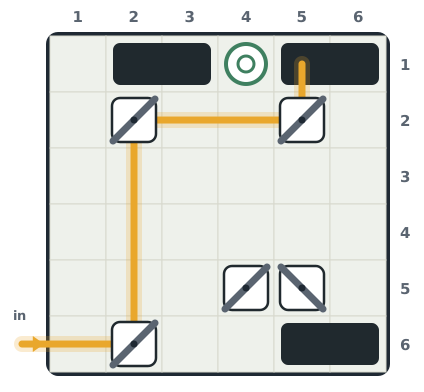
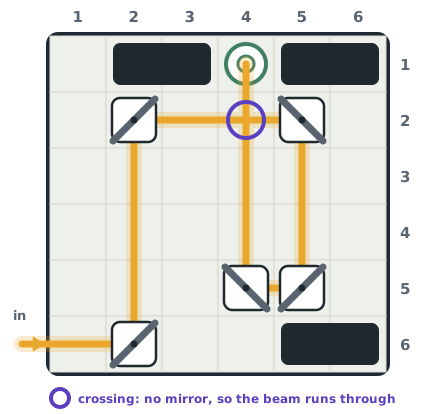
Six by six, five mirrors, three wall blocks, and a receiver on the top edge at row 1 column 4. The beam enters row 6 from the left. I wrote this board for the guide rather than taking one from the catalogue, and checked all thirty-two possible mirror settings against the game engine. Exactly one of them reaches the receiver.
As the board opens, the beam already travels a long way. Up column 2, right along row 2, and then straight into the wall at row 1 column 5. One square from the receiver and completely wrong.
That near miss is the trap. The mirror the beam just hit is genuinely at the wrong angle, but the picture in front of you does not say which way to turn it, and turning it moves everything after it.
Start at the receiver, not the source
The receiver always sits on the border of the grid. That rules out one of the four approaches before you look at anything else, and a receiver in a corner rules out two.
This one is at row 1 column 4, on the top edge, so nothing can drop into it from above. Three approaches are left: along row 1 from the left, along row 1 from the right, or up column 4.
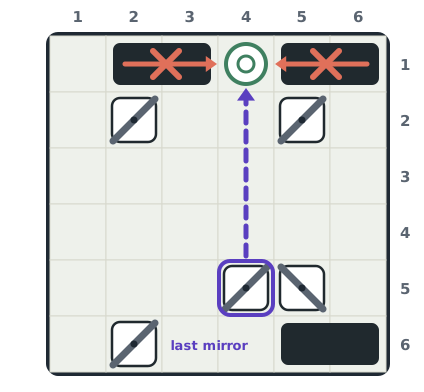
Row 1 is closed on both sides. The wall pair at columns 2 and 3 stops anything travelling right before it arrives, and the pair at columns 5 and 6 stops anything travelling left. The beam has to arrive travelling up column 4, and that is settled before you have touched a mirror.
Now look down column 4 from the receiver. Rows 2, 3 and 4 are empty squares. Row 5 column 4 holds a mirror, and it is therefore the last mirror on the route, whatever the rest of the board turns out to do.
Now the angles are forced
The last mirror has to send the beam upward, so by the axis rule it must be fed horizontally, never from above or below. Fed from the left it needs a forward slash. Fed from the right it needs a backslash. Only one of those is available.
Look along row 5. To the left of that mirror, columns 1 to 3 are empty squares, and nothing enters row 5 from the left edge, so no beam on that row can ever be travelling rightward by the time it arrives. To the right sits another mirror, at row 5 column 5. The feed comes from the right, so the last mirror is a backslash.
Its neighbour goes the same way. The mirror at row 5 column 5 has to send the beam leftward, so it must be fed vertically. From below is impossible, because row 6 column 5 is a wall. It is fed from above, travelling down, and a downward beam turns left on a forward slash.
Keep walking backwards and the board runs out of choices.
- Row 5 column 4 is a backslash. It must send the beam up, and its only possible feed is from the right.
- Row 5 column 5 is a forward slash. It must send the beam left, and the wall below it rules out a feed from underneath.
- Row 2 column 5 is a backslash. It must send the beam down column 5, and the only mirror that can reach it along row 2 sits to its left.
- Row 2 column 2 is a forward slash. It must send the beam right, and the wall at row 1 column 2 rules out a feed from above.
- Row 6 column 2 is a forward slash. It must send the beam up, and the source entering row 6 from the left is the only thing that can feed it.
The finished route
Two of the five mirrors were already at the right angle when the board opened, so the whole board takes three turns. The engine agrees that three is the minimum from this starting position.
The beam runs up column 2, right along row 2, down column 5, left along row 5, and finally up column 4, passing back through row 2 column 4 on the way. That square is the crossing. It holds no mirror, so the beam goes straight through a stretch it laid down earlier in its own route.
The mistake worth naming
Chasing the beam forward feels productive, because the beam visibly gets longer as you go. On this board the opening position already sends it nine squares. A beam that ends at a wall only tells you that something before it is wrong, and it does not say which mirror or which way.
Every turn you make and then undo is a turn you paid for. On a timed board it is also time on the clock that does not come back. Reading the receiver end costs nothing and settles the last mirror whenever the walls around it leave one open approach, which is common, because the receiver is on an edge on every board.
On a full-sized board
Real boards are bigger than this one. The easy tier is eight by eight with ten mirrors, the middle tier nine by nine with twelve, and the hardest tier ten by ten with fourteen. Every board published since 11 September needs at least eight turns, and the generator proves that minimum by searching every route the mirrors can produce, shortcuts included.
The method does not change with size. Walls never move and the receiver never moves, so the approach into the receiver is the one part of the board you can read before touching anything. Work backwards from there for as long as the walls keep the choice down to one, then meet the beam coming forward from the source.
If you stall, a hint marks one mirror that is not yet at its solved angle and leaves you to turn it yourself. On a timed board it adds ten seconds to your clock, which is a reason to spend a few of those seconds at the receiver end first.
Put it into practice
Try an Easy Beam Route Library puzzle and look for one deduction from this guide.
Play a Beam Route boardSign in or create an account to save your progress.



