 Hubbard

The squares behind you have to stay in one piece
A finished Trail is one line that passes through every square exactly once, moving up, down, left or right, and touches the numbers in order from 1 to the last. Nothing else is required, and nothing else is allowed.
Think about what that means halfway through. Everything still to be drawn has to run through the squares you have not used, one step at a time, starting next to where the line ends now. A line that runs through empty squares can only ever stay inside one connected group of them. So if the empty squares fall into two groups with no empty square joining them, the line can finish one group or the other, never both.
That gives the first check. Before a move, picture the square you are about to take as filled. If the empty squares that remain are no longer all joined up, the move is wrong. It does not matter whether the next number looks close or whether the move feels natural. The board cannot be finished from there.
The smaller version: a square with one way in
The second check catches the same mistake before it becomes a clean split. Every empty square except the last number has to be entered and then left again, so it needs two open neighbours: two squares next to it that are still empty, or empty plus the end of the line itself.
If a move leaves some empty square with only one open neighbour, the line could reach it but never get out again. That square could only be the very end of the trail, and the end of the trail is always the highest number. So unless that square holds the last number, the move is wrong.
This is the same idea as the corner rule in the earlier Trail guide, where a corner has only two neighbours and must use both. The difference is that corners are fixed from the start, while squares like this are created by your own moves. A square on the edge becomes a corner the moment the line fills the square beside it.
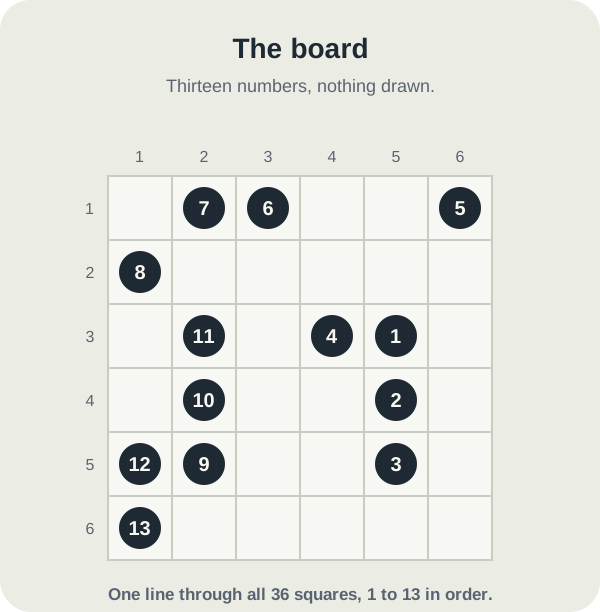
The board
Six by six, thirty-six squares, thirteen numbers. The 1 is in row 3, column 5, and the 13 is in the bottom-left corner. The board has exactly one solution.
This guide is about one moment on it, so take the start as given: from the 1 the correct trail steps right, turns down, then comes back left onto the 2 and drops straight down onto the 3. That opening is the true start of this board. Working out why takes longer than the point this guide is making, so it is shown drawn rather than argued.
Three ways out of the 3
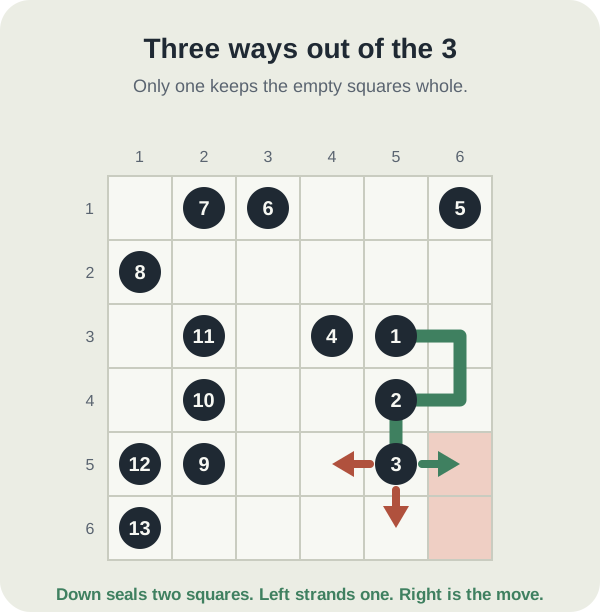
The line now ends on the 3, in row 5, column 5. Three squares next to it are empty: row 6 column 5 below, row 5 column 4 to the left, and row 5 column 6 to the right.
Down fails the first check. Fill row 6 column 5 and look at the bottom-right corner. Row 5 column 6 touches the line above it and the 3 beside it, both used, so its only empty neighbour is the corner. The corner touches only row 5 column 6 and the square you just filled. Those two squares are now a group of their own, joined to nothing, and the line cannot reach them.
Left fails the second check. Fill row 5 column 4 instead and look at row 5 column 6 again. The square above it and the 3 beside it are both used, which leaves the corner below as its only open neighbour. It can be entered but never left, and it does not hold the 13, so the move is wrong.
Right is the only move left, and both checks pass. The line steps to row 5 column 6, and from there the corner is the only way on, exactly as the corner rule says it should be. An exhaustive search of the board agrees: after down or left there is no way to finish, and after right there is exactly one.
The mistake: heading for the next number
Look at where the 4 is. It sits in row 3, column 4, up and to the left of the 3. The move that points towards it is left, and left is the tempting one, because the eye goes straight from one number to the next and the hand follows.
The correct move goes the other way, into the corner and away from the 4, and the trail only reaches the 4 after a detour along the bottom row and back up column 4. On a timed board that detour feels like wasted time, so it is easy to skip it, draw towards the number, and find out several moves later that a square in the bottom right has been left behind.
The numbers tell you the order. They do not tell you the route. Before each move towards a number, glance at the squares the move leaves behind first.
The same check a few moves later
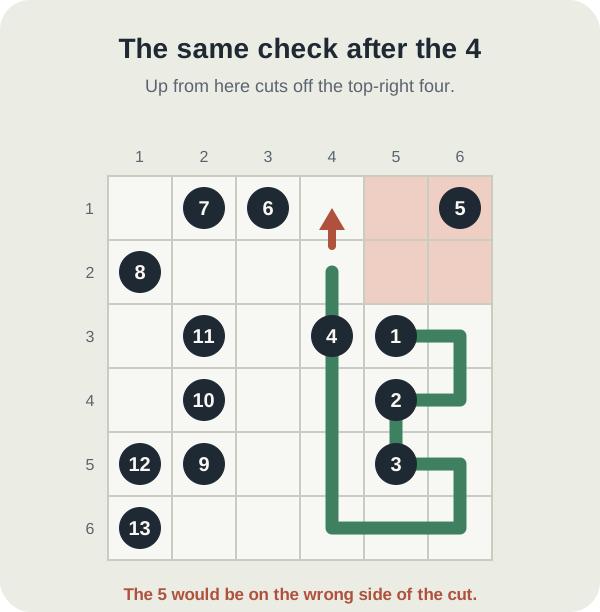
Follow the correct trail on: into the bottom-right corner, left along row 6 to column 4, up column 4 through the 4, and one more square up to row 2, column 4. The next number is the 5, in the top-right corner.
Going straight up to row 1 column 4 fails the first check. The four squares in the top right, row 1 and row 2 in columns 5 and 6, would lose their last link to the rest of the board, and the 5 is one of them. The line would have cut its own next number off.
That move is out. The correct trail turns right along row 2 and climbs into the corner onto the 5, then runs back along the top row.
The finished trail
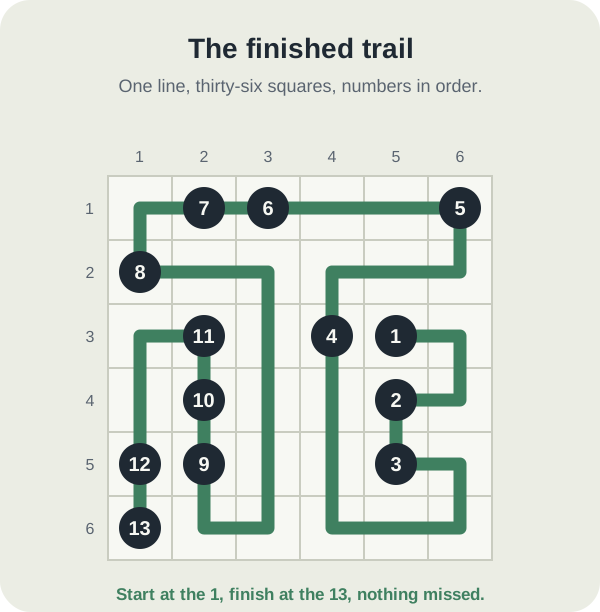
From the 5 the trail runs along row 1 through the 6 and the 7 into the top-left corner, down to the 8, and then winds through the left-hand columns to the 12 before finishing on the 13. Every one of the thirty-six squares is used once and the numbers come in order.
The two checks do not solve a board on their own. At several points on this one they leave two moves standing and the numbers have to decide. What they do is remove the moves that look fine and are already lost, which on a timed board are the expensive ones, because you only find out about them when you have to rub the line back.
Where to practise it
Trail is one of the competitive dailies, so the daily board is timed and counts towards that day's standings. Library boards are a cheaper place to build the habit. Pick a Trail board there and, before each move, say to yourself which squares the move would leave behind. It slows you down for a few boards and then stops costing anything at all.
Put it into practice
Try an Easy Trail Library puzzle and look for one deduction from this guide.
Play a Trail boardSign in or create an account to save your progress.



