 Hubbard
Why two dead ends cannot join
A finished Pipes board is one network. Every arm meets an arm on the neighbouring tile, every tile is connected to every other, and there is no closed loop.
A dead end has one arm and nothing else. If it points at another dead end and that tile points back, the pair is joined, and both of them have used their only arm on each other. Nothing else can ever reach them. The two tiles are a finished network of their own, cut off from the rest of the board, which breaks the one-network rule.
So whenever two dead ends sit side by side, cross off the rotation that has either one pointing at the other. The rule holds anywhere on the board, and it matters most on a board with plenty of dead ends in a cluster. The only exception would be a board of exactly two tiles, which you will not meet.
The board
Four by four, sixteen tiles, shown scrambled. The whole top row is dead ends, and there are five in total. The board has exactly one solution, checked with the game's own solver and separately by trying every combination of rotations that keeps each arm on the board.
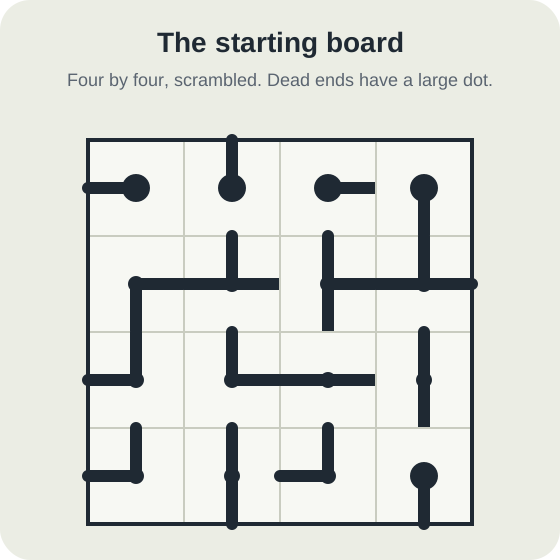
Start with the walls, as the earlier Pipes guide describes. The T-piece on the right edge of row 2 turns its gap to the wall. The straight on the right edge of row 3 stands upright and the straight in the middle of the bottom row lies flat. The elbow in the bottom-left corner points up and right.
Twelve tiles from matching arms
Now follow each settled arm to the tile it touches, since that tile must reach back. The flat straight on the bottom row points right, so the elbow beside it must point left, which leaves it pointing up and left. That elbow no longer points right, so the dead end in the bottom-right corner cannot point left and must point up.
Up the right side, the T-piece in row 2 points up, so the top-right dead end points down. Up the left side, the corner elbow points up, so the elbow above it must point down, and on the left edge that means down and right. It then points right into row 3 column 2, which must point left and cannot point down, because the flat straight below it has no arm going up. That settles it as up and left.
The elbow in row 3 column 1 does not point up, so the elbow in row 2 above it cannot point down: it points up and right. That sends the top-left dead end down. Finally the upright straight in row 3 column 3 is forced by the elbow below it, which points up.
That is twelve tiles. The last four sit in a square in the top middle: the two dead ends in row 1, columns 2 and 3, and the two T-pieces below them. Each still has two rotations, and every arm they could offer finds a partner.
The deduction that finishes it
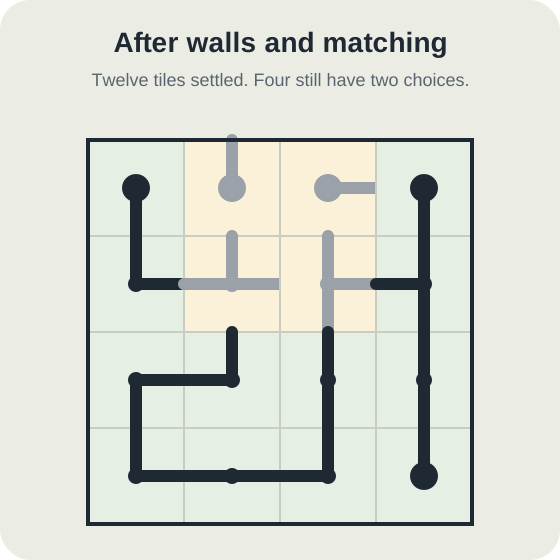
Look at what the four tiles need. Both T-pieces must reach down, because the tiles below them point up. The left T-piece must reach left and the right one must reach right, because their outer neighbours already point in. So the only open question is the middle: either the two T-pieces join each other, or they both reach up to the dead ends above.
If the T-pieces join each other, they have no arm left pointing up, so the two dead ends cannot point down. The left dead end cannot point left either, because the top-left dead end points down and has nothing to meet it. The same holds on the right. The only rotation left for each is to face the other. That is two dead ends joined, which we have just ruled out.
So the T-pieces do not join. Both reach up, the left one pointing up, down and left, the right one pointing up, down and right, and both top dead ends point down to meet them. The board is finished.
The mistake: a finish where every arm meets
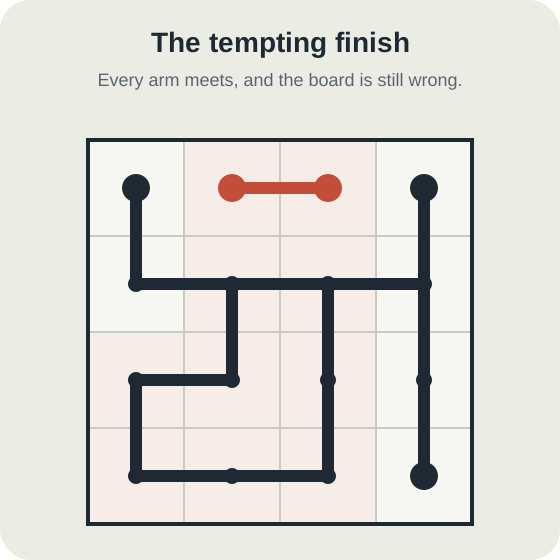
The wrong finish is easy to reach because it passes the check most players make by eye. Turn the two middle dead ends to face each other and the T-pieces to face each other, and every arm on the board meets another arm. Nothing points at a wall. Nothing points at an empty side.
The board is still not solved, and it fails twice. The two dead ends are a separate network. And because they have taken a join away from everything else, the remaining fourteen tiles close into a loop of eight tiles running round the lower middle of the board. A tree of fourteen tiles has thirteen joins; these fourteen have fourteen, so a loop is unavoidable.
If a board looks complete and the game has not accepted it, look for exactly this: a pair of dead ends facing each other, or a small ring of tiles. Either one means a join is in the wrong place.
Using it on a real board
When a board stalls, list the dead ends that are neighbours and cross off any rotation that makes one face the other. It is quickest to check whenever a wall or a settled tile leaves a dead end with two rotations, since the rule then often picks one outright.
The same thinking extends a little further. Any small group of tiles whose arms are all used up among themselves is a network of its own. A dead end joined to a straight joined to a dead end is exactly as cut off as two dead ends touching. The two-dead-end case is simply the one you can spot at a glance.
Pipes is timed, so a board you misjudge costs seconds rather than a wrong guess. Checking for facing dead ends before you rotate the last few tiles is usually quicker than hunting for the fault afterwards.
Put it into practice
Try an Easy Pipes Library puzzle and look for one deduction from this guide.
Play a Pipes boardSign in or create an account to save your progress.



