 Hubbard

Why a short run gives you nothing at first
In an empty row of six, a run of 3 can start at square 1, 2, 3 or 4. Pushed left it covers squares 1 to 3, pushed right it covers 4 to 6, and those two positions share no square. With nothing in common there is no overlap, and every square in the row is still undecided.
That is not a dead end. It only means this row has to wait for a crossing column to tell it something. The moment one of its squares is known to be filled, the four possible positions shrink to the few that include that square.
Measure the reach from a filled square
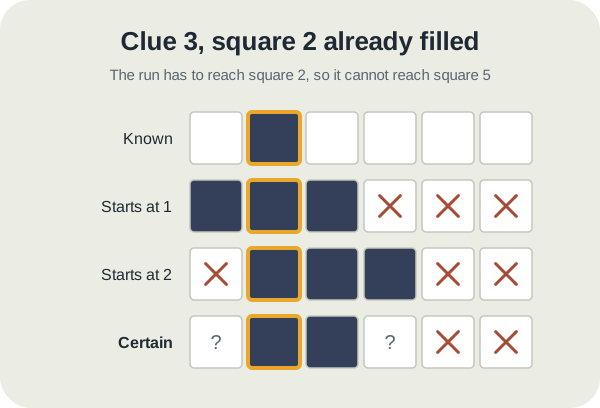
Suppose a column tells you that square 2 of that row is filled. The run of 3 has to include square 2, so it can start at square 1 or square 2, and nowhere else. Starting at square 3 or later would leave square 2 outside the run.
Both surviving positions fill squares 2 and 3, and neither reaches square 5 or 6. So you can fill square 3 and mark squares 5 and 6 with ×. Squares 1 and 4 stay undecided, because one position uses square 1 and the other uses square 4.
The general rule is that a run of length L that includes a filled square can stretch at most L minus 1 squares either side of it. Anything further away cannot belong to that run. When the row has only one clue, anything the run cannot reach is empty.
The wall makes this sharper. If the filled square is square 1, the run has nowhere to go but right, so squares 1 to 3 are filled and square 4 is ×. A filled square touching the edge of the grid always tells you exactly where its run is.
Ask which run owns the square
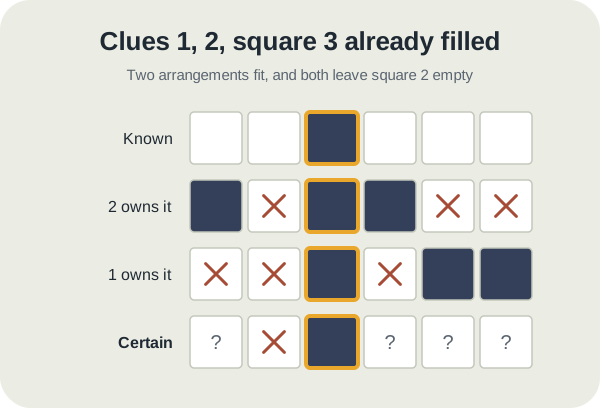
With two or more clues, a filled square could belong to any of the runs, and the reach rule only applies once you know which. Take a row of six with the clues 1, 2 and square 3 filled.
If square 3 is the 1, then the 2 has to come after it with a gap, so it fills squares 5 and 6. If square 3 is part of the 2, the 2 can only be squares 3 and 4, because squares 2 and 3 would leave no room for the 1 and its gap. Those are the only two arrangements, and both leave square 2 empty. Mark it with ×.
That result surprises people. The certain square here is an empty one right next to the filled square, while every other square in the row is still open. Checking both owners one at a time is how you find it.
A worked 6 by 6 board
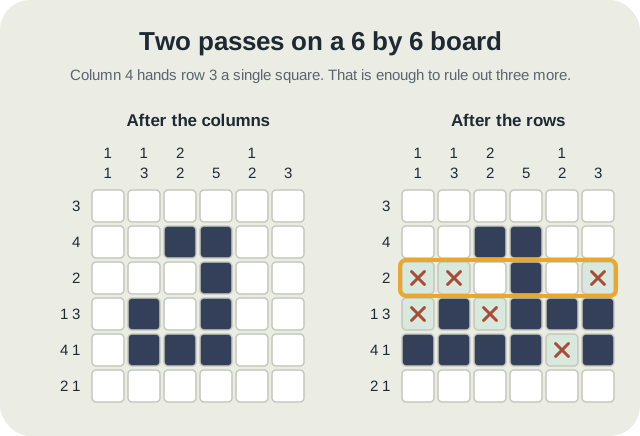
The rows of this board, top to bottom, have the clues 3; 4; 2; 1 3; 4 1; and 2 1. The columns, left to right, have 1 1; 1 3; 2 2; 5; 1 2; and 3. It has exactly one solution, and every step below is forced by the clues.
Start with the columns. Column 4 has a run of 5 in six squares, so rows 2 to 5 are filled whichever way it sits. Column 2 has 1, 3: the 3 fits only in rows 3 to 5 or 4 to 6, so rows 4 and 5 are filled. Column 3 has 2, 2, which takes five of its six squares, and every arrangement fills rows 2 and 5.
Now row 3, clue 2. On its own it had no overlap. Column 4 has just given it square 4, so the 2 is either squares 3 and 4 or squares 4 and 5. Squares 1, 2 and 6 are out of reach: mark all three with ×.
Row 4, clues 1 3, now has squares 2 and 4 filled. Ask which run owns square 2. If it were part of the 3, the 1 and its gap would need room to its left, and there is only square 1. So square 2 is the 1. The 3 must start at least two squares later and still include square 4, so it is squares 4 to 6, and squares 1 and 3 are empty. Row 5, clues 4 1, needs four squares, a gap and one more, which is all six: filled, filled, filled, filled, ×, filled.
One more column pass and one more row pass finish the board, using the same two questions each time: which run can own this square, and how far can it reach.
The mistake to avoid
The common slip is treating a filled square as the start of its run. In row 3 of the board, square 4 is filled, and it is tempting to fill square 5 straight away as though the run began there. It might equally be squares 3 and 4. The reach rule tells you what is empty, not which way the run goes.
Leave squares 3 and 5 undecided and let column 5 settle it. On the next column pass it does: column 5 fills row 3, so the run is squares 4 and 5, and square 3 becomes ×.
On HubbardGames, a clue turns green once its line is complete, and tapping it marks that line's remaining squares with ×. That is quicker than marking each one, but only once every filled square in the line is right.
Put it into practice
Try an Easy Nonograms Library puzzle and look for one deduction from this guide.
Play a Nonograms boardSign in or create an account to save your progress.



