 Hubbard

Why the diagonal squares are out
Take a wall clued 3 with all four sides open. Three of its four neighbours hold bulbs and exactly one stays empty.
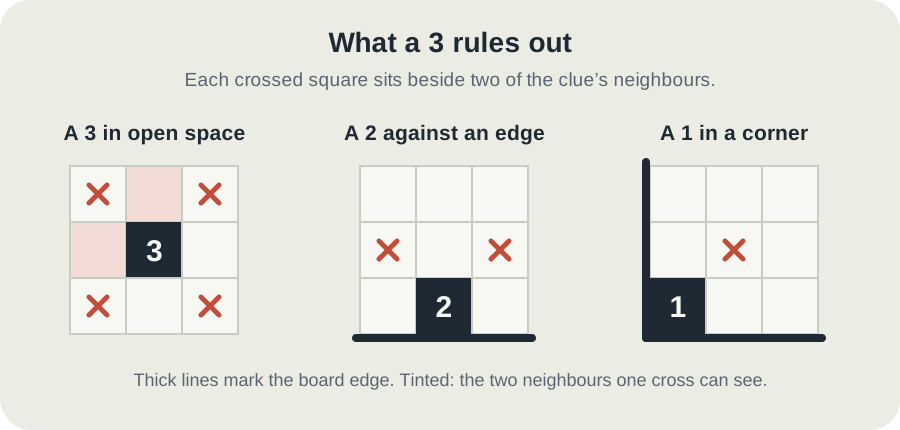
Now look at the square touching it diagonally, say up and to the left. That square sits directly beside two of the clue's neighbours: the one above the wall and the one to its left. Nothing stands between them, so a bulb in the diagonal square would see both.
Only one of the clue's four neighbours can be empty, so at least one of those two is a bulb. A bulb in the diagonal square would therefore always be in view of another bulb, which the rules forbid. The same argument works for all four diagonals, so you can cross them off straight away.
The rule is really about the count, not the number 3. It applies whenever a clue is exactly one less than its open sides. A 2 against the edge of the board has three open sides, so its two inside diagonals are out. A 1 tucked into a corner has two open sides, so the square diagonally inside it is out. A wall or an edge beside the clue changes which diagonals qualify: a diagonal only counts when both squares it touches are open neighbours of that clue.
The board
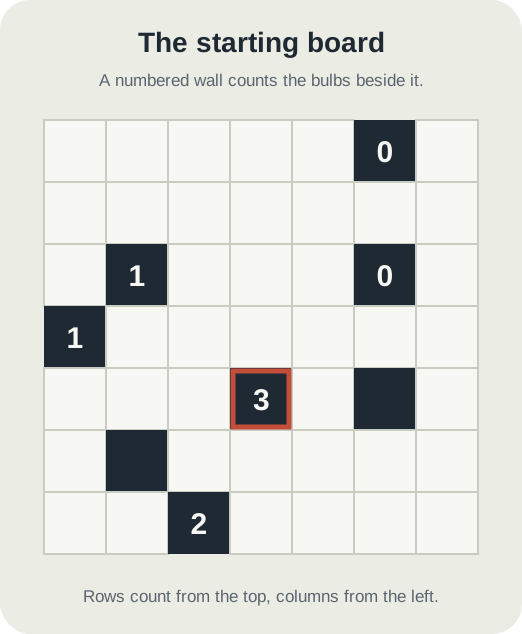
Seven by seven, eight walls. Rows count from the top and columns from the left. There are walls clued 0 at row 1 column 6 and row 3 column 6, walls clued 1 at row 3 column 2 and row 4 column 1, a wall clued 3 at row 5 column 4, a wall clued 2 at row 7 column 3, and plain walls at row 5 column 6 and row 6 column 2.
Nothing else is given. The board has exactly one solution, which we confirmed by checking every possible bulb arrangement, and it can be solved without a guess.
The zeros, then a dead end
Start with the easy marks. A 0 allows no bulbs beside it, so cross off the three open squares around row 1 column 6 and the four around row 3 column 6. One square sits beside both, so that is six crosses.
Then try the usual counting. The 1 at row 4, column 1 has three open neighbours. The 1 at row 3, column 2 has four. The 2 on the bottom edge has three squares to choose two from. The 3 has four squares to choose three from. Every clue still has a choice, and no bulb is forced anywhere. If you only count, the board stops here.
Let the 3 cross off its corners
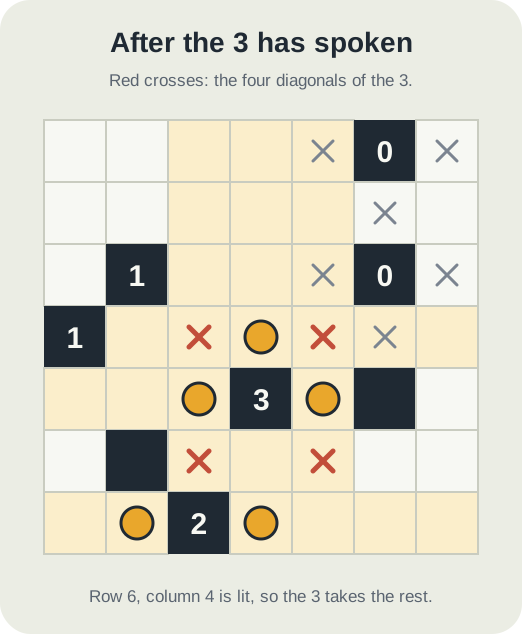
The 3 at row 5, column 4 has all four sides open, so its four diagonal squares are out: row 4 columns 3 and 5, and row 6 columns 3 and 5. Cross them off, not because they are lit yet, but because no bulb could ever go there.
One of those crosses lands on a square the 2 at the bottom was counting on. That 2 sits on the bottom edge at row 7, column 3, with open squares to its left, its right and above it. The square above, row 6 column 3, has just been ruled out. Two squares remain and the clue needs two, so row 7 column 2 and row 7 column 4 both take bulbs. The wall between them keeps them out of each other's sight.
Now follow the light. The bulb at row 7, column 4 shines up column 4 and lights row 6, column 4 before the 3 stops it. That square is directly below the 3, and it is lit, so it cannot hold a bulb. The 3 has three squares left and needs three: row 4 column 4, row 5 column 3 and row 5 column 5 are all bulbs. The two in row 5 face each other across the 3 itself, so they do not clash.
The ones fall together
Those five bulbs light most of the lower half. Look at the 1 at row 4, column 1. Its neighbour to the right, row 4 column 2, is lit by the bulb at row 4, column 4, shining left along row 4. Its neighbour below, row 5 column 1, is lit by the bulb at row 5, column 3. Only row 3, column 1 is left, so that is its bulb.
That same bulb sits directly left of the 1 at row 3, column 2, so that clue is now complete. Cross off its other open neighbours, including row 2, column 2.
Four dark squares, four single answers
Every remaining bulb is found the same way: pick a dark square and list every square that could still light it.
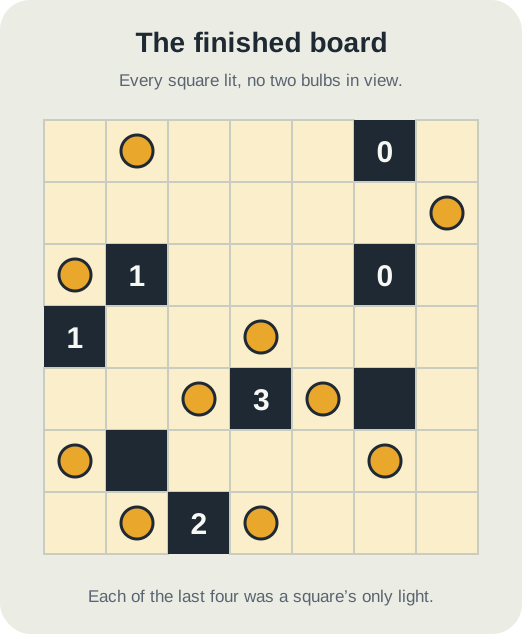
Row 6, column 1 has a wall to its right. Above it, row 5 column 1 is lit. Below it, row 7 column 1 is lit by the bulb at row 7, column 2. Nothing else can reach it, so it takes a bulb itself.
Row 1, column 2 can only be lit from row 1 or from row 2, column 2, because the wall at row 3, column 2 stops anything further down. Row 2, column 2 is crossed off, and along row 1 every other square is lit or sits beside the 0. It also takes its own bulb.
Row 2, column 6 sits between the two zeros, so it cannot hold a bulb and no light can reach it from above or below. Along row 2, everything to its left is lit or crossed. Only row 2, column 7 can light it, so that is a bulb, and it lights the whole of column 7 on the way down.
That leaves row 6, column 6. Row 6 column 7 is now lit, every square to its left is crossed or lit, and it has a wall above and a lit square below. It takes the tenth and last bulb.
The mistake to avoid
The rule needs a clue that is exactly one short of its open sides. A 2 in open space does not qualify. It has four open sides and two of them stay empty, and those two can be the pair next to a diagonal square, leaving that square free for a bulb. Apply the rule to it and you will cross off a square the solution needs.
Also, crossing a square off does not light it. The diagonal squares of a 3 still have to be lit by something, often a bulb further along their row or column. Treat the cross as "no bulb here" and nothing more.
Put it into practice
Try an Easy Light Up Library puzzle and look for one deduction from this guide.
Play a Light Up boardSign in or create an account to save your progress.



