 Hubbard

Grey does not mean missing
A Lattice board is three words across and three down, sharing 21 tiles. The letters you start with are exactly the letters of the finished grid, shuffled. Nothing is added and nothing is spare, so every tile on the board, grey ones included, has a home.
The rules card explains green and gold. Green is the right letter in the right square. Gold means one of the words running through that square still needs the letter, in a different position. Grey is what is left: neither word through that square needs it. The letter belongs in a word that does not touch the tile at all.
One word or two
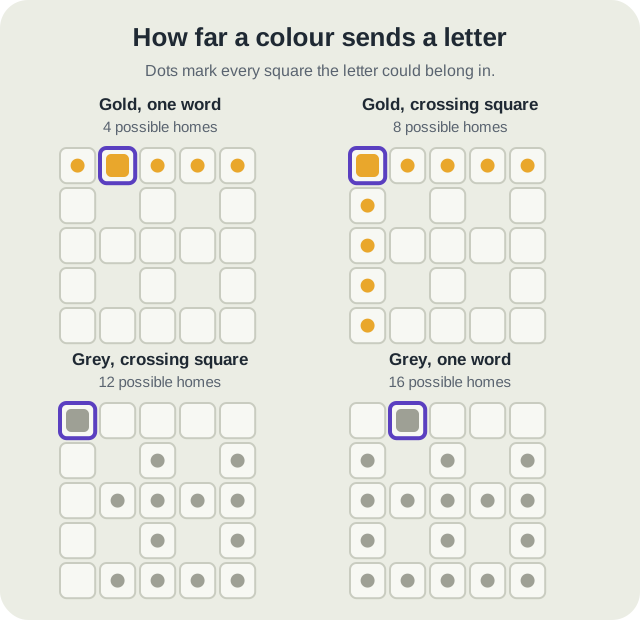
How much a colour tells you depends on where the tile sits. Nine of the 21 squares are crossings that belong to two words: the four corners, the middle of each outside edge, and the centre. The other twelve sit in only one word.
Gold on a one-word square leaves four possible homes, the other four squares of that word. Gold on a crossing leaves eight, because either word could be the one that wants it. Grey flips the picture. Grey on a crossing square rules out both of its words, nine squares in all, and leaves twelve. Grey on a one-word square rules out only five and leaves sixteen.
So a grey tile on a crossing square is worth reading carefully. It removes almost half the board in one go, which is more than a gold tile on that same square can manage.
The board
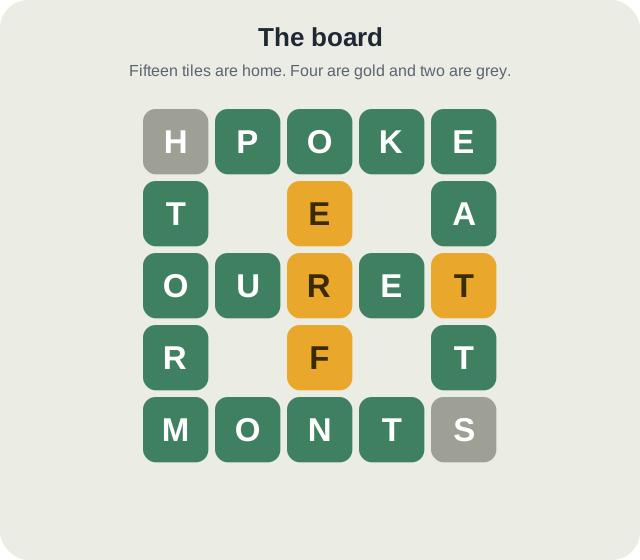
Here is a board partway through. Fifteen tiles are already green. Four are gold: the E and the F in the middle column, and the R and the last T of the middle row. Two are grey: the H in the top-left corner and the S in the bottom-right corner.
Six tiles are out of place, and one swap can put at most two tiles home, so three swaps is the best this board allows. The aim is to find all three without a wasted move.
Following the grey H
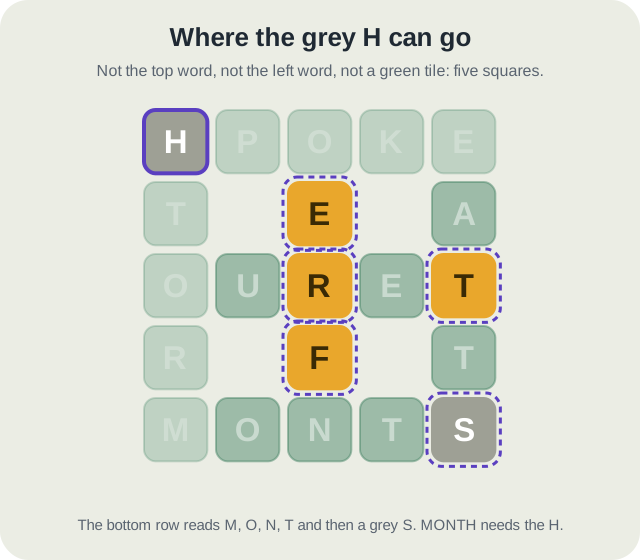
Start with the H, because it sits on a crossing square. The corner belongs to the top word and the left-hand word, and grey says neither of them wants an H. That rules out all nine of their squares and leaves twelve.
Seven of those twelve are already green, and a green tile never moves. That leaves five squares that could be waiting for the H: the three gold tiles in the middle column below the top row, the gold T at the end of the middle row, and the grey S in the bottom-right corner.
Now read the words those squares sit in. The bottom row is M, O, N, T and then the grey S. There is only one way to finish that, and it needs the H in the last square.
Check the S the same way before swapping. It is grey on a crossing square too, so it belongs in neither the bottom row nor the right-hand column, and the top-left corner is one of its twelve possible homes. With the S in place, the top row reads SPOKE and the left column reads STORM. Swap the two corners and both tiles turn green.
The other two swaps
What is left is four gold tiles, and gold is the easier colour. The middle column now reads O, E, R, F, N, and the middle row reads O, U, R, E, T. The E and the F are both gold in the same column and each wants the other's square, so swapping them is one swap that finishes two tiles. The R and the T pair up the same way along the middle row.
After those two swaps the middle column reads OFTEN, the middle row reads OUTER, and the R has landed in EARTH down the right-hand side.
That is the board finished in three swaps, the minimum for six misplaced tiles. The grey pair was the part most players would leave until last, and it was the one swap that needed no guesswork at all.
The mistake: moving a grey tile along its own word
The tempting move with the corner H is to slide it somewhere nearby in the top row, and on this board one version of that even looks like it worked. Swap the H with the E in the top-right corner and the H turns gold, because the right-hand word EARTH does need an H.
It is still a wasted swap. The E is now out of place too, the S has not moved, and the board has seven misplaced tiles instead of six. It needs at least four more swaps, so five in all where three would have done.
The rule is simple. A grey letter's home is not in either word through its square, so any square in that row or that column is wrong for it, whatever colour the tile turns when it gets there.
Grey on a letter the word does contain
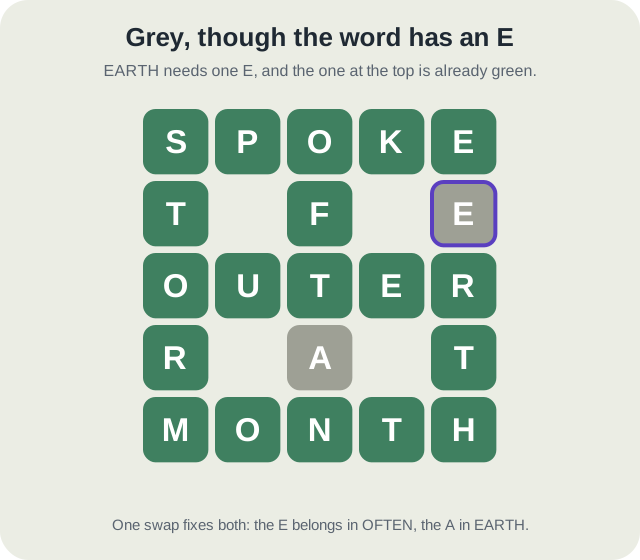
Sometimes a tile is grey even though its word plainly contains that letter. That is not a mistake in the colours. Gold is counted: each word gets as many gold tiles for a letter as copies it still needs, and any copy beyond that shows grey.
On this second position, EARTH down the right-hand side needs one E, and the E at the top of it is already green. So a second E sitting in that column is grey, because EARTH has no use for it. It belongs in OFTEN, in the square currently holding a grey A, and one swap sends both home.
When a word still needs a letter and holds two unplaced copies of it, the first in reading order takes the gold and the other shows grey. The two letters are identical, so it does not matter which one you move.
Where to practise it
Lattice is one of the competitive dailies. It is untimed, and fewer swaps places you higher in the day's field, so there is no reason to move before you have read every grey tile. A board is designed to solve within 15 swaps, and it keeps working after that if you need more.
Library boards are the place to practise reading grey without a league result riding on it. Try starting each one with the grey tiles on crossing squares and see how many of them pair up with each other.
Put it into practice
Try an Easy Lattice Library puzzle and look for one deduction from this guide.
Play a Lattice boardSign in or create an account to save your progress.



