 Hubbard

The pair that looks free
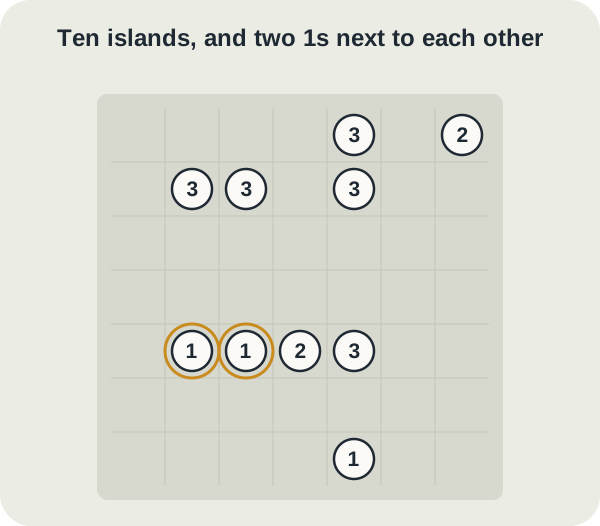
The board below is seven by seven with ten islands. Row 1 holds a 3 at column 5 and a 2 at column 7. Row 2 holds a 3 at column 2, a 3 at column 3 and a 3 at column 5. Row 5 holds a 1 at column 2, a 1 at column 3, a 2 at column 4 and a 3 at column 5. Row 7 holds a single 1 at column 5.
The two 1s in row 5 are ringed. Nothing sits between them, so a bridge is legal there, and one bridge would settle both islands at once. On a timed game that is exactly the kind of move you take without thinking.
It is the wrong move, and it is wrong on every Bridges board, not just this one.
Why joining them kills the board
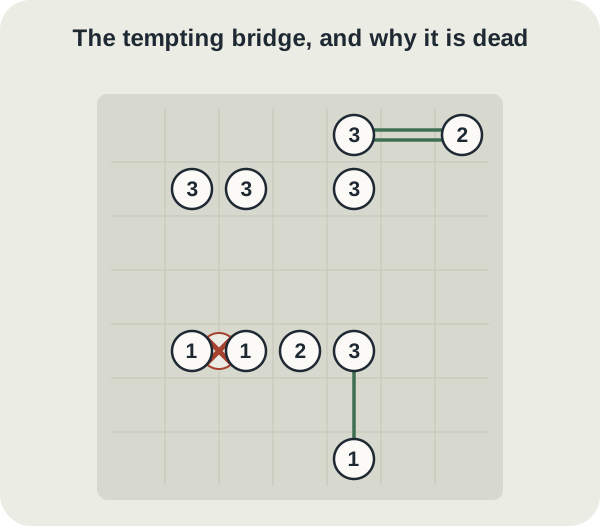
Put one bridge between the two 1s and both islands are full. A full island takes no more bridges, so neither of them can reach anything else, and nothing else can reach them. Those two islands are now a closed network of their own, cut off from the other eight.
Bridges asks for one network covering every island, so the position is already lost, however good the rest of the board looks. Checking every possible completion of this board confirms it: with that bridge in place, no legal finish exists.
The rule generalises. Two islands each needing 1 never join, and two islands each needing 2 never take a double bridge between them, because in both cases the pair fills itself and closes. The only exception is a board with nothing else on it, which is not a board you will be given. Any group that satisfies itself early is a dead end, whether it is two islands or five.
Start with the islands that have one neighbour
Before the interesting part, take the free work. An island can only build towards the nearest island in each of the four directions, so count a number's actual neighbours before you count anything else.
The 2 at row 1 column 7 has one neighbour, the 3 at row 1 column 5. Two bridge ends and one place to put them means a double bridge, with no choice involved. The 1 at row 7 column 5 has one neighbour too, the 3 at row 5 column 5, so that single bridge goes in as well.
Those are the only two islands on this board with a single neighbour. Both are drawn above.
What the refusal hands you
Now look again at the 1 at row 5 column 2. It has exactly two possible neighbours: the 1 beside it, and the 3 directly above it at row 2 column 2. The bridge to the 1 is out, so its single bridge runs up column 2 to that 3.
The numbers agree, and it is worth seeing why, because the same counting works when no 1s are involved. The 3 at row 2 column 2 also has only two neighbours: the 3 at row 2 column 3 and that 1 below it. The 1 can accept at most one bridge end, so at least two of the three must go sideways, and two is the maximum between any pair. So the bridge along row 2 to column 3 is a double, and the bridge down to the 1 is a single. Both are now fixed.
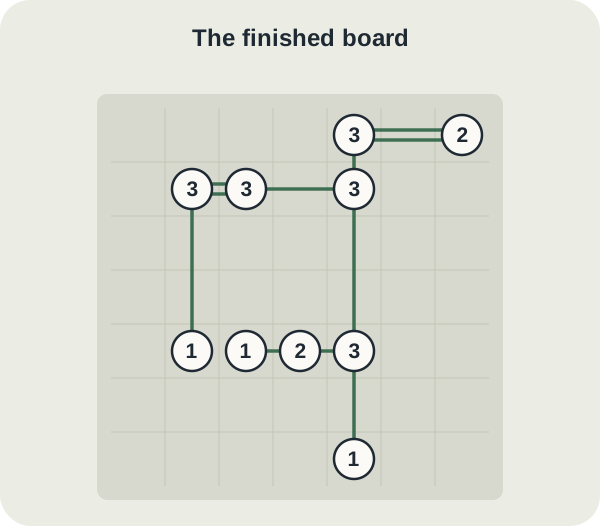
From there the counts close the board. The 3 at row 2 column 3 has spent two of its three ends, leaving a single bridge to the 3 at row 2 column 5. The 3 at row 2 column 5 takes one up to row 1 and one down column 5 to row 5. The 3 at row 5 column 5 already holds the bridge from row 7, so it adds one up column 5 and one along row 5 to the 2 at column 4, which passes its second end on to the last 1 at row 5 column 3.
The finished network
Eleven bridge units, every number satisfied, and a single network: from the 1 at row 5 column 2 you can walk up to row 2, across to column 5, up to row 1, out to the 2 at column 7, back down column 5 and along row 5 to the far 1. That is the test the game applies when you submit.
The two 1s in row 5 are both connected, and neither is connected to the other. They reach each other the long way round, through five other islands, which is exactly what the one network rule wants.
The mistake behind the mistake
The 1 and 1 trap is worth knowing on its own, but the habit underneath it is worth more. Players treat the numbers as the puzzle and connectivity as a formality to be checked at the end. It is a constraint you can solve with, from the first bridge onwards.
The useful version of the question is not whether a bridge fits, but what it would close. A bridge that finishes two islands and touches nothing else has closed a network of two. A bridge that finishes a corner of four has closed a network of four. Both are illegal for the same reason, and the four is much harder to spot after the fact.
The other half of the habit is counting neighbours rather than squares. A 3 with two neighbours is nearly solved. A 3 with three neighbours is not forced at all: it can spread one bridge to each, or send two one way and one another. That is the difference between a number that is decided and a number that only looks generous.
Where Bridges sits
Bridges is one of the nine competitive games in the daily league. It is timed, so your result is the clock, and the day's board is the same for everyone. Boards start at seven by seven and grow as the difficulty rises.
The board above is not a league board. It was built for this guide and checked by exhaustive search, so there is exactly one way to finish it and nothing here gives away a daily answer.
If you want to practise the refusal, the archive has Bridges boards you can replay without the clock mattering.
Put it into practice
Try an Easy Bridges Library puzzle and look for one deduction from this guide.
Play a Bridges boardSign in or create an account to save your progress.



